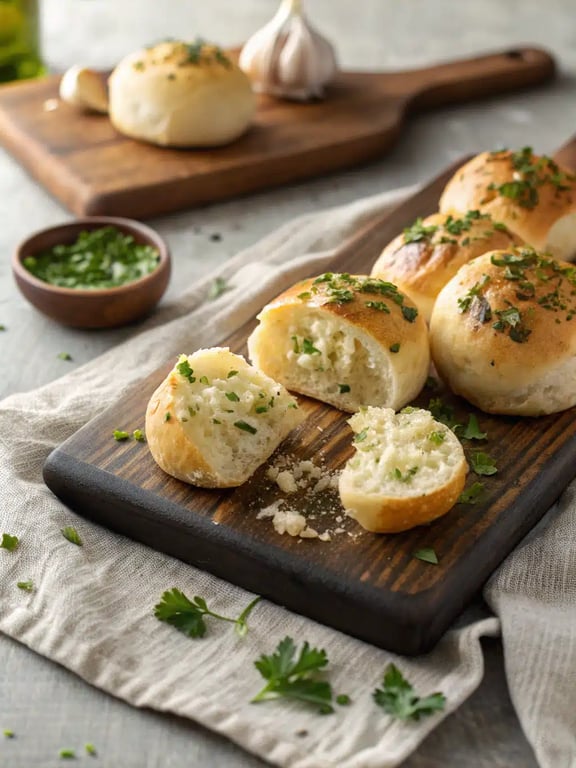
Soft, fluffy homemade rolls with a savory garlic butter well baked right into the center. These warm, aromatic rolls turn any meal into a special occasion with their irresistible buttery, garlicky flavor and tender crumb.
What Makes Garlic Bread Rolls So Special
With just a handful of simple ingredients, these garlic bread rolls deliver a warm, buttery, and aromatic experience that turns any meal into a special occasion. Imagine soft, fluffy rolls, each with a golden-brown top and a tender crumb, infused with a savory garlic butter that pools in a little well right in the center. The scent of garlic and fresh parsley baking is absolutely irresistible, making these homemade garlic rolls the ultimate comfort food side. During our testing, we found that the key to the perfect texture is giving the dough its full time to rise. It might be tempting to rush, but that patient rise is what creates those wonderfully light and airy rolls. Trust us, it’s simpler than it looks, and the payoff is huge. You’re going to want to make a double batch because they disappear fast!
This post may contain affiliate recommendations. Please see our disclosure policy.
What You’ll Find in This Article
Ingredients for Garlic Bread Rolls
Here’s everything you’ll need to make these irresistible garlic butter rolls. We recommend using fresh garlic and parsley for the brightest flavor, but everything else is likely already in your pantry.- 2 ¼ teaspoons active dry yeast
- 1 cup warm water
- 2 tablespoons granulated sugar
- 3 tablespoons unsalted butter, melted
- 1 large egg, at room temperature
- 1 teaspoon fine sea salt
- 3 cups all-purpose flour, plus more for dusting
- 4 tablespoons unsalted butter, softened
- 4 cloves garlic, finely minced
- 2 tablespoons fresh parsley, finely chopped
- ½ teaspoon flaky sea salt

Cook Time for Garlic Butter Rolls
We know your time is precious, so we’ve broken down the timeline for these easy garlic rolls. Most of the time is hands-off while the dough works its magic. In just about two hours, you’ll have a pan of warm, fragrant rolls ready to enjoy.- Prep Time: 20 minutes
- Rise Time: 1 hour 30 minutes (total)
- Cook Time: 20 minutes
- Total Time: 2 hours 10 minutes
How to Make Easy Garlic Rolls
Follow these simple steps for perfect results every time. We’ve included our team’s little tips along the way to guide you.Step 1: Activate the Yeast
In a large bowl, combine the warm water, sugar, and yeast. Let it sit for 5-10 minutes until the mixture is foamy and bubbly.Step 2: Make the Dough
Stir in the 3 tablespoons of melted butter, the egg, and the fine sea salt. Gradually add the flour, one cup at a time, stirring with a wooden spoon until a shaggy dough forms.Step 3: Knead and First Rise
Turn the dough onto a lightly floured surface and knead for 5-7 minutes, adding a little more flour if it’s too sticky, until the dough is smooth and elastic. Place in a greased bowl, cover with a damp towel, and let rise in a warm spot for 1 hour or until doubled in size.Step 4: Make the Garlic Butter
While the dough rises, make the garlic butter by mixing the softened butter, minced garlic, and chopped parsley in a small bowl until well combined.
Step 5: Shape and Second Rise
Punch down the risen dough and divide it into 12 equal pieces. Roll each piece into a smooth ball and place them in a greased 9×13-inch baking dish, leaving a little space between each. Cover and let rise again for 30 minutes.Step 6: Fill and Bake
Preheat your oven to 375°F. Gently press your thumb into the center of each risen roll to make a deep indentation. Spoon about 1 teaspoon of the garlic butter mixture into each indentation.Step 7: Finish Baking
Bake for 18-22 minutes, until the rolls are golden brown and sound hollow when tapped on the bottom. Immediately brush the tops with any remaining garlic butter and sprinkle with the flaky sea salt.Step 8: Serve Warm
Let the rolls cool in the pan for 5 minutes before serving warm. They are best eaten the same day.
Pro Tips & Tasty Tweaks
After making countless batches, we’ve gathered our favorite insights to help you master these cheesy garlic rolls (even without the cheese!). Here’s what we learned.- Flavor Swap: For a richer, nuttier note, try using half a teaspoon of smoked paprika in the garlic butter.
- Timing/Heat Adjustment: If your kitchen is cool, place the covered bowl of dough in your oven with just the light on for a perfect, draft-free rise.
- Prep/Texture Fix: If your dough feels too sticky while kneading, add flour one tablespoon at a time. You want it tacky but not sticking to your hands.
- Storage/Reheat Tip: To revive day-old rolls, wrap them in foil and warm in a 300°F oven for 10 minutes. They’ll taste freshly baked.
Flavor & Texture Notes
When you get these garlic bread rolls just right, the experience is pure comfort. The exterior should have a gentle crispness to the top, giving way to an incredibly soft and fluffy interior. The garlic butter isn’t just on top; it bakes right into that thumbprint well, creating a savory, moist pocket in every bite. The aroma is the first sign of success—your kitchen will smell like a bakery. As for doneness, look for that uniform golden-brown color and listen for the hollow sound when you tap a roll’s bottom. The flaky sea salt sprinkled on at the end isn’t just for looks; it provides the perfect little burst of salinity that balances the rich, garlicky butter. These homemade garlic rolls are truly a masterpiece of simple ingredients.Variations & Substitutions
One of the joys of this recipe is how easily you can make it your own. Whether you’re out of an ingredient or want to play with flavors, here are some team-approved ideas for your next batch of garlic butter rolls. For a cheesy twist, sprinkle a little shredded mozzarella or Parmesan into the garlic butter indentations before baking. If you love herbs, add a teaspoon of dried Italian seasoning or some fresh chopped rosemary to the dough. Out of fresh parsley? A teaspoon of dried parsley works in the butter, or you can use fresh chives for a different, oniony note. For a richer dough, you can replace one tablespoon of the water with milk. And if you need a dairy-free version, your favorite plant-based butter works perfectly in both the dough and the garlic butter topping. The goal is to keep these easy garlic rolls adaptable and delicious for everyone at your table.Make-Ahead & Scaling
We love a recipe that fits into a busy schedule, and these garlic butter rolls are wonderfully flexible. You can easily break the process into stages, making them perfect for planning ahead or feeding a crowd. For make-ahead prep, you have a couple of great options. First, you can prepare the dough through the first rise, then punch it down, cover it tightly, and refrigerate it overnight. The next day, let it sit at room temperature for 30 minutes before shaping and proceeding with the second rise. Alternatively, you can shape the rolls, place them in the pan, cover, and refrigerate overnight for a slow second rise. Just let them sit at room temperature for about an hour before baking. When it comes to scaling, this recipe doubles beautifully for a party. Simply use two 9×13-inch pans or one large half-sheet pan, ensuring the rolls still have a little space to expand. Conversely, you can easily halve the recipe for a smaller batch, using an 8×8-inch square pan. The bake time may vary slightly with different pan sizes, so keep an eye on them for that perfect golden-brown color. Remember, while these homemade garlic rolls are best fresh, a brief reheat in the oven will restore their warmth and soft texture beautifully.How to Serve Garlic Bread Rolls
Honestly, one of our favorite parts of recipe testing is figuring out the perfect way to serve our creations. These easy garlic rolls are so versatile, they can elevate almost any meal from simple to spectacular. We found they disappear fastest when served warm right in the baking dish, placed in the center of the table for everyone to share. The aroma alone is an invitation to dig in. For a casual weeknight dinner, pair them with a hearty soup, a big salad, or a comforting pasta dish. They’re the ultimate side for soaking up sauces and adding a touch of homemade warmth. For a special occasion or holiday spread, these rolls fit right in alongside a roasted main course. We love the contrast of their savory, buttery flavor with the richness of a holiday meal. No matter how you serve them, just be prepared to make more—they have a way of bringing people back for seconds.
Mistakes to Avoid
We’ve made our share of baking blunders so you don’t have to! Here are the most common pitfalls we’ve seen (and fixed) with this recipe for perfect garlic bread rolls every time. First, using water that’s too hot or too cold for the yeast. If you’ve ever ended up with dense rolls that didn’t rise, the yeast might have been the culprit. Water between 105°F and 115°F is ideal—warm to the touch but not hot. Second, don’t skimp on the kneading time. That 5-7 minutes of kneading develops the gluten, which is what gives your rolls that wonderful, soft, and airy structure. Another common issue is over-flouring the dough. While kneading, add flour only one tablespoon at a time if the dough is sticky. You’re aiming for a smooth, slightly tacky dough, not a dry one. Over-flouring leads to dry, tough rolls. Also, avoid overbaking. The rolls are done when they’re golden brown and sound hollow when tapped. Baking them too long dries them out. Finally, don’t forget to let the rolls rest for 5 minutes after baking. We know it’s tempting to tear into them immediately, but this short cooling period allows the structure to set, making them easier to handle and even more tender to eat.How to Store Garlic Bread Rolls
While these garlic butter rolls are truly at their peak fresh from the oven, we’ve tested all the best ways to keep and enjoy any leftovers. A little know-how goes a long way in preserving their delicious texture. For short-term storage, let the rolls cool completely, then place them in an airtight container or resealable bag at room temperature for up to 2 days. To freeze them, wrap each roll individually in plastic wrap and then place them all in a freezer bag. They’ll keep for up to 2 months. This method prevents freezer burn and lets you thaw only what you need. Our favorite reheating trick is to wrap the rolls in foil and warm them in a 300°F oven for 10-12 minutes. For a single roll, a quick 15-20 second zap in the microwave works in a pinch, though the oven method best restores that fresh-baked exterior. You can even refresh frozen rolls directly in the oven—just add a few extra minutes to the warming time.Try This Garlic Bread Rolls Yourself
We genuinely hope you give this recipe a try. There’s something incredibly satisfying about pulling a pan of these warm, fragrant homemade garlic rolls from your own oven. During our testing, the moment we pulled the first successful batch from the oven was a real “we did it!” celebration. The smell filled the whole kitchen, and that first bite confirmed that the simple process was absolutely worth it. We think you’ll have the same rewarding experience. So, gather your ingredients, clear a little counter space, and treat yourself to the joy of baking. Whether it’s for a quiet family dinner or a gathering with friends, these easy garlic rolls are sure to become a requested favorite. We’d love to hear how your batch turns out!Garlic Bread Rolls
Soft, fluffy homemade rolls with a savory garlic butter well baked right into the center. These warm, aromatic rolls turn any meal into a special occasion with their irresistible buttery, garlicky flavor and tender crumb.
Ingredients
Equipment
Method
- In a large bowl, combine the warm water, sugar, and yeast. Let it sit for 5-10 minutes until the mixture is foamy and bubbly.
- Stir in the 3 tablespoons of melted butter, the egg, and the fine sea salt. Gradually add the flour, one cup at a time, stirring with a wooden spoon until a shaggy dough forms.
- Turn the dough onto a lightly floured surface and knead for 5-7 minutes, adding a little more flour if it's too sticky, until the dough is smooth and elastic. Place in a greased bowl, cover with a damp towel, and let rise in a warm spot for 1 hour or until doubled in size.
- While the dough rises, make the garlic butter by mixing the softened butter, minced garlic, and chopped parsley in a small bowl until well combined.
- Punch down the risen dough and divide it into 12 equal pieces. Roll each piece into a smooth ball and place them in a greased 9x13-inch baking dish, leaving a little space between each. Cover and let rise again for 30 minutes.
- Preheat your oven to 375°F. Gently press your thumb into the center of each risen roll to make a deep indentation. Spoon about 1 teaspoon of the garlic butter mixture into each indentation.
- Bake for 18-22 minutes, until the rolls are golden brown and sound hollow when tapped on the bottom. Immediately brush the tops with any remaining garlic butter and sprinkle with the flaky sea salt.
- Let the rolls cool in the pan for 5 minutes before serving warm. They are best eaten the same day.
Nutrition
Notes
Pro Tips: For a cool kitchen, let dough rise in the oven with just the light on. Add flour one tablespoon at a time if dough is sticky. To revive day-old rolls, wrap in foil and warm at 300°F for 10 minutes.
Variations: Add shredded cheese or herbs to the garlic butter. Use plant-based butter for a dairy-free version.
Tried this recipe?
Let us know how it was!Enjoyed the recipe? Share it!

Kitchen Essentials We Recommend
Tools that make cooking easier — tried, tested, and loved.


As an Amazon Associate we earn from qualifying purchases.
Got a recipe the world should try?
Share your favorite family recipe or national dish with food lovers in 100+ countries.
Submit Your RecipeFrequently Asked Questions
Can I use instant yeast instead of active dry yeast?
Absolutely. You can substitute instant yeast in equal measure. The main difference is you can mix it directly in with the dry flour without needing to activate it in water first, which can save a little time. Your garlic bread rolls will rise just as beautifully.
How do I know when the dough has risen enough?
The best test is the finger poke test. Gently press a floured finger about an inch into the dough. If the indentation remains and doesn’t spring back, the dough is perfectly proofed and ready for the next step. This is a reliable way to get light, airy rolls.
Why are my rolls dense and not fluffy?
Dense rolls are usually due to issues with the yeast or rising time. Ensure your yeast is fresh and your water is the right temperature. Also, make sure you’re letting the dough rise in a warm, draft-free spot until truly doubled in size. Rushing the rise is the most common culprit for dense texture.
Can I make the garlic butter ahead of time?
Yes, you can prepare the garlic butter mixture up to 3 days in advance. Store it covered in the refrigerator. Just let it soften at room temperature for about 30 minutes before using so it’s easy to spoon into the indentations of your garlic butter rolls.
")