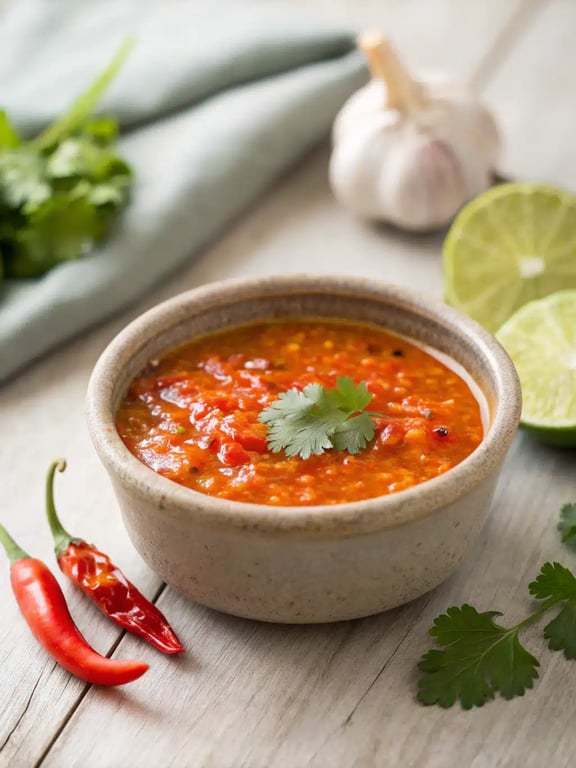
A perfectly balanced Thai dipping sauce that's sweet, salty, tangy, and spicy all at once. This vibrant condiment, known as Nam Jim, transforms grilled meats, fresh spring rolls, and simple rice into something extraordinary. The key is letting the flavors meld for at least 30 minutes.
What Makes This Thai Dipping Sauce Recipe So Special
With just a handful of simple ingredients, this Thai dipping sauce recipe delivers a flavor explosion that’s perfectly balanced—sweet, salty, tangy, and spicy all at once. It’s the kind of vibrant condiment that can transform a simple plate of grilled chicken, fresh spring rolls, or even steamed rice into something extraordinary. The beauty of this sauce, often called a Nam jim sauce, lies in its harmony; no single note overpowers the others, creating a complex yet incredibly approachable taste. During our team testing, we discovered that the key to its magic is in the resting time. While you can use it right away, letting it sit for at least 30 minutes allows the garlic and chilies to mellow and the carrot to soften slightly, weaving all the flavors together seamlessly. Trust us, the wait is worth it for that authentic, well-rounded taste. You’re going to want to keep a jar of this in your fridge at all times!
This post may contain affiliate recommendations. Please see our disclosure policy.
What You’ll Find in This Article
Ingredients for Your Thai Dipping Sauce Recipe
Gathering your ingredients is the first step to mastering this classic Thai dipping sauce. Each one plays a crucial role in building the signature sweet, sour, salty, and spicy profile. Here’s everything you’ll need:- 1/2 cup granulated sugar
- 1/2 cup water
- 1/2 cup white vinegar
- 1/4 cup fish sauce
- 1 tablespoon fresh lime juice
- 2 garlic cloves, minced
- 1-2 Thai bird’s eye chilies, finely chopped (or 1 teaspoon red pepper flakes)
- 1 small carrot, cut into very thin matchsticks
- 1 tablespoon finely chopped fresh cilantro stems

Cook Time for Nam Jim Sauce
One of the best things about this Nam jim sauce is how quickly it comes together. From start to finish, you’re looking at less than 15 minutes of active time. The real “work” is letting the flavors get to know each other while the sauce rests. Here’s our team’s quick breakdown:- Prep Time: 10 minutes
- Cook Time: 3 minutes
- Resting Time: 30 minutes (minimum)
- Total Time: About 45 minutes
How to Make Sweet Chili Sauce
Follow these simple steps to create your own vibrant sweet chili sauce at home. We’ve broken it down so you can see just how straightforward this Thai dipping sauce recipe truly is.Step 1: Create the Simple Syrup
In a small saucepan over medium heat, combine the sugar and water. Stir constantly until the sugar completely dissolves, about 2-3 minutes, to create a simple syrup.Step 2: Build the Base
Remove the saucepan from the heat and immediately stir in the white vinegar and fish sauce. The mixture will sizzle slightly. Allow it to cool for about 5 minutes.
Step 3: Prep the Aromatics
While the base cools, prepare your aromatics. Mince the garlic, finely chop the chilies (wear gloves if sensitive), and cut the carrot into fine matchsticks using a sharp knife or julienne peeler.Step 4: Combine and Infuse
Stir the minced garlic, chopped chilies, carrot matchsticks, and chopped cilantro stems into the warm liquid base. The residual heat will soften the carrots and mellow the raw garlic bite.
Step 5: Finish with Lime
Finally, stir in the fresh lime juice. Taste and adjust if desired—add more lime for tang, a pinch of sugar for sweetness, or another chili for heat.Step 6: Let the Flavors Meld
Let the sauce sit at room temperature for at least 30 minutes before serving to allow the flavors to meld. For best results, refrigerate in a sealed jar for a few hours. It will keep for up to a week.
Pro Tips & Tasty Tweaks
After making this sauce dozens of times, our team has gathered a few insights to help you nail it on the first try and make it your own.- Flavor Swap: For a different aromatic note, try using finely chopped lemongrass (the tender inner part) instead of cilantro stems.
- Heat Adjustment: Control the spice level by removing the seeds from the Thai chilies before chopping, or start with just half a chili and add more after tasting.
- Prep Fix: If you don’t have a julienne peeler for the carrot, use a vegetable peeler to create wide, thin ribbons, then stack and slice them thinly into matchsticks.
- Storage Tip: This sauce actually improves with a day in the fridge. Store it in a clean glass jar or airtight container; the flavors deepen beautifully overnight.
Flavor & Texture Notes
When you get this Thai dipping sauce recipe right, it’s a symphony for your taste buds. Initially, you’ll notice a bright, sweet-tangy hit from the vinegar and sugar, which is quickly grounded by the deep, savory umami of the fish sauce. The garlic and chilies provide a pungent, spicy kick that builds slowly, while the fresh lime juice adds a final, clarifying burst of acidity. The carrot matchsticks and cilantro stems aren’t just for looks; they offer a subtle, fresh crunch and an herbal layer that makes the sauce feel complete. The texture should be a thin, pourable syrup with little bits of carrot, chili, and garlic suspended throughout. Doneness is less about cooking and more about balance—your taste test is the final guide. If one flavor feels too sharp, let it rest a bit longer. The goal is a sauce where no single element shouts over the others, creating a perfectly harmonious Thai cucumber sauce companion or a dazzling dip for anything grilled.Variations & Substitutions
We love this classic version, but part of the fun of cooking is making a recipe your own. Here are a few team-tested twists and swaps for this versatile Thai dipping sauce recipe that keep the spirit alive while offering something new. For a fruitier, slightly milder version, you can replace half of the white vinegar with fresh pineapple or mango juice. Simply reduce the added water by the same amount to keep the consistency right. If fish sauce isn’t your thing, a combination of soy sauce and a pinch of salt can provide a similar savory depth, though the flavor profile will shift. To create a creamy, nutty alternative akin to a peanut sauce recipe, blend a few tablespoons of smooth peanut butter or tahini into the cooled base until perfectly smooth. Finally, for a vibrant herb-forward sauce, stir in a handful of finely chopped fresh mint or Thai basil just before serving alongside the cilantro.Make-Ahead & Scaling
One of the best things about this Thai dipping sauce recipe is how well it works for planning ahead. We often make a double batch on Sunday to have a versatile condiment ready for the week. The sauce itself is a fantastic make-ahead item; in fact, its flavors deepen and harmonize beautifully after a day in the fridge. You can prepare the entire recipe up to 5 days in advance and store it in a sealed jar. When it comes to scaling, this recipe is wonderfully flexible. For a smaller, trial batch, you can easily halve all the ingredients—just use a smaller saucepan to ensure the sugar dissolves properly. Conversely, if you’re hosting a party or want to stock up, doubling or even tripling the recipe works perfectly. The key is to use a larger, wide-bottomed pot when making the simple syrup to encourage even evaporation and prevent the syrup from becoming too thick. The resting time remains the same, no matter the batch size, giving you that perfectly balanced Nam jim sauce every time.How to Serve Your Thai Dipping Sauce
Now for the fun part—getting this vibrant sauce from the jar to your plate! During our team tastings, we found ourselves reaching for it with just about everything. Its balanced profile makes it an incredibly versatile companion in your kitchen. Classically, this sauce is a must with grilled proteins. Think juicy chicken satay, flavorful turkey skewers, or simply brushed over grilled shrimp during the last minute of cooking. It’s also the perfect partner for fresh rolls, whether they’re packed with shrimp, tofu, or lots of crunchy veggies. Don’t stop there, though! We love it as a Thai cucumber sauce alternative drizzled over a simple salad of sliced cucumbers and red onions, or as a lively dip for crispy spring rolls and fried wontons. For a quick weeknight upgrade, stir a spoonful into a bowl of steamed jasmine rice or use it to dress cold noodle salads. Our favorite team insight? Keep a small bowl of this sweet chili sauce on the table whenever you serve a platter of crudités. It turns simple carrot sticks and bell pepper slices into an exciting snack that disappears quickly!Mistakes to Avoid
We’ve made this Thai dipping sauce recipe countless times, and along the way, we’ve learned what little missteps can throw off the balance. By sharing these, we hope you can sidestep them and achieve sauce perfection on your first try. A common hiccup is boiling the simple syrup for too long. You only need to heat it until the sugar dissolves. If you let it simmer or reduce, the final sauce can become overly thick and cloyingly sweet once cooled. Another mistake is adding the fresh lime juice while the base is still very hot. The heat can cook the lime juice, dulling its bright, fresh acidity. Always let the mixture cool for those five minutes, or even completely, before stirring in the lime. We also see folks sometimes skip the resting time because the sauce smells so good right away. Trust us, patience is key! Using it immediately means the garlic and chili will taste harsh and raw, and the flavors won’t have married. Letting it rest is non-negotiable for that authentic, rounded taste. Finally, be mindful of your fish sauce. Brands vary in saltiness and intensity. If yours is particularly potent, you might want to start with a slightly smaller amount and add more to taste after the sauce has rested. Keeping these tips in mind will help you avoid the question, “Why did my sauce taste too sharp or too sweet?” and ensure your Thai dipping sauce is perfectly balanced every single time.How to Store Your Thai Dipping Sauce
Proper storage is simple but important for keeping your homemade sauce fresh and flavorful. We always use a clean glass jar with a tight-sealing lid, like a mason jar or a repurposed jam jar. Glass is ideal because it won’t absorb any odors and allows you to see the vibrant colors of your creation. From our testing, this sauce will keep beautifully in the refrigerator for up to one week. The flavors continue to develop and mellow, often tasting even better on day two or three. We don’t recommend freezing this particular Nam jim sauce, as the texture of the carrot matchsticks and the fresh herbs can become unpleasantly soft and watery upon thawing. There’s no need to reheat it either—simply take it out of the fridge about 15 minutes before you plan to serve. This takes the chill off and allows the sauce to return to its perfect, pourable consistency.Try This Thai Dipping Sauce Recipe Yourself
We genuinely hope you give this Thai dipping sauce recipe a try in your own kitchen. It’s one of those foundational condiments that opens up a world of easy, flavorful meals. Whether you’re dunking summer rolls, glazing chicken, or just looking for a way to jazz up a weeknight rice bowl, this sauce delivers. What we love most is how it proves that big, restaurant-quality flavor doesn’t require complicated techniques or hard-to-find ingredients. In less than 15 minutes of active time, you can create something truly special. So, grab that saucepan and your cutting board. Whip up a batch, let the flavors meld, and get ready to see just how often you reach for it. We’re confident it will become a staple in your fridge, just like it is in ours.Thai Dipping Sauce (Nam Jim)
A perfectly balanced Thai dipping sauce that’s sweet, salty, tangy, and spicy all at once. This vibrant condiment, known as Nam Jim, transforms grilled meats, fresh spring rolls, and simple rice into something extraordinary. The key is letting the flavors meld for at least 30 minutes.
Ingredients
Equipment
Method
- In a small saucepan over medium heat, combine the sugar and water. Stir constantly until the sugar completely dissolves, about 2-3 minutes, to create a simple syrup. Do not let it boil or reduce.
- Remove the saucepan from the heat and immediately stir in the white vinegar and fish sauce. The mixture will sizzle slightly. Allow it to cool for about 5 minutes.
- While the base cools, prepare your aromatics. Mince the garlic, finely chop the chilies (wear gloves if sensitive), and cut the carrot into fine matchsticks using a sharp knife or julienne peeler.
- Stir the minced garlic, chopped chilies, carrot matchsticks, and chopped cilantro stems into the warm liquid base. The residual heat will soften the carrots and mellow the raw garlic bite.
- Finally, stir in the fresh lime juice. Taste and adjust if desired—add more lime for tang, a pinch of sugar for sweetness, or another chili for heat.
- Let the sauce sit at room temperature for at least 30 minutes before serving to allow the flavors to meld. For best results, refrigerate in a sealed jar for a few hours. It will keep for up to a week.
Nutrition
Notes
Pro Tips: The sauce improves with a day in the fridge. Control spice by removing chili seeds. For a vegetarian version, substitute fish sauce with soy sauce and a pinch of salt. Use as a dip for spring rolls, grilled chicken, or as a dressing for salads.
Tried this recipe?
Let us know how it was!Enjoyed the recipe? Share it!

Kitchen Essentials We Recommend
Tools that make cooking easier — tried, tested, and loved.


As an Amazon Associate we earn from qualifying purchases.
Got a recipe the world should try?
Share your favorite family recipe or national dish with food lovers in 100+ countries.
Submit Your RecipeFrequently Asked Questions
Can I make this sauce less spicy?
Absolutely! To control the heat in your Thai dipping sauce, start by removing the seeds and membranes from the Thai chilies before chopping, as that’s where most of the capsaicin resides. You can also begin with just half a chili, or use a milder chili variety like a jalapeño. Remember, you can always add more heat later, but it’s tough to take it away.
How long does homemade sweet chili sauce last?
When stored properly in a clean, airtight container in the refrigerator, your homemade sweet chili sauce will stay fresh and flavorful for up to one week. The acidity from the vinegar and lime juice acts as a natural preservative, helping to keep it tasty.
What can I use instead of fish sauce?
If you don’t have fish sauce, you can create a similar savory depth. We’ve had good results using a combination of soy sauce and a tiny pinch of salt. For a vegetarian umami boost, a light splash of liquid aminos or a bit of mushroom seasoning also works well in this versatile Thai dipping sauce recipe.
")