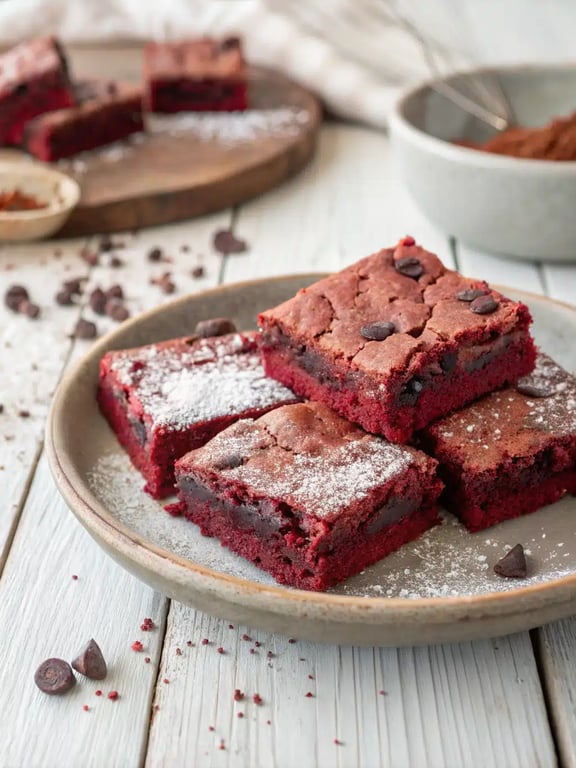
Fudgy, vibrant, and swirled with a tangy cream cheese frosting, this red velvet brownies recipe is the ultimate treat that feels both decadent and delightfully simple. The rich cocoa flavor pairs with that signature velvety texture, creating a dessert that's as stunning to look at as it is delicious to eat.
What Makes This red velvet brownies recipe So Special
Fudgy, vibrant, and swirled with a tangy cream cheese frosting, this red velvet brownies recipe is the ultimate treat that feels both decadent and delightfully simple. We love how the rich cocoa flavor pairs with that signature velvety texture, creating a dessert that’s as stunning to look at as it is delicious to eat. Honestly, it’s the perfect answer for anyone craving a show-stopping bake without spending hours in the kitchen. During our testing, we found that the secret to achieving that perfect, moist red velvet crumb lies in the combination of vinegar and buttermilk (or in our case, a clever substitute). One of our team members noted, “Getting that bold red color is easier when you mix the food coloring with the wet ingredients first.” Trust us, this method makes all the difference. You’re going to be amazed at how straightforward it is to create such a luxurious dessert.
This post may contain affiliate recommendations. Please see our disclosure policy.
What You’ll Find in This Article
Ingredients for red velvet brownies recipe
Here is everything you’ll need to create these incredibly easy red velvet brownies. We recommend having all your ingredients measured and at room temperature before you begin for the smoothest batter.- 1 cup unsalted butter, melted
- 2 cups granulated sugar
- 4 large eggs, at room temperature
- 2 teaspoons vanilla extract
- 1/4 cup unsweetened cocoa powder
- 2 tablespoons red food coloring
- 1 teaspoon white vinegar
- 1/4 teaspoon salt
- 1 1/2 cups all-purpose flour
- 8 ounces cream cheese, softened
- 1/3 cup powdered sugar

Cook Time for Fudgy Red Velvet
We know you’re eager to dig in, so here’s the timeline you can expect for this easy red velvet treat. From start to finish, you’ll be enjoying these brownies in just over an hour, with most of that time being hands-off while they bake and cool.- Prep Time: 15 minutes
- Cook Time: 30-35 minutes
- Cooling Time: 1 hour (trust us, it’s worth the wait for clean slices!)
- Total Time: About 1 hour 50 minutes
How to Make Moist Red Velvet
Follow these simple steps for the most fudgy red velvet brownies you’ve ever tasted. We’ve tested this method repeatedly to ensure your success.Step 1: Preheat and Prepare
Preheat your oven to 350°F and line an 8×8 inch baking pan with parchment paper, leaving some overhang for easy removal later.Step 2: Combine Wet Ingredients
In a large bowl, whisk together the melted butter and granulated sugar until well combined and slightly glossy, about 1 minute.Step 3: Build the Red Velvet Base
Beat in the eggs one at a time, mixing thoroughly after each addition, then stir in the vanilla extract, cocoa powder, red food coloring, and white vinegar until the batter is smooth and uniformly red.Step 4: Incorporate Dry Ingredients
Gently fold in the salt and flour just until no dry streaks remain, being careful not to overmix which would make the brownies tough.
Step 5: Pan the Batter
Pour the batter into your prepared pan and spread it evenly into the corners with a spatula.Step 6: Create the Cream Cheese Swirl
In a small bowl, mix the softened cream cheese and powdered sugar until smooth, then dollop it over the brownie batter and swirl gently with a knife.Step 7: Bake to Perfection
Bake for 30-35 minutes until the edges are set but a toothpick inserted in the center comes out with a few moist crumbs attached.Step 8: Cool and Slice
Let the brownies cool completely in the pan on a wire rack before lifting them out and cutting into squares for clean edges.
Pro Tips & Tasty Tweaks
We’ve learned a few tricks after many batches in our test kitchen. Here are our top tips to ensure your red velvet brownies recipe turns out perfectly every single time.- Flavor Swap: For a deeper chocolate note, try using dark cocoa powder instead of regular unsweetened cocoa.
- Timing/Heat Adjustment: Oven temperatures can vary, so start checking for doneness at the 28-minute mark to prevent over-baking.
- Prep/Texture Fix: For an ultra-fudgy texture, make sure you don’t overmix the batter once the flour is added. A few streaks are okay!
- Storage/Reheat Tip: Store any leftovers in an airtight container at room temperature for up to 3 days, or freeze for up to a month.
Flavor & Texture Notes
When you bite into one of these fudgy red velvet brownies, you’ll experience a beautiful balance of flavors and textures. The rich, buttery cocoa base is subtly tangy from the vinegar, which enhances the overall chocolate flavor without being overpowering. We love the contrast between the dense, moist red velvet crumb and the bright, creamy swirls of frosting. The edges will be slightly cakey while the center remains decadently fudgy. You’ll know they’re perfectly baked when the top is set and a toothpick comes out with a few clinging crumbs, not wet batter.Variations & Substitutions
Our team is always experimenting, and we’ve found some fantastic ways to customize this red velvet brownies recipe. Whether you’re out of an ingredient or just want to mix things up, here are our favorite tweaks.- For a nutty crunch, fold in a half-cup of chopped pecans or walnuts into the batter right before pouring it into the pan.
- If you’re out of cream cheese for the frosting, a simple glaze made from powdered sugar and a little milk drizzled over the top is a delightful alternative.
- To make a marble version, you can set aside a cup of the plain batter before adding the food coloring, then swirl the chocolate and red batters together.
- For a hint of warmth, add a quarter teaspoon of cinnamon to the dry ingredients; it complements the cocoa flavor beautifully.
- If you prefer a less sweet treat, you can reduce the granulated sugar in the brownie base by a quarter cup without sacrificing texture.
Make-Ahead & Scaling
We love how flexible this red velvet brownies recipe is for planning ahead. You can prepare the batter up to a day in advance, cover the bowl tightly, and keep it refrigerated until you’re ready to bake. Just give it a quick stir before pouring it into the pan. For the ultimate time-saver, we often bake a full batch, let it cool completely, and freeze the squares for up to a month. When it comes to scaling, this recipe is wonderfully adaptable. For a larger crowd, you can easily double the ingredients and bake in a 9×13 inch pan, though you may need to add 5-10 minutes to the baking time. Conversely, for a smaller batch, halving the recipe works perfectly in a loaf pan, reducing the bake time to about 20-25 minutes. One of our team members noted, “The cream cheese swirl holds its pattern beautifully regardless of pan size, making any version look professionally done.”How to Serve red velvet brownies recipe
Presenting these stunning brownies is half the fun! We love serving them slightly warmed, which makes the center even more fudgy and the cream cheese swirl wonderfully soft. For special occasions, dust them with a light shower of powdered sugar or drizzle with a simple white chocolate glaze to make them extra festive. During our testing, we discovered that pairing these easy red velvet treats with a cold glass of milk or a hot cup of coffee balances their richness perfectly. They’re also fantastic with a scoop of vanilla ice cream for a truly decadent dessert experience. For holiday gatherings, we often arrange them on a tiered stand with other baked goods—they always disappear first! We’ve found that cutting them into smaller, bite-sized pieces makes them perfect for parties, while larger squares feel more indulgent for everyday treats. No matter how you serve them, these moist red velvet brownies always feel special.Mistakes to Avoid
After testing numerous batches, we’ve identified a few common pitfalls that can affect your results. Understanding these mistakes will help you achieve perfect fudgy red velvet brownies every time. One frequent issue we see is overmixing the batter after adding the flour. This develops too much gluten and can make your brownies tough rather than tender. Mix just until the flour disappears—a few streaks are actually okay! Another common question we hear is “Why did mine turn out cakey?” This usually happens when the brownies are overbaked. Remember, you want a few moist crumbs on your toothpick, not a completely clean one. We also recommend measuring your flour correctly—scooping directly from the bag can pack in too much flour, leading to dry brownies. Instead, spoon the flour into your measuring cup and level it off. Don’t skip the cooling step either; cutting into warm brownies might give you messy slices as the structure hasn’t set properly. Finally, make sure your cream cheese is truly softened before mixing, or you’ll end up with lumpy swirls instead of smooth, beautiful marbling. Trust us, avoiding these simple missteps will guarantee that perfect texture and appearance you’re looking for in this red velvet brownies recipe.How to Store red velvet brownies recipe
Proper storage is key to maintaining that wonderful fudgy texture we all love. We’ve tested various methods and found that storing your brownies in an airtight container at room temperature works perfectly for up to 3 days. Place parchment paper between layers if you’re stacking them to prevent the cream cheese swirl from sticking together. For longer storage, these brownies freeze exceptionally well. We like to wrap individual squares tightly in plastic wrap, then place them in a freezer bag for up to 3 months. One of our team members shared, “I always keep a few in the freezer for unexpected guests—they thaw perfectly in about 30 minutes at room temperature.” If you prefer them warm, you can reheat frozen brownies directly in a 300°F oven for 10-12 minutes. We don’t recommend refrigerating them unless your kitchen is particularly warm, as the cold can dry them out slightly. However, if you do refrigerate them, let them come to room temperature before serving to restore that soft, moist red velvet texture we all crave.Try This red velvet brownies recipe Yourself
We genuinely hope you’ll give this red velvet brownies recipe a try in your own kitchen. It’s become such a favorite in our test kitchen that we make it for everything from casual family nights to special celebrations. There’s something truly magical about pulling that vibrant red pan from the oven and seeing those beautiful cream cheese swirls. What we love most about this recipe is how it consistently delivers professional-looking results with straightforward, pantry-friendly ingredients. Whether you’re an experienced baker or trying your hand at red velvet for the first time, these brownies are forgiving and rewarding. The combination of rich cocoa flavor and tangy cream cheese creates a treat that feels both familiar and excitingly special. We encourage you to make this recipe your own—add those nuts we mentioned earlier, try the cinnamon variation, or keep it classic. However you choose to bake them, we’re confident these will become a new favorite in your dessert rotation.Red Velvet Brownies
Fudgy, vibrant, and swirled with a tangy cream cheese frosting, this red velvet brownies recipe is the ultimate treat that feels both decadent and delightfully simple. The rich cocoa flavor pairs with that signature velvety texture, creating a dessert that's as stunning to look at as it is delicious to eat.
Ingredients
Equipment
Method
- Preheat your oven to 350°F and line an 8x8 inch baking pan with parchment paper, leaving some overhang for easy removal later.
- In a large bowl, whisk together the melted butter and granulated sugar until well combined and slightly glossy, about 1 minute.
- Beat in the eggs one at a time, mixing thoroughly after each addition, then stir in the vanilla extract, cocoa powder, red food coloring, and white vinegar until the batter is smooth and uniformly red.
- Gently fold in the salt and flour just until no dry streaks remain, being careful not to overmix which would make the brownies tough.
- Pour the batter into your prepared pan and spread it evenly into the corners with a spatula.
- In a small bowl, mix the softened cream cheese and powdered sugar until smooth, then dollop it over the brownie batter and swirl gently with a knife.
- Bake for 30-35 minutes until the edges are set but a toothpick inserted in the center comes out with a few moist crumbs attached.
- Let the brownies cool completely in the pan on a wire rack before lifting them out and cutting into squares for clean edges.
Nutrition
Notes
For an ultra-fudgy texture, make sure you don't overmix the batter once the flour is added. A few streaks are okay! Store any leftovers in an airtight container at room temperature for up to 3 days, or freeze for up to a month.
Tried this recipe?
Let us know how it was!Enjoyed the recipe? Share it!

Kitchen Essentials We Recommend
Tools that make cooking easier — tried, tested, and loved.


As an Amazon Associate we earn from qualifying purchases.
Got a recipe the world should try?
Share your favorite family recipe or national dish with food lovers in 100+ countries.
Submit Your RecipeFrequently Asked Questions
Can I make these brownies without cream cheese swirl?
Absolutely! The brownie base is delicious on its own if you prefer plain red velvet brownies. Simply skip the cream cheese and powdered sugar step, then bake as directed. You’ll still get that wonderful fudgy red velvet texture and flavor that makes this recipe so special.
How do I get my red velvet brownies more moist?
The key to moist red velvet brownies is not overbaking them. Remove them from the oven when the edges are set but the center still has a slight jiggle. Also, make sure you’re using the correct amount of butter and not overmixing the batter once you add the flour.
Can I use a different type of food coloring?
While liquid food coloring works well, gel food coloring will give you a more vibrant red color with less product. Natural alternatives like beet powder can also work, though the color will be more subtle. The vinegar in the recipe helps enhance and set whatever color you choose.
Why did my cream cheese swirl sink into the batter?
If your cream cheese mixture is too thin or the brownie batter is too warm, the swirl can sink. Make sure your cream cheese mixture is thick enough to hold its shape when dolloped, and avoid over-swirling—gentle, shallow swirls work best for maintaining that beautiful pattern.
")