With just a handful of simple ingredients, this no bake cheesecake delivers a luxuriously creamy texture and rich flavor that rivals any baked version. It's the perfect combination of a sweet, buttery graham cracker crust and a velvety smooth, tangy filling that comes together without ever turning on your oven.
What Makes No Bake Cheesecake So Special
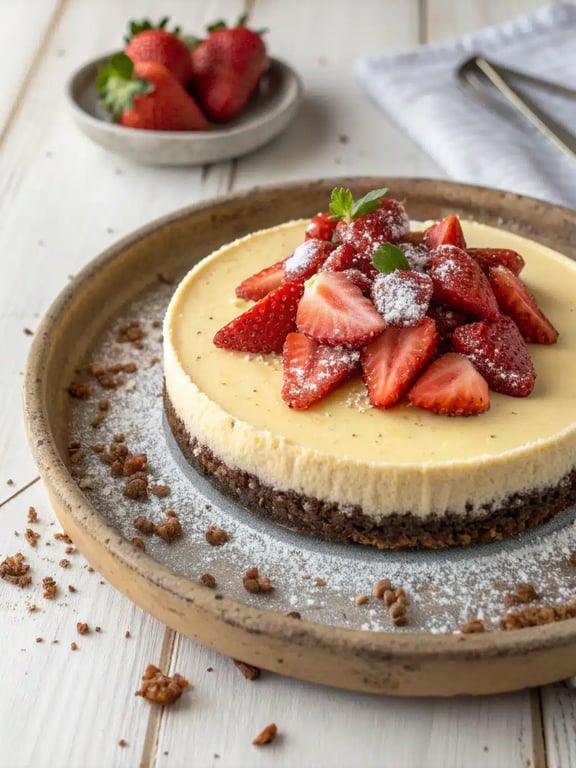
With just a handful of simple ingredients, this no bake cheesecake delivers a luxuriously creamy texture and rich flavor that rivals any baked version. It’s the perfect combination of a sweet, buttery graham cracker crust and a velvety smooth, tangy filling that comes together without ever turning on your oven. This easy cheesecake is the ultimate dessert for any occasion, from a casual weeknight treat to a show-stopping centerpiece for a celebration. During our team testing, we discovered that the secret to the creamiest cheesecake filling is taking the time to ensure your cream cheese is truly at room temperature. This simple step prevents lumps and creates that perfectly smooth, decadent texture we all love. You’re going to be amazed at how simple it is to create this classic New York cheesecake experience right in your own kitchen.
This post may contain affiliate recommendations. Please see our disclosure policy.
What You’ll Find in This Article
Ingredients for No Bake Cheesecake
Here is everything you’ll need to create this wonderfully easy cheesecake. We recommend using full-fat ingredients for the best texture and flavor.- 1 1/2 cups graham cracker crumbs
- 1/4 cup granulated sugar
- 6 tablespoons unsalted butter, melted
- 16 ounces cream cheese, at room temperature
- 1 cup powdered sugar
- 1 teaspoon pure vanilla extract
- 1 cup heavy cream, cold
- 1/4 cup sour cream

Cook Time for Creamy Cheesecake
One of the best things about this no bake cheesecake is how little active time it requires. You’ll spend about 20 minutes on prep, and then let the refrigerator do the rest of the work. The total time is mostly hands-off chilling, making this an incredibly convenient dessert to prepare ahead of a busy day or event.- Prep Time: 20 minutes
- Chill Time: 6 hours (or overnight)
- Total Time: 6 hours 20 minutes
How to Make Cheesecake Bars
Follow these simple steps for a perfectly set and deliciously creamy no bake cheesecake. We’ve designed these instructions to guide you smoothly from crust to filling.Step 1: Prepare the Crust
In a medium bowl, stir together the graham cracker crumbs, granulated sugar, and melted butter until the mixture resembles wet sand and holds together when pinched.Step 2: Press the Crust
Firmly press the crumb mixture into the bottom and slightly up the sides of a 9-inch springform pan. Use the flat bottom of a measuring cup to create an even, compact layer.
Step 3: Beat the Cream Cheese
In a large bowl, beat the room-temperature cream cheese with an electric mixer on medium speed until it is completely smooth and free of lumps, about 2 minutes.Step 4: Add Sugar and Vanilla
Beat in the powdered sugar and vanilla extract until fully incorporated and the mixture is creamy. Scrape down the sides of the bowl with a spatula to ensure everything is mixed evenly.Step 5: Whip the Cream
In a separate chilled bowl, whip the cold heavy cream with the mixer on high speed until stiff peaks form, about 3-4 minutes. Be careful not to over-whip.Step 6: Combine the Filling
Gently fold the whipped cream and sour cream into the cream cheese mixture using a spatula, using broad, sweeping motions until no white streaks remain and the filling is light and uniform.Step 7: Assemble the Cheesecake
Spread the cheesecake filling evenly over the prepared crust, smoothing the top with an offset spatula or the back of a spoon.Step 8: Chill to Set
Cover the pan tightly with plastic wrap and refrigerate for at least 6 hours, or preferably overnight, to allow the cheesecake to set completely before serving.
Pro Tips & Tasty Tweaks
Our team has made this no bake cheesecake countless times, and we’ve gathered our best insights to help you succeed on your first try. Here are a few things we’ve learned along the way.- Flavor Swap: For a citrusy twist, add the zest of one lemon to the filling along with the vanilla.
- Timing Adjustment: Don’t rush the chilling! Overnight refrigeration is key for the firmest, most sliceable texture.
- Texture Fix: If your cream cheese is still a bit cool, let the finished filling sit at room temperature for 10 minutes before spreading to make it easier to smooth.
- Storage Tip: This cheesecake stores beautifully. Keep it covered in the refrigerator for up to 5 days for the best flavor and texture.
Flavor & Texture Notes
When you make this no bake cheesecake correctly, you’ll be rewarded with a dessert that is perfectly balanced in both flavor and texture. The crust should be firmly packed and provide a distinct crunch against the creamy filling. The filling itself is the star—it should be luxuriously smooth, rich, and tangy from the cream cheese and sour cream, with just the right amount of sweetness. You’ll know it’s perfectly set when the top is firm to a gentle touch and the cheesecake holds its shape cleanly when sliced. This easy cheesecake truly delivers a classic, creamy cheesecake experience that will satisfy any craving.Variations & Substitutions
We love how versatile this base recipe for no bake cheesecake is. It’s a fantastic canvas for your favorite flavors. Here are some of our team’s favorite ways to mix it up.- Fruit Swirl: Gently swirl in 1/2 cup of raspberry or strawberry preserves into the filling before chilling for a fruity ribbon.
- Chocolate Lover’s: Replace 1/4 cup of the powdered sugar with 1/2 cup of melted and cooled semi-sweet chocolate for a decadent chocolate version.
- Cookie Crust: Swap the graham crackers for crushed vanilla wafers or chocolate sandwich cookies (filling removed) for a different crust flavor.
- Lemon Blueberry: Fold 1 cup of fresh blueberries and the zest of two lemons into the filling for a bright, summery treat.
- Dairy-Free Option: Use your favorite plant-based cream cheese and coconut cream (chilled) in place of the heavy cream for a dairy-free alternative.
Make-Ahead & Scaling
We love how this easy cheesecake fits perfectly into a busy schedule. You can prepare the entire dessert up to two days in advance, making it a true lifesaver for entertaining. For the best results, we recommend making the crust and filling the day before you need it and letting it set overnight in the refrigerator. If you’re serving a crowd, this recipe doubles beautifully in a 9×13-inch pan to create generous cheesecake bars. Conversely, you can easily halve the ingredients and use a 6-inch springform pan for a smaller, more intimate treat. The chilling time remains the same, ensuring your creamy cheesecake sets up perfectly every time.How to Serve No Bake Cheesecake
Presenting this beautiful dessert is part of the fun. After our many tests, we found that a thin, hot knife is the secret to getting those picture-perfect, clean slices. Simply run your knife under hot water, wipe it dry, and make a clean cut, repeating between each slice. For a truly stunning presentation, top slices with a handful of fresh berries, a drizzle of chocolate or caramel sauce, or a dollop of whipped cream. A cup of strong coffee or a glass of cold milk are our team’s favorite pairings for this classic New York cheesecake experience. We always get compliments when we add a simple garnish; it transforms this easy cheesecake from a simple treat into a special occasion dessert.
Mistakes to Avoid
Through our extensive testing, we’ve identified a few common pitfalls that can affect your final no bake cheesecake. Fortunately, they’re all easy to avoid with a little know-how. First, using cold cream cheese is the number one reason for a lumpy filling. Always ensure your cream cheese has sat out until it’s truly soft to the touch. Secondly, don’t rush the whipping of your heavy cream; stiff peaks are essential for giving the filling enough structure to set properly. Finally, impatience with the chilling time is a common mistake. This creamy cheesecake needs a full six hours, or ideally overnight, to firm up completely so it slices neatly. Another tip we learned the hard way: press your crust firmly. A loosely packed crust can crumble when you slice the cheesecake. By following these simple guidelines, you’re guaranteed a flawless dessert every single time.How to Store No Bake Cheesecake
Proper storage is key to maintaining the fantastic texture of your cheesecake. We always store ours right in the springform pan, covered tightly with plastic wrap, or transfer slices to an airtight container. Your no bake cheesecake will keep beautifully in the refrigerator for up to 5 days. For longer storage, you can freeze the whole cheesecake or individual slices. Wrap it securely in plastic wrap and then a layer of foil to prevent freezer burn. It will keep frozen for up to 2 months. Thaw it overnight in the refrigerator before serving. We don’t recommend refreezing a previously frozen cheesecake, as it can affect the creamy texture we all love.Try This No Bake Cheesecake Yourself
We genuinely hope you feel inspired to make this incredibly easy cheesecake in your own kitchen. It’s one of those recipes that consistently delivers impressive results with minimal effort, and we’re confident it will become a go-to in your dessert rotation. Remember, the most important ingredients are a little patience for chilling and the joy of sharing something homemade. Whether you’re making classic cheesecake bars or experimenting with one of the fun variations, the process is just as rewarding as the final product. So gather your ingredients, and get ready to enjoy the creamiest, most delicious no bake cheesecake you’ve ever made. We can’t wait for you to try it!No Bake Cheesecake
With just a handful of simple ingredients, this no bake cheesecake delivers a luxuriously creamy texture and rich flavor that rivals any baked version. It's the perfect combination of a sweet, buttery graham cracker crust and a velvety smooth, tangy filling that comes together without ever turning on your oven.
Ingredients
Equipment
Method
- In a medium bowl, stir together the graham cracker crumbs, granulated sugar, and melted butter until the mixture resembles wet sand and holds together when pinched.
- Firmly press the crumb mixture into the bottom and slightly up the sides of a 9-inch springform pan. Use the flat bottom of a measuring cup to create an even, compact layer.
- In a large bowl, beat the room-temperature cream cheese with an electric mixer on medium speed until it is completely smooth and free of lumps, about 2 minutes.
- Beat in the powdered sugar and vanilla extract until fully incorporated and the mixture is creamy. Scrape down the sides of the bowl with a spatula to ensure everything is mixed evenly.
- In a separate chilled bowl, whip the cold heavy cream with the mixer on high speed until stiff peaks form, about 3-4 minutes. Be careful not to over-whip.
- Gently fold the whipped cream and sour cream into the cream cheese mixture using a spatula, using broad, sweeping motions until no white streaks remain and the filling is light and uniform.
- Spread the cheesecake filling evenly over the prepared crust, smoothing the top with an offset spatula or the back of a spoon.
- Cover the pan tightly with plastic wrap and refrigerate for at least 6 hours, or preferably overnight, to allow the cheesecake to set completely before serving.
Nutrition
Notes
For the creamiest texture, ensure cream cheese is truly at room temperature. Don't rush the chilling time - overnight refrigeration is best for firm, sliceable texture. Use a hot knife for clean slices. Store covered in refrigerator for up to 5 days.
Tried this recipe?
Let us know how it was!Enjoyed the recipe? Share it!

Kitchen Essentials We Recommend
Tools that make cooking easier — tried, tested, and loved.


As an Amazon Associate we earn from qualifying purchases.
Got a recipe the world should try?
Share your favorite family recipe or national dish with food lovers in 100+ countries.
Submit Your RecipeFrequently Asked Questions
Can I make no bake cheesecake without a springform pan?
Absolutely. While a springform pan makes removal easiest, you can use a regular 9-inch pie dish. We suggest lining the dish with parchment paper strips that overhang the sides, which will act as handles to lift the cheesecake out after it’s set.
How do I know when my no bake cheesecake is set?
The cheesecake is properly set when the top is firm to a gentle touch and doesn’t jiggle loosely when you move the pan. After our many tests, we stand by the overnight chill for the firmest, most sliceable creamy cheesecake texture.
Why is my no bake cheesecake filling runny?
A runny filling usually points to under-whipped cream or insufficient chilling time. Ensure your heavy cream is whipped to stiff peaks and that you’ve allowed the full six hours, or preferably overnight, for the easy cheesecake to set in the refrigerator.
")