Juicy, seasoned beef patties with melty cheese, tangy sauce, and crisp toppings on soft, toasted buns. These homemade cheeseburger sliders are the ultimate crowd-pleaser, perfect for game day, family dinners, or any gathering.
What Makes mini burger sliders So Special
With just a handful of simple ingredients, our mini burger sliders deliver a big, satisfying flavor in every perfectly sized bite. Think juicy, seasoned beef, melty cheese, and a tangy sauce, all hugged by a soft, toasted bun. These cheeseburger sliders are the ultimate crowd-pleaser, ideal for game day, a family dinner, or any gathering where you want delicious food without the fuss. During our testing, we found that the secret to the best homemade burger sliders is all in the gentle touch. Overworking the meat can make the patties tough, so we mix just until combined. Trust us, a light hand makes all the difference between a good slider and a great one. You’re going to love how quickly these come together!
This post may contain affiliate recommendations. Please see our disclosure policy.
What You’ll Find in This Article
Ingredients for mini burger sliders
Here’s everything you need for this easy beef sliders recipe. We recommend an 80/20 blend of ground beef for the perfect balance of flavor and juiciness.- 1 pound ground beef (80/20 blend recommended)
- 1 tablespoon Worcestershire sauce
- 1 teaspoon kosher salt
- 1/2 teaspoon freshly ground black pepper
- 12 small slider buns or dinner rolls, split
- 6 slices American cheese, each cut into quarters
- 1/4 cup mayonnaise
- 1/4 cup ketchup
- 1 tablespoon yellow mustard
- 1 small yellow onion, thinly sliced
- 12 small dill pickle chips

Cook Time for cheeseburger sliders
One of the best things about these slider burgers is how quickly they come together. From start to finish, you can have a platter of hot, cheesy goodness ready in about 20 minutes. We’ve timed it out so you can plan perfectly for your party or weeknight dinner.- Prep Time: 10 minutes
- Cook Time: 10 minutes
- Total Time: 20 minutes
How to Make mini burger sliders
Follow these simple steps for the most delicious homemade burger sliders. We’ll guide you through each part of the process to ensure your sliders are juicy, flavorful, and cooked just right.Step 1: Mix the Patty Mixture
In a medium bowl, gently combine the ground beef, Worcestershire sauce, salt, and pepper until just mixed. Avoid overworking the meat to keep the patties tender.Step 2: Shape the Patties
Divide the mixture into 12 equal portions and shape each into a thin, small patty slightly wider than your buns, as they will shrink during cooking.
Step 3: Cook and Add Cheese
Preheat a large skillet or griddle over medium-high heat. Cook the patties for 2-3 minutes per side, until well-browned and cooked through. In the last minute of cooking, place two small cheese quarters on each patty to melt.Step 4: Make Sauce & Toast Buns
While the patties cook, mix the mayonnaise, ketchup, and mustard in a small bowl to create a simple sauce. Lightly toast the split buns, cut-side down, in a separate skillet or in the oven until golden.
Step 5: Assemble and Serve
To assemble, spread a small amount of the sauce on the bottom bun. Top with a cheesy patty, a couple slices of onion, a pickle chip, and the top bun. Serve immediately while warm.Pro Tips & Tasty Tweaks
After making dozens of batches, our team has gathered a few favorite tips to make your mini burger sliders even better. Here’s what we’ve learned.- Flavor Swap: For a smoky twist, add a teaspoon of smoked paprika or a dash of garlic powder to the beef mixture.
- Timing Adjustment: Don’t crowd the skillet! Cook the patties in batches if needed to ensure they get a good sear instead of steaming.
- Prep Fix: To prevent the patties from doming in the center, use your thumb to make a very slight indentation in the middle of each one before cooking.
- Storage Tip: Store any leftover cooked patties separately from the buns and toppings in the fridge for up to 3 days. Reheat gently in a skillet or microwave.
Flavor & Texture Notes
When you bite into one of these perfect mini burger sliders, you should experience a wonderful harmony of flavors and textures. The Worcestershire sauce adds a savory, umami depth to the juicy beef, which is balanced by the tangy, creamy sauce and sharp pickles. Texture-wise, you’re aiming for a tender, slightly crumbly patty (thanks to that gentle mixing), contrasted with the soft, toasted bun and the crisp snap of fresh onion. The cheese should be fully melted and oozy. A good doneness signal is firm patties with clear juices running clear, and beautiful browning on both sides. These slider burgers easy to master once you know what to look for!Variations & Substitutions
Our beef sliders recipe is wonderfully adaptable. Whether you’re catering to different tastes or just using what’s in your fridge, here are some of our team’s favorite ways to mix things up while keeping everything delicious and compliant.- Cheese Choices: Swap American for cheddar, pepper jack, or Swiss. Shredded cheese works too—just sprinkle it on a bit earlier so it has time to melt.
- Protein Swap: Ground chicken or turkey makes a fantastic, lighter alternative. Just add an extra tablespoon of broth to the mix to keep it moist.
- Sauce Upgrade: Stir a teaspoon of relish, a pinch of onion powder, or a splash of hot sauce into the mayo-ketchup mix for a custom sauce.
- Bun Alternatives: No slider buns? Small potato rolls, Hawaiian sweet rolls, or even squares of focaccia bread work beautifully.
- Topping Bar: Set out lettuce, tomato slices, sautéed mushrooms, or crispy fried onions and let everyone build their own perfect slider.
Make-Ahead & Scaling
We love a recipe that can be prepped ahead, and these mini burger sliders are perfect for that. For busy weeknights or parties, you can shape the patties up to a day in advance. Just layer them between sheets of parchment paper on a tray, cover tightly, and refrigerate. The sauce can also be mixed and kept in a jar in the fridge. This way, when it’s time to cook, you’re just minutes away from a hot, delicious meal. Scaling this beef sliders recipe up or down is wonderfully straightforward. For a smaller batch, simply halve all the ingredients. For a crowd, we’ve successfully doubled and even tripled the recipe. The key is to cook the patties in batches to avoid overcrowding the skillet, which can cause them to steam instead of sear. If you’re making a huge batch, you can keep cooked patties warm on a baking sheet in a low oven (around 200°F) while you finish the rest. One quick note from our testing: if you hold the fully assembled cheeseburger sliders for too long, the buns can get a bit soggy. For the best texture, we recommend storing components separately and assembling just before serving.How to Serve mini burger sliders
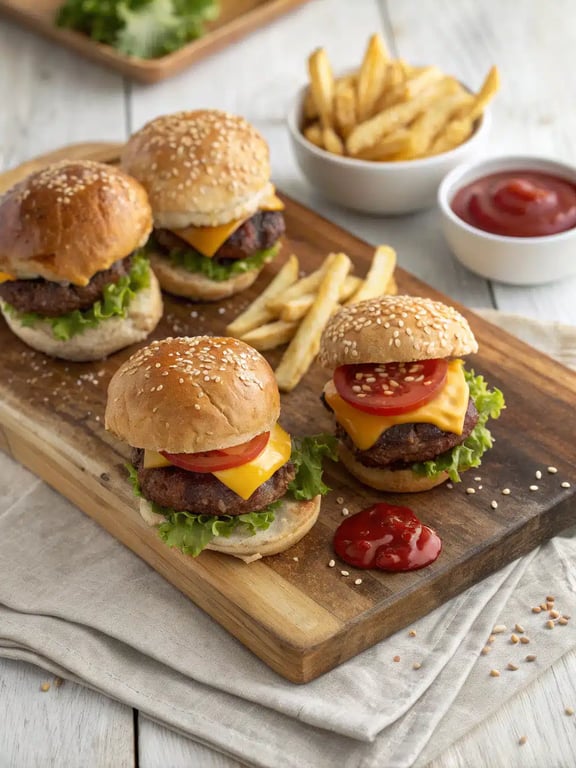
Presentation is part of the fun with these slider burgers easy to serve. We love arranging them on a large wooden board or platter, maybe with a little bowl of extra sauce on the side for dipping. It creates that inviting, shareable feel that makes any gathering special. During one of our team tastings, we realized the perfect partners for these sliders are classic, easy sides. Think crispy seasoned fries, a simple green salad with a tangy vinaigrette, or some crunchy coleslaw. For drinks, an ice-cold lemonade, iced tea, or sparkling water with lime complements the savory flavors beautifully. Remember, part of what makes these homemade burger sliders so great is their casual vibe. Don’t stress about perfection—just stack them up, pass them around, and watch them disappear!
Mistakes to Avoid
We’ve made plenty of sliders over the years, and we’ve learned from every misstep. Here are the most common pitfalls we see, so you can avoid them and nail your mini burger sliders on the first try. Overworking the Meat: This is the number one way to end up with tough, dense patties. Mix the beef and seasonings gently and just until combined. It should look a bit shaggy, not like a smooth paste. Making Patties Too Thick: Since they cook so quickly, a thick patty might be undercooked inside or overcooked outside. Keep them thin and slightly wider than the bun to account for shrinkage. Skipping the Bun Toast: A soft bun can quickly become soggy from the juicy patty and sauce. Taking that extra minute to lightly toast the cut sides adds crucial texture and helps hold everything together. Moving Patties Too Soon: If you try to flip the patties before a good crust forms, they might stick and tear. Let them cook undisturbed for the first 2-3 minutes to get that beautiful, flavorful sear. Crowding the Pan: If you’ve ever wondered why your beef sliders recipe turned out steamy instead of seared, this is likely why. Give each patty some space so the moisture can evaporate, leading to a perfect brown crust. Keep these tips in mind, and your batch of slider burgers easy to master will be absolutely foolproof.How to Store mini burger sliders
Got leftovers? These cheeseburger sliders store beautifully if you follow a simple rule: keep the components separate. We found that storing fully assembled sliders leads to a soggy mess, so we always deconstruct them. Let the cooked patties cool completely, then store them in an airtight container in the fridge for up to 3 days. The sauce can stay in its jar, and any unused buns should be kept in their bag. To reheat, warm the patties gently in a skillet over medium-low heat or in the microwave until heated through. Re-toast the buns if you like, then assemble fresh. This method preserves the texture far better than reheating a whole slider. You can also freeze the unseasoned, raw patties for up to 3 months. Place them on a parchment-lined sheet to freeze solid, then transfer to a freezer bag. Thaw in the fridge before cooking. We don’t recommend freezing the assembled homemade burger sliders, as the buns and toppings don’t hold up well.Try This mini burger sliders Yourself
We truly hope you give this recipe a try. There’s something so satisfying about making a batch of these mini burger sliders from scratch—the aroma filling your kitchen, the joy of building each little burger, and the smiles around the table when you serve them. One of our favorite reader notes was from a mom who told us these became her go-to for her kids’ sleepovers. They were a huge hit, and the kids even loved helping assemble their own. That’s the kind of simple, shared joy we love to hear about. So, gather your ingredients, remember to mix the beef gently, and get ready for a delicious, crowd-pleasing meal. Whether it’s for game day, a weeknight dinner, or a casual party, these sliders are guaranteed to deliver big flavor in every single bite.Mini Burger Sliders
Juicy, seasoned beef patties with melty cheese, tangy sauce, and crisp toppings on soft, toasted buns. These homemade cheeseburger sliders are the ultimate crowd-pleaser, perfect for game day, family dinners, or any gathering.
Ingredients
Equipment
Method
- In a medium bowl, gently combine the ground beef, Worcestershire sauce, salt, and pepper until just mixed. Avoid overworking the meat to keep the patties tender.
- Divide the mixture into 12 equal portions and shape each into a thin, small patty slightly wider than your buns, as they will shrink during cooking.
- Preheat a large skillet or griddle over medium-high heat. Cook the patties for 2-3 minutes per side, until well-browned and cooked through. In the last minute of cooking, place two small cheese quarters on each patty to melt.
- While the patties cook, mix the mayonnaise, ketchup, and mustard in a small bowl to create a simple sauce. Lightly toast the split buns, cut-side down, in a separate skillet or in the oven until golden.
- To assemble, spread a small amount of the sauce on the bottom bun. Top with a cheesy patty, a couple slices of onion, a pickle chip, and the top bun. Serve immediately while warm.
Nutrition
Notes
Pro Tips: For a smoky twist, add a teaspoon of smoked paprika or a dash of garlic powder to the beef mixture. To prevent patties from doming, make a slight indentation in the center of each raw patty with your thumb. Don't crowd the skillet—cook in batches for a good sear.
Storage: Store leftover cooked patties separately from buns and toppings in the fridge for up to 3 days. Reheat gently in a skillet or microwave.
Storage: Store leftover cooked patties separately from buns and toppings in the fridge for up to 3 days. Reheat gently in a skillet or microwave.
Tried this recipe?
Let us know how it was!Enjoyed the recipe? Share it!

Kitchen Essentials We Recommend
Tools that make cooking easier — tried, tested, and loved.


As an Amazon Associate we earn from qualifying purchases.
Got a recipe the world should try?
Share your favorite family recipe or national dish with food lovers in 100+ countries.
Submit Your RecipeFrequently Asked Questions
Can I make mini burger sliders ahead of time?
Absolutely! You can shape the patties and mix the sauce a day ahead. Store the patties layered with parchment paper in the fridge and keep the sauce in a sealed container. This makes putting together your beef sliders recipe incredibly fast when you’re ready to cook.
What’s the best way to keep sliders warm for a party?
For a party, we cook the patties in batches. As they finish, we place them on a baking sheet and keep them warm in a preheated oven set to its lowest temperature (around 200°F). We toast the buns and set out the toppings, so guests can assemble their own cheeseburger sliders fresh and warm.
Can I use a different type of ground meat?
Yes, ground chicken or turkey work well for a lighter option. Because they are leaner, we recommend adding a tablespoon of broth or a bit of olive oil to the mixture to help keep the patties moist and juicy as they cook.
How do I prevent the patties from shrinking too much?
Some shrinkage is natural, but you can minimize it. First, shape your patties slightly wider than your buns. Second, make a small indentation in the center of each raw patty with your thumb. This helps them stay flat and cook evenly, making your slider burgers easy to assemble later.
")