With just a handful of simple ingredients, this Italian herb cheese bread delivers a warm, aromatic loaf that’s soft and cheesy on the inside with a beautifully golden, buttery crust. It’s the kind of easy cheese bread that fills your kitchen with the irresistible scent of garlic and herbs, promising a slice that’s perfect for soups, salads, or simply enjoyed on its own.
What Makes Italian Herb Cheese Bread So Special
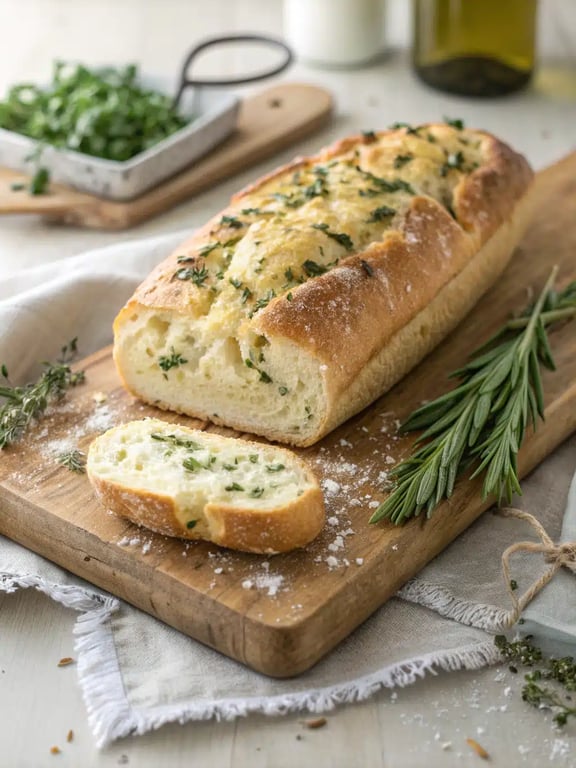
With just a handful of simple ingredients, this Italian herb cheese bread delivers a warm, aromatic loaf that’s soft and cheesy on the inside with a beautifully golden, buttery crust. It’s the kind of easy cheese bread that fills your kitchen with the irresistible scent of garlic and herbs, promising a slice that’s perfect for soups, salads, or simply enjoyed on its own. Honestly, we think the combination of melted Italian cheeses and savory seasoning creates a mozzarella bread recipe that feels both rustic and incredibly satisfying. During our testing, we found that the key to the perfect texture lies in letting the yeast get nice and foamy at the start and, crucially, allowing the baked loaf to rest before slicing. This patience lets the cheese set, so you get clean, beautiful slices instead of a cheesy mess. Trust us, that 20-minute wait is the hardest part of this whole process, but it makes all the difference. You’re going to love how simple and impressive this Italian herb bread turns out!
This post may contain affiliate recommendations. Please see our disclosure policy.
What You’ll Find in This Article
Ingredients for Italian Herb Cheese Bread
Here’s everything you’ll need to make this wonderfully savory Italian herb cheese bread. We love that most of these are pantry staples, and the cheese blend is easy to find. For the best flavor, use a good-quality Italian seasoning blend.- 2 ¼ teaspoons active dry yeast (1 packet)
- 1 teaspoon granulated sugar
- 1 cup warm water (about 110°F)
- 3 cups all-purpose flour, plus more for dusting
- 1 teaspoon kosher salt
- 2 tablespoons olive oil, plus more for the bowl
- 1 cup shredded Italian cheese blend (like mozzarella, provolone, and Parmesan)
- 2 tablespoons unsalted butter, melted
- 1 tablespoon dried Italian seasoning
- ½ teaspoon garlic powder
- ½ teaspoon onion powder
- Coarse sea salt for sprinkling (optional)

Cook Time for Italian Herb Bread
We know your time is precious, so we’ve broken down the timeline for this cheese herb bread. The active hands-on time is quite short, but remember to account for the rising periods—they’re what give the bread its wonderful airy texture. Here’s what you can expect:- Prep Time: 20 minutes (plus 1 hour 20 minutes for rising)
- Cook Time: 25-30 minutes
- Total Time: About 2 hours 10 minutes
How to Make Cheese Herb Bread
Follow these steps for a foolproof, delicious loaf. We’ve included our team’s little notes along the way to guide you to success. This easy cheese bread method is straightforward and so rewarding.Step 1: Activate the Yeast
In a large bowl or the bowl of a stand mixer, combine the warm water, sugar, and yeast. Let it sit for 5-10 minutes until foamy and active.Step 2: Make the Dough
Add the flour, kosher salt, and 2 tablespoons of olive oil to the yeast mixture. Mix with a dough hook or a wooden spoon until a shaggy dough forms, then knead for 5-7 minutes by machine or 8-10 minutes by hand on a lightly floured surface until smooth and elastic. Place the dough in an oiled bowl, turn to coat, cover with a damp towel, and let rise in a warm place for 1 hour or until doubled in size.Step 3: Shape the Dough
Preheat your oven to 375°F. Punch down the risen dough and turn it out onto a lightly floured surface. Roll or press it into a rough 9×13-inch rectangle.Step 4: Add the Filling
In a small bowl, mix the shredded cheese, Italian seasoning, garlic powder, and onion powder. Sprinkle this mixture evenly over the dough rectangle, leaving a ½-inch border on all sides. Starting from a long side, tightly roll the dough into a log, pinching the seam to seal.
Step 5: Final Proof and Score
Transfer the loaf, seam-side down, to a parchment-lined baking sheet. Use a sharp knife to make 5-6 diagonal slashes about ½-inch deep across the top of the loaf. Cover loosely with the towel and let it rest for 20 minutes.Step 6: Bake to Perfection
Brush the top of the loaf generously with the melted butter. If desired, sprinkle lightly with coarse sea salt. Bake for 25-30 minutes, until the crust is deep golden brown and the loaf sounds hollow when tapped on the bottom.Step 7: Cool and Slice
Let the bread cool on the baking sheet for 10 minutes, then transfer to a wire rack to cool for at least another 20 minutes before slicing. This allows the cheese to set and makes for cleaner slices.
Pro Tips & Tasty Tweaks
After making this Italian herb cheese bread more times than we can count, we’ve gathered a few insights to make your experience even better.- Flavor Swap: For a garlic herb focaccia vibe, press halved cherry tomatoes and a few rosemary sprigs into the top of the loaf before the final proof.
- Timing/Heat Adjustment: If your bread is browning too quickly, tent it loosely with aluminum foil for the last 10 minutes of baking.
- Prep/Texture Fix: If your dough feels too sticky when rolling, a light dusting of flour on your hands and the rolling pin works wonders. Don’t add too much extra flour to the dough itself, though, or the bread can become dense.
- Storage/Reheat Tip: To revive day-old bread, wrap it in foil and warm it in a 350°F oven for 10 minutes. For a crisp crust, unwrap it for the last 2-3 minutes.
Flavor & Texture Notes
When you get this Italian herb cheese bread right, it’s a true symphony of savory flavors and satisfying textures. As you slice into it, you’ll notice the crust has a delicate, buttery crispness that gives way to a soft, tender crumb. The pockets of melted cheese are savory and rich, perfectly complemented by the aromatic blend of Italian herbs, garlic, and onion. The doneness signals are your best friends here. First, look for that deep, golden-brown color across the entire loaf. Then, carefully lift it (using oven mitts!) and tap the bottom—it should sound hollow. If you’re unsure, an instant-read thermometer inserted into the center of the loaf (avoiding a cheese pocket) should read between 190-200°F. Finally, that incredible aroma filling your kitchen is the final clue that your cheese herb bread is ready to come out and cool.Variations & Substitutions
One of the things we love about this recipe is how adaptable it is. Whether you want to play with flavors or need to use what’s in your fridge, here are some of our favorite twists on this Italian herb bread.- Cheese Choices: While the Italian blend is classic, a sharp white cheddar or a smoky gouda can create a deliciously different profile. For a stronger flavor, try adding a few tablespoons of grated Pecorino Romano to the blend.
- Fresh Herbs: If you have them, substitute the dried Italian seasoning with 2-3 tablespoons of finely chopped fresh herbs like rosemary, thyme, and oregano. The flavor will be brighter and more vibrant.
- Add Some Heat: For a spicy kick, mix ½ teaspoon of crushed red pepper flakes into the cheese and herb filling. It adds a wonderful warmth that contrasts the rich cheese.
- Seeded Crust: After brushing with butter, press a mixture of everything bagel seasoning, sesame seeds, or poppy seeds onto the top of the loaf before baking for extra texture and flavor.
- Whole Wheat Option: You can substitute up to one cup of the all-purpose flour with whole wheat flour for a heartier texture and nuttier flavor. The loaf may be slightly denser, but still delicious.
How to Serve Italian Herb Cheese Bread
We love how versatile this Italian herb cheese bread is—it truly elevates any meal from simple to special. Honestly, one of our favorite team memories is the time we served a warm loaf with a big pot of tomato soup on a rainy afternoon; the combination was pure comfort. This easy cheese bread is fantastic for dipping, tearing, or slicing, making it the perfect sidekick for so many dishes. For a complete meal, pair it with a hearty minestrone soup or a crisp Italian salad. It also makes a wonderful appetizer when sliced and served with a side of marinara or a creamy roasted garlic dip for dipping. If you’re hosting, consider turning this mozzarella bread recipe into the star of a casual bread board, surrounded by olives, cured meats, and pickled vegetables. Our best tip? Always serve it warm. The aroma of the garlic herb focaccia-style seasoning and the gooey cheese is part of the experience, inviting everyone to the table before you even say a word.Mistakes to Avoid
We’ve made our share of mistakes in the test kitchen so you don’t have to! Here are the most common pitfalls we see with this cheese herb bread and exactly how to steer clear of them for a perfect loaf every time. Using water that’s too hot or too cold: If your water is hotter than 110°F, it can kill the yeast, leading to a dense brick. Conversely, if it’s too cool, the yeast won’t activate. We always use a quick-read thermometer to be sure—it’s a small step that guarantees a good rise for your Italian herb bread. Adding too much flour while kneading: It’s tempting to keep adding flour if the dough feels sticky, but resist! Too much flour makes the bread dry and dense. Instead, lightly oil your hands and the work surface. The dough should become smooth and elastic as you knead. Not letting the bread cool before slicing: We know it’s hard to wait, but slicing into your Italian herb cheese bread too soon is a recipe for a cheesy, gummy mess. The 20-30 minute cooling time allows the steam to escape and the melted cheese to set, giving you those beautiful, clean slices. Overbaking or underbaking: Keep a close eye during the last 10 minutes. An overbaked loaf can be dry, while an underbaked one will be doughy in the center. Look for that deep golden-brown crust and listen for the hollow sound when tapped. By avoiding these simple errors, you’ll master this mozzarella bread recipe with confidence. Remember, baking is as much about technique as it is about ingredients!How to Store Italian Herb Cheese Bread
To keep your Italian herb cheese bread tasting its best, a little know-how goes a long way. Through our testing, we found that how you store it directly impacts whether you get a soft, revived slice or a stale one. This easy cheese bread is best enjoyed fresh, but with these tips, you can extend its delicious life. For short-term storage, let the loaf cool completely, then wrap it tightly in aluminum foil or place it in a large zip-top bag. It will stay soft at room temperature for 1-2 days. For longer storage, we recommend freezing. Slice the cooled loaf, wrap individual slices or the whole loaf in plastic wrap, and then place it in a freezer bag. It will keep for up to 2 months. To reheat, thaw frozen slices at room temperature if needed. For a soft, warm interior, wrap the bread in foil and warm in a 350°F oven for 10-12 minutes. If you crave that crisp crust again, unwrap it for the last 3-4 minutes of heating. A quick toast in the toaster oven also works wonders for single slices.Try This Italian Herb Cheese Bread Yourself
We genuinely hope you give this Italian herb cheese bread a try in your own kitchen. It’s one of those recipes that feels like a real accomplishment but is built on simple, reliable steps. We’ve shared all our little secrets so you can experience the joy of pulling a golden, aromatic loaf from your oven. Whether you’re looking for a comforting side for weeknight soup or an impressive offering for guests, this cheese herb bread delivers. Don’t be intimidated by the yeast—just follow the steps, and you’ll be amazed at what you can create. The process of making this mozzarella bread recipe is just as rewarding as eating it. So, gather your ingredients, clear a spot on the counter, and get ready to fill your home with the incredible smell of baking bread. We’re confident you and anyone you share it with will absolutely love it.Italian Herb Cheese Bread
With just a handful of simple ingredients, this Italian herb cheese bread delivers a warm, aromatic loaf that’s soft and cheesy on the inside with a beautifully golden, buttery crust. It’s the kind of easy cheese bread that fills your kitchen with the irresistible scent of garlic and herbs, promising a slice that’s perfect for soups, salads, or simply enjoyed on its own.
Ingredients
Equipment
Method
- In a large bowl or the bowl of a stand mixer, combine the warm water, sugar, and yeast. Let it sit for 5-10 minutes until foamy and active.
- Add the flour, kosher salt, and 2 tablespoons of olive oil to the yeast mixture. Mix with a dough hook or a wooden spoon until a shaggy dough forms, then knead for 5-7 minutes by machine or 8-10 minutes by hand on a lightly floured surface until smooth and elastic. Place the dough in an oiled bowl, turn to coat, cover with a damp towel, and let rise in a warm place for 1 hour or until doubled in size.
- Preheat your oven to 375°F. Punch down the risen dough and turn it out onto a lightly floured surface. Roll or press it into a rough 9×13-inch rectangle.
- In a small bowl, mix the shredded cheese, Italian seasoning, garlic powder, and onion powder. Sprinkle this mixture evenly over the dough rectangle, leaving a ½-inch border on all sides. Starting from a long side, tightly roll the dough into a log, pinching the seam to seal.
- Transfer the loaf, seam-side down, to a parchment-lined baking sheet. Use a sharp knife to make 5-6 diagonal slashes about ½-inch deep across the top of the loaf. Cover loosely with the towel and let it rest for 20 minutes.
- Brush the top of the loaf generously with the melted butter. If desired, sprinkle lightly with coarse sea salt. Bake for 25-30 minutes, until the crust is deep golden brown and the loaf sounds hollow when tapped on the bottom.
- Let the bread cool on the baking sheet for 10 minutes, then transfer to a wire rack to cool for at least another 20 minutes before slicing. This allows the cheese to set and makes for cleaner slices.
Nutrition
Notes
Pro Tips: For a garlic herb focaccia vibe, press halved cherry tomatoes and rosemary sprigs into the top before the final proof. If browning too quickly, tent with foil for the last 10 minutes. To revive day-old bread, wrap in foil and warm at 350°F for 10 minutes.
Storage: Store cooled loaf wrapped tightly at room temperature for 1-2 days. For longer storage, slice, wrap, and freeze for up to 2 months.
Tried this recipe?
Let us know how it was!Enjoyed the recipe? Share it!

Kitchen Essentials We Recommend
Tools that make cooking easier — tried, tested, and loved.


As an Amazon Associate we earn from qualifying purchases.
Got a recipe the world should try?
Share your favorite family recipe or national dish with food lovers in 100+ countries.
Submit Your RecipeFrequently Asked Questions
Can I use instant yeast instead of active dry yeast?
Absolutely! You can substitute instant yeast in equal measure. The main difference is that you can mix instant yeast directly into the dry flour without needing to activate it in water first. Your rising times may be slightly shorter, so just keep an eye on the dough until it doubles.
How do I know when the dough has risen enough?
The classic “poke test” is our go-to. Gently press a floured finger about an inch into the dough. If the indentation fills in slowly, it needs more time. If it stays and the dough feels airy and has visibly doubled in size, your Italian herb bread dough is perfectly proofed and ready to shape.
Why is my cheese bread dense and not fluffy?
A dense loaf usually points to issues with the yeast or over-handling. First, ensure your yeast was fresh and foamy. Second, avoid adding too much extra flour during kneading, as this makes the dough heavy. Finally, make sure you let it rise in a warm, draft-free spot until truly doubled.
Can I make this dough ahead of time?
Yes, you can prepare the dough through the first rise. After the dough has doubled, punch it down, wrap it tightly in plastic, and refrigerate for up to 24 hours. When ready to bake, let it sit at room temperature for about 30 minutes, then proceed with shaping, filling, and the final proof.
")