With just a handful of simple ingredients, this honey garlic chicken delivers a perfect balance of sweet and savory that's downright irresistible. The sticky honey garlic glaze clings to juicy, pan-seared chicken thighs, creating a glossy, restaurant-quality dish right in your own kitchen.
What Makes honey garlic chicken So Special
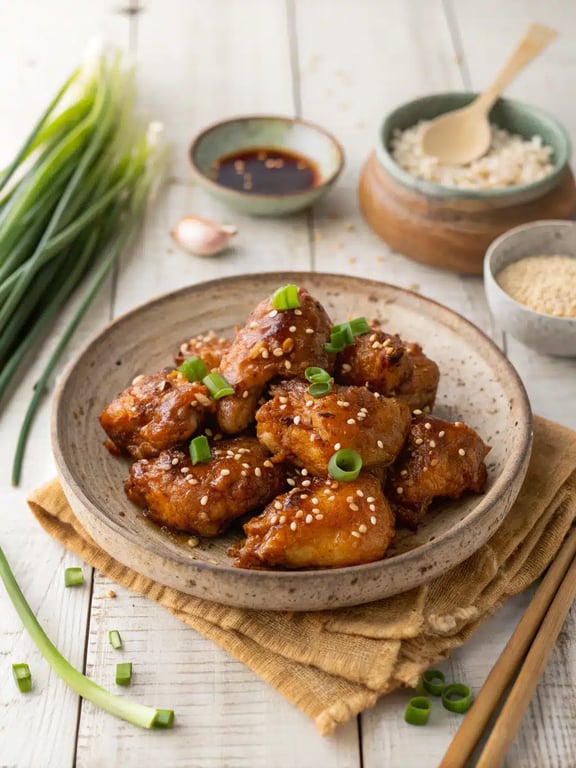
With just a handful of simple ingredients, this honey garlic chicken delivers a perfect balance of sweet and savory that’s downright irresistible. The sticky honey garlic glaze clings to juicy, pan-seared chicken thighs, creating a glossy, restaurant-quality dish right in your own kitchen. It’s the kind of meal that feels both comforting and a little bit fancy, all without requiring a lot of effort. During our testing, we found that the key to the best honey garlic sauce is letting it simmer until it truly thickens and coats the back of a spoon. This patience pays off with a rich, glossy finish that makes every bite incredible. You’re going to be amazed at how such a simple process creates such a spectacular dinner.
This post may contain affiliate recommendations. Please see our disclosure policy.
What You’ll Find in This Article
Ingredients for honey garlic chicken
Here’s everything you’ll need to create this incredible honey garlic chicken. We love how these simple, pantry-friendly ingredients come together to create something truly special.- 1 ½ pounds boneless, skinless chicken thighs
- 3 tablespoons olive oil
- ⅓ cup honey
- ¼ cup low-sodium soy sauce
- 4 cloves garlic, minced
- 1 tablespoon rice vinegar
- 1 teaspoon grated fresh ginger
- 2 teaspoons cornstarch
- 2 tablespoons water
- 2 tablespoons thinly sliced green onions
- 1 teaspoon sesame seeds
- Salt and black pepper to taste

Cook Time for honey garlic thighs
We know you’re busy, so we’ve timed this recipe to get dinner on the table quickly. From start to finish, this honey garlic chicken comes together in about 30 minutes, making it a perfect weeknight winner. Prep time: 10 minutes Cook time: 20 minutes Total time: 30 minutesHow to Make honey garlic chicken
Follow these simple steps for a flawless honey garlic chicken every single time. We’ve tested this method repeatedly to ensure you get perfectly cooked chicken with a glossy, irresistible honey garlic sauce.Step 1: Prepare the Chicken
Pat the chicken thighs dry with paper towels and season both sides generously with salt and black pepper. This step is crucial for getting a beautiful, golden sear.Step 2: Sear the Chicken
Heat olive oil in a large skillet over medium-high heat. Once the oil shimmers, add the chicken and cook for 5-7 minutes per side until golden brown and cooked through. Transfer chicken to a plate.
Step 3: Sauté the Aromatics
Reduce heat to medium-low and add minced garlic to the skillet. Cook for 30 seconds until fragrant, being careful not to burn it.Step 4: Create the Sauce
Whisk together honey, soy sauce, rice vinegar, and grated ginger in a small bowl. Pour into the skillet, scraping up any browned bits from the bottom.Step 5: Thicken the Glaze
In a separate small bowl, make a slurry by mixing cornstarch with water until smooth. Whisk the slurry into the sauce in the skillet and simmer for 2-3 minutes until the sauce thickens to a glossy consistency.Step 6: Combine and Finish
Return the chicken to the skillet, turning to coat each piece in the sauce. Cook for another 2 minutes until the chicken is heated through.Step 7: Garnish and Serve
Remove from heat and garnish with sliced green onions and a sprinkle of sesame seeds before serving.
Pro Tips & Tasty Tweaks
After making this honey garlic chicken countless times, we’ve gathered our favorite tips to help you make it even better. These small adjustments can make a big difference in your final dish.- Flavor Swap: For a different twist, try substituting maple syrup for half of the honey in your honey garlic marinade.
- Heat Adjustment: If your sauce is thickening too quickly, simply reduce the heat and add a tablespoon of water to thin it out.
- Prep Fix: For the most tender honey garlic thighs, avoid moving the chicken around too much while searing—let a good crust form.
- Storage Tip: Store leftovers in an airtight container for up to 3 days, and reheat gently on the stovetop to maintain the sauce’s perfect consistency.
Flavor & Texture Notes
When you make this honey garlic chicken correctly, you’ll experience a wonderful harmony of flavors and textures. The first thing you’ll notice is the incredible aroma of garlic and ginger filling your kitchen. The chicken itself should be juicy and tender with a slightly caramelized exterior from searing. Meanwhile, the honey garlic glaze should be thick, glossy, and perfectly balanced—not too sweet and not too salty. You’ll know the sauce is ready when it coats the back of a spoon and leaves a clear trail when you run your finger through it.Variations & Substitutions
We love how versatile this honey garlic chicken recipe is! Whether you’re adapting for dietary needs or just want to mix things up, here are some of our favorite tweaks from our team’s kitchen experiments. If you’re out of fresh ginger, ¼ teaspoon of ground ginger works in a pinch. For a bit of heat, add a pinch of red pepper flakes to the honey garlic sauce. You can also use chicken breasts instead of honey garlic thighs, but reduce the cooking time by 1-2 minutes per side to prevent drying out. Finally, if you prefer a less sweet profile, reduce the honey by a tablespoon and add an extra teaspoon of rice vinegar for balance.Make-Ahead & Scaling
We love having a game plan for busy nights, and this honey garlic chicken is wonderfully flexible when it comes to prepping ahead. You can whisk the honey garlic sauce together up to two days in advance and keep it stored in a jar in the refrigerator. Meanwhile, the chicken thighs can be seasoned and stored separately in the fridge. This way, when you’re ready to cook, everything comes together in a flash. When scaling the recipe for a crowd, we recommend using a very large skillet or cooking the chicken in batches to avoid steaming. For the honey garlic glaze, simply double all the sauce ingredients, but be prepared to let it simmer for an extra minute or two to reach that perfect, thickened consistency. On the other hand, if you’re cooking for one or two, the recipe halves beautifully. Just keep a close eye on the sauce as it will thicken a bit faster.How to Serve honey garlic chicken
After countless test dinners, we’ve found that the best way to serve this honey garlic chicken is family-style, right from the skillet. The glossy, sticky honey garlic glaze is such a showstopper, and letting everyone serve themselves feels wonderfully welcoming. For a complete meal, we love pairing it with fluffy jasmine rice to soak up every bit of the delicious honey garlic sauce. A simple side of steamed broccoli or snap peas adds a fresh, crisp contrast to the rich, savory chicken. A sprinkle of extra green onions and sesame seeds right at the end makes the whole dish look as incredible as it tastes. Our team’s favorite discovery? The honey garlic marinade flavors the rice underneath so beautifully that every single bite is packed with flavor.
Mistakes to Avoid
We’ve made our share of mistakes in the test kitchen so you don’t have to. Here are the most common pitfalls we’ve encountered with this honey garlic chicken and exactly how to steer clear of them. First, never add the honey garlic sauce to the pan while the chicken is still cooking. If you’ve ever wondered why your sauce sometimes breaks or becomes greasy, this is usually the culprit. Instead, always remove the chicken first, create your sauce, then return the chicken to coat. This ensures a glossy, perfectly emulsified honey garlic glaze every time. Second, don’t rush the sear. Letting the chicken thighs develop a deep golden-brown crust is essential for building flavor. If you move them around too much, they’ll steam instead of sear. Finally, be patient when thickening the sauce. If your honey garlic sauce isn’t coating the back of a spoon, let it bubble for another minute rather than adding more cornstarch, which can make it gummy. Trust us, avoiding these simple missteps will guarantee your honey garlic chicken turns out perfectly juicy and coated in that incredible sticky sauce.How to Store honey garlic chicken
Proper storage is key to enjoying your honey garlic chicken leftovers, which we think are almost as good as the fresh-made dish. Through our testing, we found that the sauce holds its consistency beautifully when stored correctly. Let the chicken cool completely before transferring it to an airtight container. It will keep in the refrigerator for up to 3 days. When reheating, we strongly recommend using the stovetop over the microwave. Gently warm it in a skillet with a tablespoon of water over low heat, stirring occasionally until heated through. This method helps the honey garlic glaze return to its original silky texture without separating. Unfortunately, we don’t recommend freezing this dish, as the texture of the sauced chicken can become watery upon thawing.Try This honey garlic chicken Yourself
We genuinely hope you’ll give this honey garlic chicken a try in your own kitchen. It’s one of those recipes that consistently wows everyone at our team potlucks, and we’re confident it will become a regular in your dinner rotation too. What we love most about this dish is how it transforms simple ingredients into something truly special. The process is straightforward, but the result feels like you’ve put in far more effort than you actually did. Whether you’re cooking for a busy weeknight or a casual weekend gathering, this honey garlic chicken delivers on flavor every single time. So gather your ingredients, heat up that skillet, and get ready to fall in love with this incredible honey garlic chicken. We can’t wait for you to experience that first bite of juicy chicken coated in the sticky, savory-sweet glaze.Honey Garlic Chicken
With just a handful of simple ingredients, this honey garlic chicken delivers a perfect balance of sweet and savory that's downright irresistible. The sticky honey garlic glaze clings to juicy, pan-seared chicken thighs, creating a glossy, restaurant-quality dish right in your own kitchen.
Ingredients
Equipment
Method
- Pat the chicken thighs dry with paper towels and season both sides generously with salt and black pepper.
- Heat olive oil in a large skillet over medium-high heat. Once the oil shimmers, add the chicken and cook for 5-7 minutes per side until golden brown and cooked through. Transfer chicken to a plate.
- Reduce heat to medium-low and add minced garlic to the skillet. Cook for 30 seconds until fragrant, being careful not to burn it.
- Whisk together honey, soy sauce, rice vinegar, and grated ginger in a small bowl. Pour into the skillet, scraping up any browned bits from the bottom.
- In a separate small bowl, make a slurry by mixing cornstarch with water until smooth. Whisk the slurry into the sauce in the skillet and simmer for 2-3 minutes until the sauce thickens to a glossy consistency.
- Return the chicken to the skillet, turning to coat each piece in the sauce. Cook for another 2 minutes until the chicken is heated through.
- Remove from heat and garnish with sliced green onions and a sprinkle of sesame seeds before serving.
Nutrition
Notes
For the most tender chicken, avoid moving it around too much while searing. Store leftovers in an airtight container for up to 3 days, and reheat gently on the stovetop to maintain the sauce's perfect consistency. If your sauce is thickening too quickly, reduce heat and add a tablespoon of water.
Tried this recipe?
Let us know how it was!Enjoyed the recipe? Share it!

Kitchen Essentials We Recommend
Tools that make cooking easier — tried, tested, and loved.


As an Amazon Associate we earn from qualifying purchases.
Got a recipe the world should try?
Share your favorite family recipe or national dish with food lovers in 100+ countries.
Submit Your RecipeFrequently Asked Questions
Can I use chicken breasts instead of thighs?
Absolutely! Chicken breasts work well, but we recommend cutting them into even-sized pieces to ensure they cook through at the same rate. Just remember that breasts cook faster than thighs, so reduce the searing time by 1-2 minutes per side to keep them juicy.
How do I know when the sauce has thickened enough?
The honey garlic sauce is ready when it coats the back of a spoon and leaves a clear trail when you run your finger through it. It should be glossy and have a syrup-like consistency that will cling beautifully to your honey garlic thighs.
My sauce is too thin. What can I do?
If your honey garlic glaze is too thin, let it simmer for another minute or two. The cornstarch needs a little time to work its magic. If it still needs help, mix another teaspoon of cornstarch with a tablespoon of cold water and whisk it in, then simmer until thickened.
Can I make this honey garlic chicken without cornstarch?
You can, but the sauce will be thinner. For a cornstarch-free option, let the sauce reduce naturally by simmering it for 5-7 minutes longer. It won’t be as thick, but the flavor will still be fantastic on your honey garlic chicken.
")