By Olivia
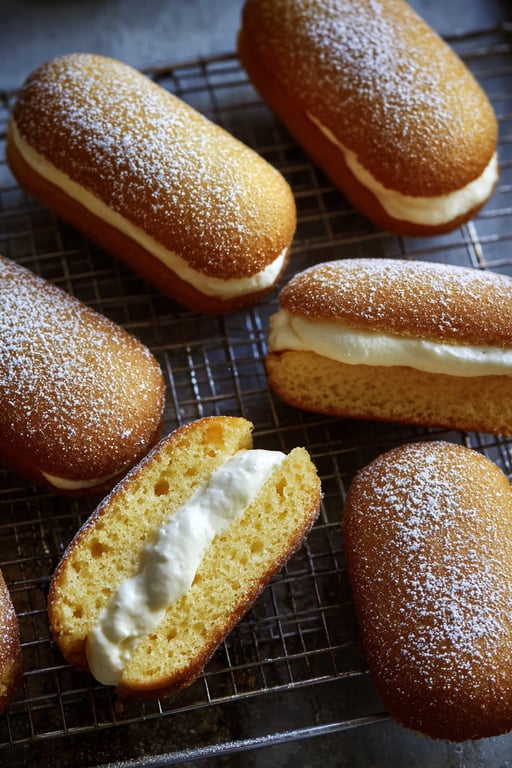
We love a recipe that brings back childhood memories, and these homemade twinkies do exactly that. Golden, springy sponge cakes filled with a soft cloud of vanilla cream, they taste just like the snack we grew up loving, only fresher and made with real ingredients. That is real food for real life, a little nostalgic, a lot of fun, and perfect for sharing.
Making these homemade twinkies from scratch is easier than you might think. A light vanilla sponge bakes up tender and golden, then gets filled with a creamy blend of butter, marshmallow creme, and a touch of vanilla. Without any preservatives and with sweetness you control, these little cakes are a joyful weekend project that disappears fast.

Golden, springy sponge cakes filled with a soft cloud of vanilla cream, these homemade twinkies are pure nostalgia.
Why You Will Love These Homemade Twinkies
- They are pure nostalgia. These homemade twinkies taste just like the classic snack, only fresher and better.
- Made with real ingredients. No preservatives here, just simple pantry staples you can feel good about.
- That dreamy filling. A soft, creamy vanilla center makes every bite feel like a treat.
- You control the sweetness. Making them at home lets you adjust the flavor exactly how you like.
- They are a fun project. Baking and filling them is a joyful activity to do with kids or friends.
What Makes These Homemade Twinkies So Good
It all starts with the sponge. Beating the eggs and sugar until thick and pale creates an airy base that bakes into a soft, springy, golden cake. Folding in the dry ingredients gently, without overmixing, is what keeps the crumb light and tender. If you enjoy a little nostalgia, you can read more about the classic Twinkie and its long history as a lunchbox favorite.
The cake itself is lightly sweet and rich with vanilla, the perfect vessel for the filling. A splash of milk and a little melted butter folded into the batter add moisture and a tender finish, so each homemade twinkie is soft enough to melt in your mouth.
Then there is the cream filling, which is the real magic. Butter is beaten until fluffy, then blended with marshmallow creme, powdered sugar, vanilla, and a little heavy cream until smooth and pipeable. Tucked into the center of each cake, it gives these homemade twinkies their signature soft, sweet surprise.

Optional Pro Tip: Cool Completely Before Filling
Patience is the secret to perfect homemade twinkies. Let the sponge cakes cool completely before you add the filling, since piping cream into a warm cake will cause it to melt and run. A fully cooled cake holds the filling beautifully, keeping it soft and creamy right where it belongs.
When you fill them, use a piping bag with a small round tip and poke a few small holes in the bottom of each cake. Gently squeeze until you feel a little resistance, which tells you the center is full. Wipe away any excess and your homemade twinkies are ready.
Tips for the Best Homemade Twinkies
- Beat the eggs well. Whip the eggs and sugar until thick and pale for a light, airy sponge.
- Do not overmix. Fold in the flour gently so the batter stays fluffy and the cake stays tender.
- Fill the molds evenly. Fill each mold about three quarters full so the cakes rise nicely.
- Use the right pan. A twinkie pan or mini loaf pan works best, or shape foil into oval molds in a muffin tin.
- Bake until just golden. The cakes are done when the tops are lightly golden and a toothpick comes out clean.
- Cool fully. Let the cakes cool completely before filling so the cream stays in place.
- Whip the filling smooth. Beat the filling until silky so it pipes cleanly into the cakes.
- Use a piping bag. A bag with a small tip makes filling the cakes easy and neat.

Variations and Add Ins
This recipe is easy to make your own. Here are a few simple ways to put a spin on these homemade twinkies.
- Chocolate filling. Stir a little cocoa powder into the filling for a chocolate cream center.
- Coffee twist. Add a touch of instant coffee to the filling for a mocha flavor.
- Citrus zest. Fold lemon or lime zest into the sponge or filling for a bright lift.
- Nutty crunch. Mix finely chopped nuts into the batter for a little texture.
- Cinnamon spice. Add a pinch of cinnamon to the cake batter for cozy warmth.
- Chocolate drizzle. Drizzle melted chocolate over the tops for an extra treat.
- Powdered sugar. Dust the finished cakes with powdered sugar for a pretty look.
- Dairy free. Swap in a plant based milk and butter for a dairy free version.
How to Store and Make Ahead
These homemade twinkies are a great make ahead treat. You can bake the sponge cakes up to a day in advance, let them cool completely, and store them in an airtight container until you are ready to fill them. The filling can also be made ahead and kept sealed in a separate container for a few days.
Once filled, store the cakes in an airtight container in the refrigerator and enjoy them within a few days for the freshest flavor and texture. Let them sit at room temperature for a few minutes before serving so the sponge is at its softest.
Serving Suggestions for Homemade Twinkies
Part of the charm of these homemade twinkies is how perfectly snackable they are. Enjoy them just as they are with a cold glass of milk, the classic pairing that makes them feel like an after school treat all over again.
They also shine on a dessert table or in a lunchbox. Pile them on a plate for a party, tuck one into a packed lunch, or serve them alongside fresh fruit for a sweet and simple finish to any meal.
- With milk. Serve with a cold glass of milk for a nostalgic snack.
- On a dessert table. Pile them up for parties and gatherings.
- In a lunchbox. Pack one as a sweet midday treat.
- With fresh fruit. Pair with berries for a light, sweet finish.
Frequently Asked Questions
Do I need a special twinkie pan?
A twinkie pan or mini loaf pan works best, but you can shape aluminum foil into small oval molds and place them in a muffin tin instead.
How do I fill them without a piping bag?
A zip top bag with a corner snipped off works well. Poke a few holes in the bottom of each cake and gently squeeze in the filling.
Why is my sponge dense?
The batter may have been overmixed. Whip the eggs and sugar well and fold in the flour gently to keep the cakes light.
Can I make these homemade twinkies ahead?
Yes. Bake the sponges a day ahead and store them cooled. The filling can be made ahead too and piped in when you are ready.
Why should the cakes cool before filling?
A warm cake will melt the cream filling. Cooling the cakes completely keeps the filling soft and in place.
How long do they keep?
Store filled cakes in an airtight container in the refrigerator and enjoy them within a few days for the best texture.
Can I flavor the filling?
Absolutely. Stir in cocoa, a little coffee, or citrus zest to give the filling a fun twist.
Can I freeze them?
The unfilled sponge cakes freeze well. Thaw and fill them fresh for the best results.
How full should I fill the molds?
Fill each mold about three quarters full so the cakes have room to rise without overflowing.
How many does this make?
The recipe makes a batch of soft, cream filled cakes, plenty to share with family and friends.
A Nostalgic Treat Worth Making
There is something special about recreating a beloved snack in your own kitchen, and these homemade twinkies are proof that the from scratch version is always worth it. Soft, golden, and filled with creamy vanilla, they bring a little childhood joy to any day.
If you love fun, nostalgic desserts, try pairing them with another playful favorite like our fried strawberry cheesecake for a sweet treat spread. However you serve them, we hope these little cakes bring a smile to your table.
Results vary by ingredients, equipment, and cooking conditions. Always taste and adjust as you go.
Homemade Twinkies
Ingredients
Equipment
Method
- Preheat your oven to 350 F. Grease a Twinkie pan or mini loaf pan and set aside.
- In a small bowl, sift together flour, baking powder, and salt.
- In a large bowl, beat the eggs with sugar using an electric mixer until thick and pale, about 6 to 8 minutes.
- Add vanilla bean paste, then gently fold in the flour mixture in batches.
- Combine warm milk and melted butter, then gently fold into the batter until just combined.
- Fill each mold 3/4 full with batter and bake for 12 to 15 minutes, or until golden and a toothpick comes out clean.
- Allow cakes to cool completely before removing from the pan.
- Beat the softened butter until fluffy. Add marshmallow creme, powdered sugar, vanilla bean paste, and heavy cream. Beat until smooth.
- Using a piping bag fitted with a small round tip, poke three holes into the bottom of each cake and fill with cream.
- Serve immediately or refrigerate in an airtight container.
Nutrition
Tried this recipe?
Let us know how it was!Enjoyed the recipe? Share it!

Kitchen Essentials We Recommend
Tools that make cooking easier — tried, tested, and loved.


As an Amazon Associate we earn from qualifying purchases.
Got a recipe the world should try?
Share your favorite family recipe or national dish with food lovers in 100+ countries.
Submit Your Recipe")