By Amelia
We make these homemade sub rolls whenever we want fresh, bakery-style bread for the best sandwiches at home. Soft and pillowy on the inside yet sturdy enough to hold a saucy filling, these rolls are rich, buttery, and lightly sweet. That is real food for real life, warm, comforting, and so much better than store-bought in every single bite. There is nothing quite like the smell of fresh bread baking in your own kitchen.
What makes these homemade sub rolls so good is the perfect balance of soft and sturdy. A tender, fluffy crumb is wrapped in a lightly golden crust that holds up beautifully to any filling. It is the kind of from-scratch bread that turns an ordinary sandwich into something special. With simple pantry ingredients and a little patience, bakery-style rolls are well within reach at home.

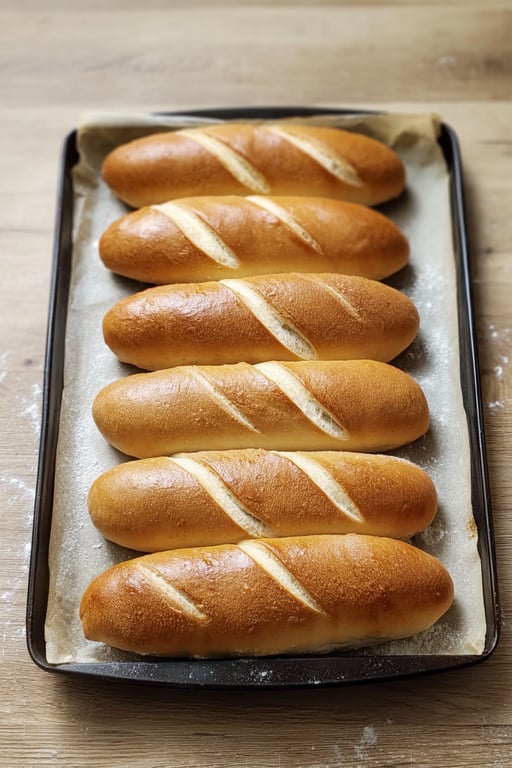
Soft and pillowy inside with a lightly golden crust, these homemade sub rolls are bakery-style bread made right at home.
Why You Will Love These Homemade Sub Rolls
- They are soft. These homemade sub rolls are pillowy and tender inside.
- They are sturdy. They hold up beautifully to saucy sandwich fillings.
- They are buttery. Rich and lightly sweet, they taste like a treat.
- They are fresh. Nothing beats warm bread baked at home.
- They are versatile. They are perfect for subs, hoagies, and so much more.
What Makes These Homemade Sub Rolls So Good
It starts with the bread flour. With its higher protein content, bread flour builds a strong gluten network, giving these homemade sub rolls the structure and chew they need to hold up to any filling while staying soft. That sturdy yet tender texture is exactly what makes a great sandwich roll.
Then comes the milk and butter. Whole milk adds richness and a slight sweetness, while cold, cubed butter is kneaded in for a tender, buttery crumb, making these bread rolls feel truly bakery-worthy.
Finally, the rise and bake bring it all together. Two gentle rises give the dough a light, airy texture, while an egg wash and a quick score in the oven give these homemade sub rolls their glossy, golden, beautifully finished tops. That golden crust is the final touch that makes them look and taste like they came from a real bakery.

Optional Pro Tip: Use Warm, Not Hot, Milk
The secret to perfectly risen homemade sub rolls is using warm, not hot, milk to bloom the yeast. The milk should feel comfortably warm to the touch, which is the ideal temperature to wake up the yeast without harming it. If it is too hot, it can hurt the yeast, and if it is too cool, the dough will not rise well.
It also helps to make sure your yeast is fresh and to let it bloom until it is frothy and bubbly before mixing. This is the sign that your yeast is active and ready, which is the key to light, airy, beautifully risen homemade sub rolls. Taking a moment for this step gives you confidence that your rolls will rise tall and soft.
Tips for the Best Homemade Sub Rolls
- Use bread flour. Its higher protein gives structure and chew.
- Warm the milk gently. It should feel comfortably warm, not hot.
- Use fresh yeast. Let it bloom until frothy before mixing.
- Knead until smooth. A smooth dough means good gluten and structure.
- Do not over-knead. Over-kneading can break down the dough.
- Pinch the seams. Seal them well so the rolls do not unroll.
- Let them rise fully. A good rise gives a light, airy crumb.
- Cool before slicing. This helps the crumb set perfectly inside.

Variations and Add Ins
These rolls are so easy to adapt. Here are a few simple ways to make these homemade sub rolls your own.
- Add sesame seeds. A sprinkle before baking adds nutty crunch.
- Try everything seasoning. Everything bagel seasoning adds bold flavor.
- Add garlic. A little garlic powder on top adds savory flavor.
- Top with parmesan. A sprinkle of parmesan bakes into a tasty crust.
- Make them smaller. Shape mini rolls for sliders or hot dogs.
- Make them bigger. Shape larger rolls for hearty hoagies.
- Brush with butter. A little butter on the warm rolls adds richness.
- Add herbs. A pinch of dried herbs in the dough adds flavor.
How to Store and Freeze
These homemade sub rolls are at their best fresh, but they keep beautifully too. Store them in an airtight container or bag at room temperature for a couple of days, and warm them briefly in the oven for that fresh-baked taste once again.
They also freeze wonderfully, which makes them perfect for keeping on hand. Cool them completely, then wrap and freeze for up to a few months. Thaw and warm in the oven whenever a sandwich craving strikes, and these homemade sub rolls taste freshly baked. Having a stash in the freezer means a great sandwich is always just minutes away.

Serving Suggestions for Homemade Sub Rolls
These homemade sub rolls are made for sandwiches, and they hold up to just about any filling. Pile them high with your favorite deli meats, melty cheese, and crisp veggies for a classic sub, or fill them with a saucy filling for a hearty meatball sub.
They are also wonderful with warm, savory fillings. Try them with a cheesy cheesesteak filling, a grilled chicken sandwich, or simply split and buttered alongside a bowl of soup for a cozy, comforting meal.
- As a classic sub. Deli meats, cheese, and crisp veggies.
- As a meatball sub. Perfect for a saucy, hearty filling.
- As a cheesesteak. Sturdy enough for a warm, cheesy filling.
- With soup. Split and buttered for a cozy, comforting meal.
Frequently Asked Questions
Why use bread flour?
Bread flour has a higher protein content, which builds a strong gluten network. This gives the rolls their structure and chew while keeping them soft.
Can I use all-purpose flour?
Yes, but the rolls will be a little softer and a bit less chewy. Bread flour gives the best structure for sturdy, sandwich-ready rolls.
How do I know the milk is the right temperature?
It should feel comfortably warm to the touch, like bathwater, not hot. Too hot can harm the yeast, and too cool will slow the rise.
Why is my dough not rising?
The yeast may be old or the milk too hot or too cool. Make sure the yeast blooms until frothy first, and let the dough rise in a warm, draft-free spot.
Can I make these ahead?
Yes. They freeze beautifully. Cool them completely, then wrap and freeze, and warm them in the oven for that fresh-baked taste.
Why do I score the rolls?
Scoring the tops lets the rolls expand evenly as they bake and gives them a pretty, finished, bakery-style look on top.
How do I keep them from unrolling?
Roll the dough up tightly and pinch the seams well to seal them. Placing them seam-side down on the pan also helps keep them together.
What can I top them with?
Sesame seeds, everything bagel seasoning, garlic powder, or grated parmesan all make wonderful toppings brushed on just before baking.
What are these rolls best for?
They are perfect for subs, hoagies, meatball subs, grinders, and just about any hearty sandwich that needs a soft yet sturdy roll.
Can I shape them different sizes?
Yes. Shape smaller rolls for sliders or hot dogs, or larger ones for hearty hoagies. Just adjust the baking time a little as needed.
A Soft, Golden Favorite
Soft, golden, and rich with buttery flavor, these homemade sub rolls are the kind of bread you will be proud to make from scratch. They are tender, sturdy, and so much better than store-bought, perfect for the very best sandwiches at home.
If you love a hearty sandwich, fill these rolls with a savory favorite like our philly cheesesteak filling next. However you fill them, we truly hope these homemade sub rolls bring a little warmth and comfort to your table.
Results vary by ingredients, equipment, and cooking conditions. Always taste and adjust as you go.
Homemade Sub Rolls
Ingredients
Equipment
Method
- In a medium sized bowl, add the warm milk, sugar, and yeast. Let bloom for 5 to 10 minutes until frothy.
- Combine the bread flour and salt in the bowl of a stand mixer.
- Add the yeast mixture and beaten eggs. Knead on low speed for 3 to 5 minutes until a shaggy dough forms.
- Add the cold cubed butter and knead for 8 to 10 minutes until smooth.
- Shape the dough into a tight ball.
- Place the dough in a greased bowl, cover, and let rise for 1 hour until doubled.
- Punch down the dough, divide into six pieces, and roll into balls.
- Roll each dough ball into a 9 by 5 inch rectangle, then roll tightly into a log. Pinch the seams closed and place seam-side down on a parchment-lined baking sheet.
- Cover and let the rolls rise for 30 minutes.
- Preheat the oven to 400 F.
- Mix the egg white and water and brush over the rolls.
- Score each roll in three places with a sharp knife or lame.
- Bake for 15 minutes until golden brown. Cool completely on a wire rack before slicing.
Nutrition
Tried this recipe?
Let us know how it was!Enjoyed the recipe? Share it!
Kitchen Essentials We Recommend
Tools that make cooking easier — tried, tested, and loved.


As an Amazon Associate we earn from qualifying purchases.
Got a recipe the world should try?
Share your favorite family recipe or national dish with food lovers in 100+ countries.
Submit Your Recipe