By Amelia
We make these deviled eggs whenever we want a rich, creamy appetizer that always disappears first off the platter. Classic deviled eggs get an upgrade here with crispy turkey bacon and a luxuriously smooth, perfectly balanced filling. That is real food for real life, creamy, savory, and just a touch sweet, the kind of deviled eggs that turn a few humble ingredients into a crowd-pleasing snack, perfect for cookouts, holidays, and parties, and easy to prep ahead for stress-free entertaining.
What makes these deviled eggs so good is the combination of an ultra-creamy filling and smoky, crispy turkey bacon in every bite. A smooth, tangy yolk filling is piped into tender egg whites and topped with crunchy turkey bacon. They are the kind of irresistible, crowd-pleasing deviled eggs that prove a handful of simple ingredients can come together into something rich, elegant, and completely snackable.

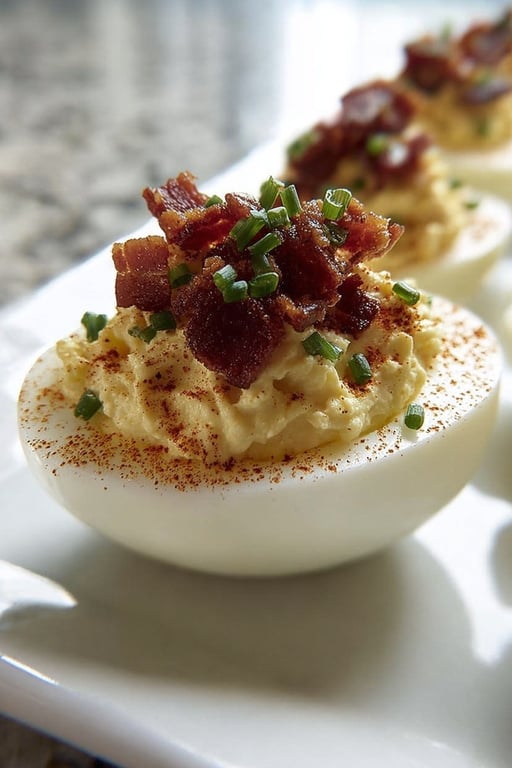
A smooth, tangy yolk filling piped into tender whites and topped with crispy turkey bacon, these deviled eggs are a crowd favorite.
Why You Will Love These Deviled Eggs
- They are creamy. These deviled eggs have an ultra-smooth filling.
- They are savory. Crispy turkey bacon adds smoky depth.
- They are balanced. A perfect mix of tangy and slightly sweet.
- They are a crowd-pleaser. A classic at any gathering.
- They are make-ahead friendly. Easy to prep before guests arrive.
- They are elegant. Beautiful piped and dusted with paprika.
What Makes These Deviled Eggs So Good
It starts with the eggs. Tender hard-boiled deviled egg whites form the base of these deviled eggs, cradling the creamy filling in each perfectly cooked half.
Then comes the creamy filling. Mashed yolks blended with mayonnaise and Dijon create the rich, smooth, luscious center that gives these deviled eggs their luxurious texture.
Next is the sweet-tangy balance. A splash of apple cider vinegar and a touch of sugar brighten and round out the filling, giving these deviled eggs their perfectly balanced, crave-worthy flavor.
Finally, the turkey bacon ties it all together. Crispy crumbled turkey bacon, both stirred into the filling and sprinkled on top, adds a smoky, savory crunch that makes these deviled eggs feel complete.

Optional Pro Tip: Use Older Eggs and Do Not Overcook Them
The secret to deviled eggs that peel cleanly starts with the eggs themselves. Slightly older eggs peel far more easily than fresh ones, so if you have a carton that has been in the fridge for a week or so, save it for this recipe. Bring the eggs to a boil, then cover and pull them off the heat to gently finish cooking, which keeps the whites tender. Transferring them straight to an ice bath afterward stops the cooking and makes peeling almost effortless.
The other key is to avoid overcooking, which causes that greenish-gray ring around the yolk and a faint sulfur smell. Stick to a short rest off the heat, and use the ice bath every time to cool the eggs quickly. For the smoothest filling, mash the yolks until completely free of lumps before mixing in the other ingredients, and taste as you go, since the mayonnaise and turkey bacon both add salt and you may need very little extra.
Tips for the Best Deviled Eggs
- Use older eggs. They peel far more easily than fresh ones.
- Do not overcook. A short rest off the heat avoids a green ring.
- Use an ice bath. It stops cooking and makes peeling easy.
- Mash yolks smooth. A lump-free filling is the creamiest.
- Taste as you go. The turkey bacon and mayo add salt already.
- Cook turkey bacon crisp. Extra crispy crumbles add the best crunch.
- Pipe the filling. A piping bag gives a pretty, polished look.
- Chill before serving. The flavors meld and the filling firms.
- Garnish at the end. Add paprika and chives just before serving.

Variations and Add Ins
These bites are wonderfully easy to adapt. Here are a few simple ways to make these deviled eggs your own.
- Add heat. A dash of hot sauce or cayenne adds a kick.
- Add pickles. A little relish or pickle juice adds tang.
- Add cheese. A sprinkle of cheddar or Parmesan adds richness.
- Switch the mustard. Try yellow or whole grain mustard.
- Add fresh herbs. Dill or extra chives brighten the flavor.
- Top with everything seasoning. For extra savory crunch.
- Add jalapeno. Finely diced for a spicy version.
- Top with capers. A briny pop on top of the filling.
- Make them tangier. A little extra vinegar or Dijon.
How to Store and Make Ahead
These deviled eggs are wonderful for making ahead, which makes them a relaxed choice for entertaining. In fact, they taste even better after a little time in the fridge, since the flavors meld and the filling firms up just enough to hold its shape. A little planning ahead means you can enjoy the party instead of scrambling in the kitchen.
For the best results when prepping ahead, keep the components separate until serving. You can boil and peel the eggs and make the filling a day in advance, storing the yolk filling and the egg white halves in separate airtight containers. When you are ready, give the filling a quick stir and pipe it into the whites for a fresh, polished look.
Store assembled deviled eggs in an airtight container in the refrigerator, where they keep well for a couple of days. They are best enjoyed within that window, and freezing is not recommended, since the creamy filling separates and turns watery once thawed. Add the turkey bacon and garnishes close to serving for the best texture.

Serving Suggestions for Deviled Eggs
These deviled eggs are a cookout and holiday classic, which makes them a natural fit for any gathering. Their creamy, savory, one-bite form is perfect for grazing, sitting happily on an appetizer spread alongside other finger foods at parties, barbecues, and holiday tables.
They are just as lovely as part of a larger spread or a relaxed family meal. Serve them as a starter before a cookout dinner, set them out on a brunch or potluck table, or add them to a holiday spread where they always disappear before everything else.
- At a cookout. A creamy, savory barbecue classic.
- On a holiday table. A must-have at Easter and beyond.
- At a brunch. A savory bite among the morning spread.
- On a party platter. A crowd-pleaser that vanishes fast.
- At a potluck. Easy to transport and always a hit.
Frequently Asked Questions
What are million dollar deviled eggs?
They are classic deviled eggs with an extra-creamy, perfectly balanced filling and crispy turkey bacon. The rich, luscious texture and savory crunch are what earn them their luxurious name.
How do I get the eggs to peel easily?
Use slightly older eggs, which peel far more easily than fresh ones, and transfer them to an ice bath right after cooking. The quick cooling makes the shells slip off with ease.
How do I avoid the green ring around the yolk?
The green ring comes from overcooking. Bring the eggs to a boil, then cover and rest off the heat rather than boiling for a long time, and cool them in an ice bath right away.
Can I make them ahead?
Yes. Boil and peel the eggs and make the filling a day ahead, storing the filling and whites separately. Pipe and garnish right before serving for the freshest look.
How do I get the filling extra creamy?
Mash the yolks until completely smooth before mixing in the other ingredients. For an even silkier filling, you can press the yolks through a fine mesh sieve first.
Should I pipe or spoon the filling?
Both work well. A piping bag with a star tip gives a polished, restaurant-style swirl, but a spoon is perfectly fine and a little quicker for a more casual look.
Can I freeze them?
Freezing is not recommended. The creamy filling separates and turns watery once thawed, so deviled eggs are best made fresh and enjoyed within a couple of days.
What other toppings can I add?
Beyond turkey bacon and paprika, try chives, capers, sliced pickles, a dash of hot sauce, or everything bagel seasoning to make them your own with a little extra flavor.
Can I make them without turkey bacon?
Yes. The creamy, tangy filling is delicious on its own, so you can leave out the turkey bacon and simply top the eggs with paprika and chives for a classic deviled egg.
How long do they keep?
They keep for a couple of days in an airtight container in the refrigerator. For the best texture, add the turkey bacon and garnishes close to serving rather than ahead of time.
A Rich, Crowd-Pleasing Classic
Creamy, savory, and just a touch sweet, these deviled eggs are the kind of appetizer that disappears first at every gathering. They are easy to make, endlessly adaptable, and even better made ahead, making them a perfect choice for cookouts, holidays, and parties alike.
If you love classic, crowd-pleasing finger foods, try another favorite like our easy party appetizers next. However you make them, we hope these deviled eggs bring a little rich, creamy comfort to your table.
Results vary by ingredients, equipment, and cooking conditions. Always taste and adjust as you go.
Million Dollar Turkey Bacon Deviled Eggs
Ingredients
Equipment
Method
- Place eggs in a single layer in a saucepan.
- Cover with cold water by 1 inch.
- Bring the water to a rolling boil over high heat.
- Once boiling, remove the pan from the heat, cover, and let stand for 10 to 12 minutes.
- Drain the hot water and transfer the eggs to an ice bath for 5 minutes.
- Peel the eggs and slice each in half lengthwise.
- Scoop the yolks into a medium bowl and place the egg whites on a serving platter.
- Mash the egg yolks until smooth.
- Add mayonnaise, Dijon mustard, apple cider vinegar, sugar, salt, and pepper. Mix until creamy.
- Stir in most of the crumbled turkey bacon, reserving some for garnish.
- Spoon or pipe the filling into the egg white halves.
- Garnish with the reserved turkey bacon, smoked paprika, and chopped chives if desired.
- Chill for at least 30 minutes before serving.
Nutrition
Tried this recipe?
Let us know how it was!Enjoyed the recipe? Share it!

Kitchen Essentials We Recommend
Tools that make cooking easier — tried, tested, and loved.


As an Amazon Associate we earn from qualifying purchases.
Got a recipe the world should try?
Share your favorite family recipe or national dish with food lovers in 100+ countries.
Submit Your Recipe")