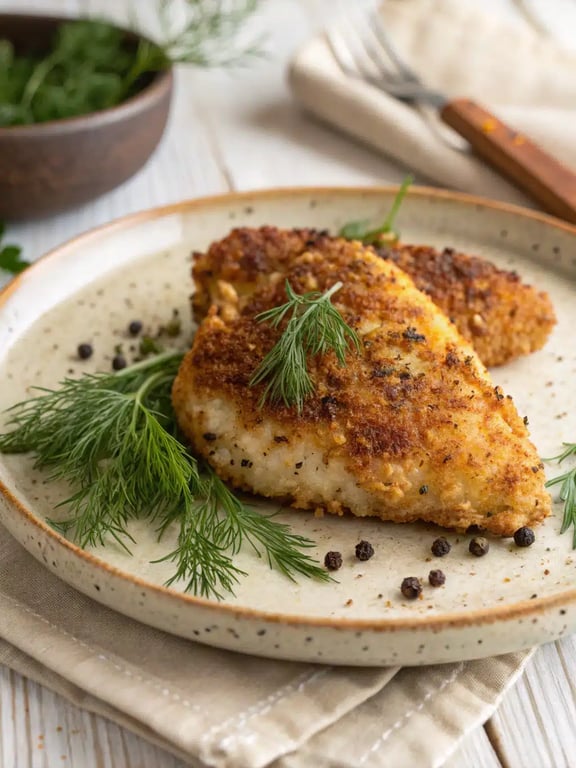
Crunchy, herby, and impossibly juicy, crispy dill chicken is a weeknight hero that feels anything but ordinary. We're talking about a golden-brown, pan-fried chicken with a crust that shatters with each bite, giving way to tender, flavorful meat.
What Makes crispy dill chicken So Special
Crunchy, herby, and impossibly juicy, crispy dill chicken is a weeknight hero that feels anything but ordinary. We’re talking about a golden-brown, pan-fried chicken with a crust that shatters with each bite, giving way to tender, flavorful meat. The magic lies in the simple combination of fresh dill and a handful of pantry staples, creating a dish that’s both impressive and incredibly approachable. After testing this recipe multiple times, our team landed on one non-negotiable tip: patting the chicken completely dry before you start. This one small step is the secret to achieving that perfectly crisp, non-greasy crust we all crave. You’re going to be amazed at how such simple ingredients can transform into a restaurant-quality meal right in your own skillet.
This post may contain affiliate recommendations. Please see our disclosure policy.
What You’ll Find in This Article
Ingredients for crispy dill chicken
Here’s everything you’ll need to create this simple yet spectacular baked dill chicken. We find that boneless, skinless chicken thighs work best for their inherent juiciness, but the recipe is wonderfully flexible.- 1 1/2 pounds boneless, skinless chicken thighs
- 1/2 cup all-purpose flour
- 1 teaspoon garlic powder
- 1 teaspoon onion powder
- 1/2 teaspoon paprika
- 1 teaspoon kosher salt
- 1/2 teaspoon black pepper
- 1/2 cup buttermilk
- 2 tablespoons chopped fresh dill
- 2 tablespoons olive oil
- 2 tablespoons unsalted butter

Cook Time for pan fried chicken
We know your time is precious, so we’ve streamlined this recipe for maximum flavor with minimal fuss. From start to finish, you can have this delicious pan fried chicken on the table in well under an hour.- Prep Time: 15 minutes
- Cook Time: 15-20 minutes
- Total Time: About 35 minutes
How to Make crispy dill chicken
Follow these straightforward steps for the crispiest, most flavorful dill chicken thighs you’ve ever made. We promise, the process is as satisfying as the result!Step 1: Prepare the Chicken and Coating
Pat the chicken thighs completely dry with paper towels and set aside. In a shallow dish, whisk together the flour, garlic powder, onion powder, paprika, salt, and pepper.Step 2: Create the Dill Buttermilk Bath
In a separate medium bowl, combine the buttermilk and chopped fresh dill. Dip each chicken thigh into the buttermilk mixture, letting the excess drip off.
Step 3: Dredge for a Perfect Crust
Dredge the buttermilk-coated chicken thoroughly in the seasoned flour mixture, pressing gently to help the coating adhere. Place the coated chicken on a wire rack set over a baking sheet.Step 4: Pan-Fry to Golden Perfection
Heat the olive oil and butter in a large skillet over medium-high heat until the butter is melted and foaming. Carefully add the chicken thighs, being careful not to crowd the pan.Step 5: Cook Through and Rest
Cook the chicken for 5-7 minutes per side, without moving it, until a deep golden-brown crust forms and the internal temperature reaches 165°F. Cook in batches if necessary.Step 6: The Final Touch
Transfer the cooked chicken back to the wire rack to rest for 5 minutes before serving. This allows the crust to stay crispy and the juices to redistribute.
Pro Tips & Tasty Tweaks
Our team has made this lemon dill chicken more times than we can count, and we’ve picked up a few tricks along the way to ensure your success.- Flavor Swap: For a different herb profile, try using fresh tarragon or parsley in place of the dill.
- Heat Adjustment: If your crust is browning too quickly, don’t be afraid to reduce the heat to medium to allow the inside to cook through.
- Texture Fix: That wire rack is crucial! It prevents the bottom crust from getting steamy and soft while the chicken rests.
- Storage Tip: Leftovers keep beautifully in an airtight container in the fridge for up to 3 days. Reheat in a toaster oven or air fryer to recrisp the coating.
Flavor & Texture Notes
When you get this crispy dill chicken just right, it’s a true symphony of taste and texture. You should experience a shatteringly crisp, well-seasoned crust that gives way to incredibly moist and tender meat. The fresh dill provides a bright, almost grassy note that cuts through the richness of the pan-fried chicken, while the paprika and garlic powder add a warm, savory depth. As for doneness, the visual cues are a deep, golden-brown crust and an internal temperature of 165°F. Ultimately, the resting period is what locks in all those wonderful juices, making every bite of these dill chicken thighs perfectly succulent.Variations & Substitutions
We love this recipe as written, but we also encourage you to make it your own! Here are a few of our favorite twists on this classic crispy dill chicken.- Lemon Zest Boost: Add a tablespoon of fresh lemon zest to the flour mixture for a vibrant lemon dill chicken variation that’s fantastic in the summer.
- Spice It Up: Incorporate a half-teaspoon of smoked paprika or a pinch of cayenne pepper into the flour for a subtle, smoky heat.
- Herb Garden Mix: Use a combination of fresh chives and dill for a more complex herbal flavor.
- Buttermilk Substitute: No buttermilk? No problem. Combine 1/2 cup of milk with 1 1/2 teaspoons of white vinegar or lemon juice, let it sit for 5 minutes, and use it as directed.
- Gluten-Free Option: For a gluten-free version, a 1-to-1 gluten-free flour blend works wonderfully in place of the all-purpose flour.
Make-Ahead & Scaling
We know that weeknight dinners can be hectic, so we’ve tested several ways to get a head start on this crispy dill chicken. You can absolutely prep components ahead of time to make your evening flow smoothly. For the best make-ahead results, we recommend preparing the seasoned flour mixture and the dill buttermilk bath up to a day in advance. Simply store them in separate airtight containers in the refrigerator. When you’re ready to cook, let the buttermilk mixture come to room temperature for about 15 minutes before using. You can also coat the chicken thighs and arrange them on the wire rack, then refrigerate them uncovered for up to an hour before frying; this actually helps the coating set and can lead to an even crispier crust. When scaling this recipe for a crowd, we’ve found that using two large skillets is far more effective than overcrowding a single pan. For a larger batch of these delicious dill chicken thighs, simply double or triple the ingredients, but be sure to cook in consistent, uncrowded batches to maintain that perfect golden-brown sear. Keep the cooked batches warm on a wire rack set in a 200°F oven while you finish the rest.How to Serve crispy dill chicken
After all our testing, we’ve discovered that the way you serve this pan fried chicken can truly elevate it from a simple weeknight meal to something special. The bright, herby notes of the dill play so well with a variety of sides. For a truly satisfying meal, we love pairing our crispy dill chicken with creamy mashed potatoes or a simple quinoa pilaf. The creaminess is a wonderful contrast to the crunchy texture. A bright, acidic side like a simple arugula salad with a lemon vinaigrette or some quick-pickled cucumbers really cuts through the richness and makes the whole plate sing. If you’re looking for a complete lemon dill chicken experience, a generous squeeze of fresh lemon juice over the plated chicken just before serving adds a fantastic burst of freshness. One of our favorite team discoveries was that this baked dill chicken is just as fantastic at room temperature as it is hot, making it a brilliant option for picnics or packed lunches.
Mistakes to Avoid
We’ve made our share of mistakes in the test kitchen so you don’t have to. Here are the most common pitfalls we’ve encountered with this crispy dill chicken and exactly how to sidestep them. First, never skip the step of patting the chicken dry. If you’ve ever wondered why your coating didn’t stick or wasn’t as crisp as you hoped, this is almost always the reason. Moisture on the surface of the chicken creates steam, which prevents proper browning and can lead to a soggy crust. Another frequent misstep is moving the chicken too soon in the pan. It’s tempting to peek or shift it, but patience is key. Let it cook undisturbed for the first 5-7 minutes to allow a solid, golden crust to form. If you try to move it too early, the coating will stick to the pan and tear. We also see cooks overcrowd the pan. When you add too many dill chicken thighs at once, the pan temperature drops drastically, and the chicken ends up steaming instead of frying. This results in a pale, greasy coating rather than a crisp one. Always cook in batches if your skillet isn’t large enough to hold all the pieces with some space between them. Finally, don’t forget the resting step. Slicing into the chicken immediately after cooking will cause all those precious juices to run out onto the cutting board, leaving you with drier meat. Letting it rest for just five minutes makes a world of difference.How to Store crispy dill chicken
Proper storage is the secret to enjoying your leftovers just as much as the first serving. We’ve tested all the methods to find what works best for this particular pan fried chicken. After the chicken has cooled completely, store it in a single layer in an airtight container in the refrigerator. We recommend placing a paper towel at the bottom of the container to absorb any excess moisture, which helps keep the crust crisp. Properly stored, your crispy dill chicken will keep for up to 3 days. For reheating, we strongly advise against using a microwave, as it will turn the beautiful crust soft and rubbery. Instead, reheat the chicken in a toaster oven, conventional oven, or air fryer at 375°F for 5-8 minutes, or until heated through. This method will bring back much of the original crispiness. You can also freeze the cooked chicken for up to 2 months. Thaw it overnight in the refrigerator before reheating using the same oven method.Try This crispy dill chicken Yourself
We genuinely hope you feel inspired to try this recipe in your own kitchen. It’s one of those dishes that consistently surprises people with how simple ingredients can create such a spectacular result. What we love most about this crispy dill chicken is its versatility. It’s fancy enough for a weekend dinner party but straightforward enough for a busy Tuesday night. The process of creating that shatteringly crisp crust is just as satisfying as eating it. We encourage you to gather your ingredients and give it a go. Once you master this technique, you’ll have a go-to chicken recipe that never fails to impress. Remember, cooking is about joy and discovery, not perfection. So don’t be afraid to make this recipe your own. Whether you stick to the classic version or experiment with the variations we suggested, we’re confident you’ll end up with a delicious meal that will have everyone asking for seconds.Crispy Dill Chicken
Crunchy, herby, and impossibly juicy, crispy dill chicken is a weeknight hero that feels anything but ordinary. We're talking about a golden-brown, pan-fried chicken with a crust that shatters with each bite, giving way to tender, flavorful meat.
Ingredients
Equipment
Method
- Pat the chicken thighs completely dry with paper towels and set aside. In a shallow dish, whisk together the flour, garlic powder, onion powder, paprika, salt, and pepper.
- In a separate medium bowl, combine the buttermilk and chopped fresh dill. Dip each chicken thigh into the buttermilk mixture, letting the excess drip off.
- Dredge the buttermilk-coated chicken thoroughly in the seasoned flour mixture, pressing gently to help the coating adhere. Place the coated chicken on a wire rack set over a baking sheet.
- Heat the olive oil and butter in a large skillet over medium-high heat until the butter is melted and foaming. Carefully add the chicken thighs, being careful not to crowd the pan.
- Cook the chicken for 5-7 minutes per side, without moving it, until a deep golden-brown crust forms and the internal temperature reaches 165°F. Cook in batches if necessary.
- Transfer the cooked chicken back to the wire rack to rest for 5 minutes before serving. This allows the crust to stay crispy and the juices to redistribute.
Nutrition
Notes
Patting the chicken completely dry before coating is crucial for achieving a crisp crust. Don't overcrowd the pan - cook in batches if needed. Let the chicken rest for 5 minutes after cooking to keep it juicy. For best results, reheat leftovers in a toaster oven or air fryer to maintain crispiness.
Tried this recipe?
Let us know how it was!Enjoyed the recipe? Share it!

Kitchen Essentials We Recommend
Tools that make cooking easier — tried, tested, and loved.


As an Amazon Associate we earn from qualifying purchases.
Got a recipe the world should try?
Share your favorite family recipe or national dish with food lovers in 100+ countries.
Submit Your RecipeFrequently Asked Questions
Can I use dried dill instead of fresh?
You can, but the flavor will be more subtle and less bright. If using dried dill, we recommend using one-third the amount of fresh, so about 2 teaspoons for this recipe. The fresh herb really makes a difference in this crispy dill chicken, providing a vibrant, grassy note that dried dill can’t quite match.
How do I know when the chicken is done?
The most reliable method is to use an instant-read thermometer. The chicken is perfectly cooked and safe to eat when the internal temperature reaches 165°F. Visually, the crust should be a deep golden-brown, and the juices should run clear when the thickest part of the thigh is pierced with a knife.
Can I make this with chicken breasts?
Absolutely. For a lemon dill chicken made with breasts, we recommend pounding them to an even ½-inch thickness first to ensure they cook through at the same rate as the crust browns. Keep a close eye on the cooking time, as breasts can cook faster than thighs and may dry out if overcooked.
")