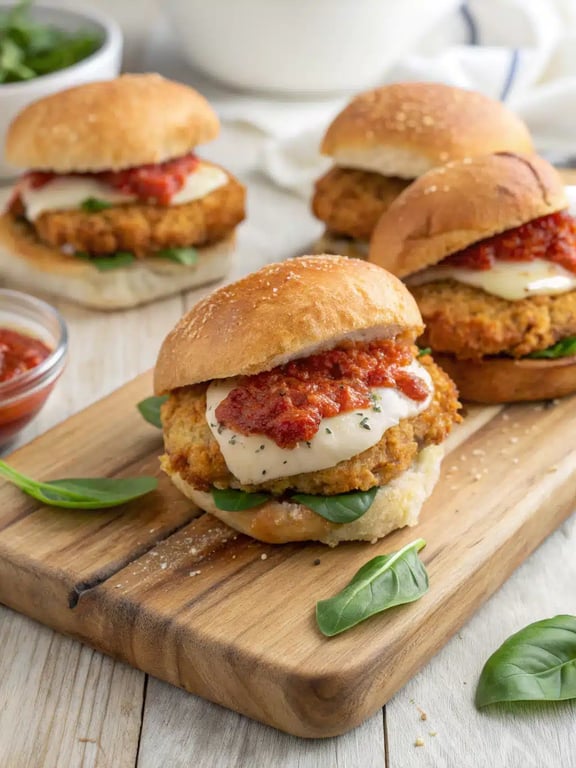
Crunchy, rich, and impossible to resist, chicken parmesan sliders are the ultimate crowd-pleasing meal. We're talking crispy, golden-brown chicken cutlets layered with melty mozzarella and warm marinara, all hugged by soft, buttery slider buns. They deliver the classic comfort of chicken parmesan sandwiches in a fun, shareable format that's perfect for game day, parties, or a busy weeknight.
What Makes chicken parmesan sliders So Special
Crunchy, rich, and impossible to resist, chicken parmesan sliders are the ultimate crowd-pleasing meal. We’re talking crispy, golden-brown chicken cutlets layered with melty mozzarella and warm marinara, all hugged by soft, buttery slider buns. They deliver the classic comfort of chicken parmesan sandwiches in a fun, shareable format that’s perfect for game day, parties, or a busy weeknight. After testing several batches, our team discovered a key trick: letting the assembled sliders rest for a few minutes after baking. This simple step allows the layers to set, making them much easier to slice and serve without falling apart. You’ll be amazed at how these simple ingredients come together to create something so delicious. It’s simpler than it looks!
This post may contain affiliate recommendations. Please see our disclosure policy.
What You’ll Find in This Article
Ingredients for chicken parmesan sliders
Here’s everything you’ll need to make these irresistible baked chicken sliders. We find that using fresh mozzarella and a good-quality marinara sauce makes a noticeable difference in flavor.- 1 pound boneless, skinless chicken breasts, thinly sliced
- 1 teaspoon kosher salt
- 1/2 teaspoon black pepper
- 1 cup all-purpose flour
- 2 large eggs, beaten
- 1 1/2 cups Italian-style breadcrumbs
- 1/2 cup grated Parmesan cheese
- 1/4 cup olive oil
- 12 slider buns
- 2 cups marinara sauce
- 8 ounces fresh mozzarella cheese, thinly sliced
- 2 tablespoons unsalted butter, melted
- 1 teaspoon garlic powder
- 1 teaspoon dried oregano

Cook Time for baked chicken sliders
We know your time is precious, so we’ve timed every step. These easy party sliders come together in under an hour from start to finish. The active prep is straightforward, and the oven does most of the work, giving you time to tidy up or prepare a side salad.- Prep Time: 20 minutes
- Cook Time: 25 minutes
- Total Time: 45 minutes
How to Make mozzarella chicken sliders
Follow these steps for perfectly assembled chicken parmesan sliders every time. We’ve broken it down to make the process as smooth as possible, even for a first-timer.Step 1: Preheat and Prep Chicken
Preheat your oven to 375°F and pat the chicken slices dry with paper towels. Season both sides generously with salt and pepper.Step 2: Create Your Breading Station
Set up a breading station with three shallow dishes: flour in the first, beaten eggs in the second, and breadcrumbs mixed with Parmesan cheese in the third. Dredge each chicken piece in flour, dip in egg, then press firmly into the breadcrumb mixture to coat.Step 3: Pan-Fry to Golden Perfection
Heat olive oil in a large skillet over medium-high heat. Cook breaded chicken in batches until golden brown and crispy, about 3-4 minutes per side. The chicken will finish cooking in the oven.Step 4: Assemble the Sliders
Slice slider buns in half horizontally and place the bottom halves in a 9×13 baking dish. Spread half the marinara sauce over the buns, then layer with cooked chicken, remaining marinara, and mozzarella slices.Step 5: Add the Flavored Top Buns
Brush the cut side of the top buns with melted butter mixed with garlic powder and oregano. Place them butter-side up over the assembled sliders.Step 6: Bake Until Bubbly and Toasted
Cover the dish with foil and bake for 15 minutes until the cheese is melted and buns are warm. Remove foil and bake 5 more minutes until tops are lightly toasted.Step 7: Rest for Clean Slices
Let rest for 2-3 minutes before slicing into individual sliders. The resting time helps the layers set for cleaner serving.Step 8: Serve and Enjoy
Serve warm with any extra marinara sauce for dipping.
Pro Tips & Tasty Tweaks
Our team has made these chicken slider recipes countless times, and we’ve gathered our best insights to help you succeed. Here are a few tweaks we love.- Flavor Swap: For a herby kick, mix a tablespoon of chopped fresh basil into the marinara sauce before assembling.
- Timing Adjustment: If you’re prepping ahead, you can bread the chicken and keep it refrigerated for a few hours before frying and assembling.
- Texture Fix: To ensure a super crispy coating, press the breadcrumbs onto the chicken firmly and let the breaded cutlets sit for 5 minutes before frying.
- Storage Tip: Leftovers reheat beautifully! Wrap them in foil and warm in a 350°F oven for 10-15 minutes to keep the buns from getting soggy.
Flavor & Texture Notes
When you bite into one of these chicken parmesan sliders, you’re greeted with a wonderful symphony of textures and tastes. The top bun should be lightly toasted and aromatic from the garlic-oregano butter, while the bottom bun soaks up the savory marinara sauce without becoming mushy. The star of the show is the chicken—expect a satisfying, audible crunch from the Parmesan-crusted exterior that gives way to tender, juicy meat inside. The fresh mozzarella provides those iconic, stretchy cheese pulls, and the marinara adds a bright, tangy sweetness that balances the rich, savory elements. When done perfectly, every component is distinct yet harmoniously blended in each bite.Variations & Substitutions
One of the best things about these mozzarella chicken sliders is how adaptable they are. We encourage you to make them your own! Here are some of our favorite variations that we’ve tested in our own kitchens.- Spicy Kick: Add a layer of sliced pepperoncini or a drizzle of hot honey over the chicken before adding the cheese for a sweet and spicy twist.
- Pesto Swirl: Swirl a few tablespoons of basil pesto into the marinara sauce for a deeper, more complex herbal flavor.
- Different Cheese: While fresh mozzarella is classic, provolone or a fontina cheese also melt beautifully and offer a slightly sharper flavor.
- Bun Upgrade: For a richer base, use Hawaiian sweet rolls. Their subtle sweetness is a fantastic contrast to the savory chicken and tomato sauce.
- Gluten-Free: You can easily make this with gluten-free all-purpose flour and gluten-free breadcrumbs for equally delicious results.
How to Serve chicken parmesan sliders
We love how these mozzarella chicken sliders transform any gathering into a special occasion. After testing them at everything from casual family dinners to larger parties, we found that a little thoughtfulness in presentation goes a long way. You can easily turn these easy party sliders into a complete, satisfying meal. One of our favorite memories is serving a big tray of these sliders for a game day get-together; they disappeared in minutes, and everyone kept asking for the recipe. For a balanced plate, we suggest starting with a simple side salad with a tangy vinaigrette to cut through the richness. Alternatively, a bowl of roasted potato wedges or a classic Caesar salad are always crowd-pleasers. We always put out a small bowl of extra warm marinara sauce for dipping—it’s a simple touch that makes the experience even more fun and interactive for your guests.
Mistakes to Avoid
Through our many rounds of testing these chicken parmesan sliders, we’ve seen a few common pitfalls that can easily be avoided. Our goal is to help you get that perfect, crispy-yet-tender result on your first try. One question we often hear is, “Why did my sliders turn out soggy?” This usually happens if the chicken isn’t properly patted dry before breading, or if the assembled sliders sit for too long before baking. To prevent this, make sure your chicken is very dry and assemble the sliders just before they go into the oven. Another common mistake is overcrowding the skillet when frying the chicken. If you add too many cutlets at once, the oil temperature drops, and the chicken steams instead of frying, resulting in a less crispy coating. Cook in batches for the best golden-brown color. We also recommend not skipping the resting step after baking. It might be tempting to dig right in, but letting the baked chicken sliders rest for a few minutes allows the cheese and sauce to set, which makes slicing them cleanly much easier. Finally, be careful with the salt. Since the Parmesan cheese and marinara sauce already contain salt, we found that just seasoning the chicken itself is usually sufficient. Always taste your sauce first if you’re using a store-bought brand.How to Store chicken parmesan sliders
We know you might have leftovers, and we’re happy to report that these chicken parmesan sandwiches store and reheat beautifully. Our team has tried every storage method to find the best way to preserve that fantastic texture. After many tests, we found that the best way to store leftover sliders is to let them cool completely, then place them in a single layer in an airtight container. They will keep in the refrigerator for up to 3 days. For longer storage, you can wrap individual sliders tightly in plastic wrap and then foil before freezing for up to 2 months. To reheat, we strongly recommend using an oven or toaster oven. Preheat your oven to 350°F, wrap the sliders in foil, and warm them for about 10-15 minutes, or until heated through. This method helps the buns regain their warmth and slight crispness without becoming soggy, which can happen in the microwave.Try This chicken parmesan sliders Yourself
We truly hope you feel inspired to make this recipe for your friends and family. These chicken parmesan sliders are one of those dishes that look impressive but are surprisingly straightforward to put together. One of our team members said it best after a long testing day: “This is the ultimate comfort food that everyone can agree on.” Whether you’re feeding a crowd or just want delicious leftovers for the week, this recipe delivers on flavor and satisfaction. So, gather your ingredients and give these incredible chicken slider recipes a try. We’re confident they’ll become a new favorite in your home kitchen.Chicken Parmesan Sliders
Crunchy, rich, and impossible to resist, chicken parmesan sliders are the ultimate crowd-pleasing meal. We're talking crispy, golden-brown chicken cutlets layered with melty mozzarella and warm marinara, all hugged by soft, buttery slider buns. They deliver the classic comfort of chicken parmesan sandwiches in a fun, shareable format that's perfect for game day, parties, or a busy weeknight.
Ingredients
Equipment
Method
- Preheat your oven to 375°F and pat the chicken slices dry with paper towels. Season both sides generously with salt and pepper.
- Set up a breading station with three shallow dishes: flour in the first, beaten eggs in the second, and breadcrumbs mixed with Parmesan cheese in the third. Dredge each chicken piece in flour, dip in egg, then press firmly into the breadcrumb mixture to coat.
- Heat olive oil in a large skillet over medium-high heat. Cook breaded chicken in batches until golden brown and crispy, about 3-4 minutes per side. The chicken will finish cooking in the oven.
- Slice slider buns in half horizontally and place the bottom halves in a 9x13 baking dish. Spread half the marinara sauce over the buns, then layer with cooked chicken, remaining marinara, and mozzarella slices.
- Brush the cut side of the top buns with melted butter mixed with garlic powder and oregano. Place them butter-side up over the assembled sliders.
- Cover the dish with foil and bake for 15 minutes until the cheese is melted and buns are warm. Remove foil and bake 5 more minutes until tops are lightly toasted.
- Let rest for 2-3 minutes before slicing into individual sliders. The resting time helps the layers set for cleaner serving.
- Serve warm with any extra marinara sauce for dipping.
Nutrition
Notes
Let the assembled sliders rest for a few minutes after baking for cleaner slices. To prevent soggy buns, don't over-sauce the bottom layer and assemble just before baking. For best reheating, use an oven at 350°F for 10-15 minutes wrapped in foil.
Tried this recipe?
Let us know how it was!Enjoyed the recipe? Share it!

Kitchen Essentials We Recommend
Tools that make cooking easier — tried, tested, and loved.


As an Amazon Associate we earn from qualifying purchases.
Got a recipe the world should try?
Share your favorite family recipe or national dish with food lovers in 100+ countries.
Submit Your RecipeFrequently Asked Questions
Can I make chicken parmesan sliders ahead of time?
Absolutely! You can bread and pan-fry the chicken cutlets up to a day in advance. Let them cool, then store them in the refrigerator. When you’re ready to serve, simply assemble the sliders with the sauce and cheese and bake as directed. You may need to add a few extra minutes to the baking time since you’re starting with cold chicken.
How do I keep the bottom buns from getting soggy?
This is a great question we tested extensively. The key is to not over-sauce the bottom layer and to assemble the sliders just before baking. We also found that using a thicker, high-quality marinara sauce helps, as it has less free water that can soak into the buns.
What’s the best way to reheat leftover sliders?
For the best texture, we always reheat them in the oven. Wrap the sliders in foil and warm at 350°F for 10-15 minutes. This method gently reheats the filling while keeping the buns from turning soft or chewy, unlike the microwave.
")