By Isabella
We make these thumbprint appetizers whenever we want a savory, bite-sized treat that brings a little sweet and spicy to the table. A buttery cheddar dough is rolled into balls, pressed with a thumbprint, filled with hot pepper jelly, and baked until golden. That is real food for real life, rich, cheesy, and just a touch sweet and spicy, the kind of thumbprint appetizers that turn a handful of simple ingredients into a crowd-pleasing snack, perfect for parties, game nights, and holidays, and easy to prep ahead so you can bake them fresh when guests arrive.
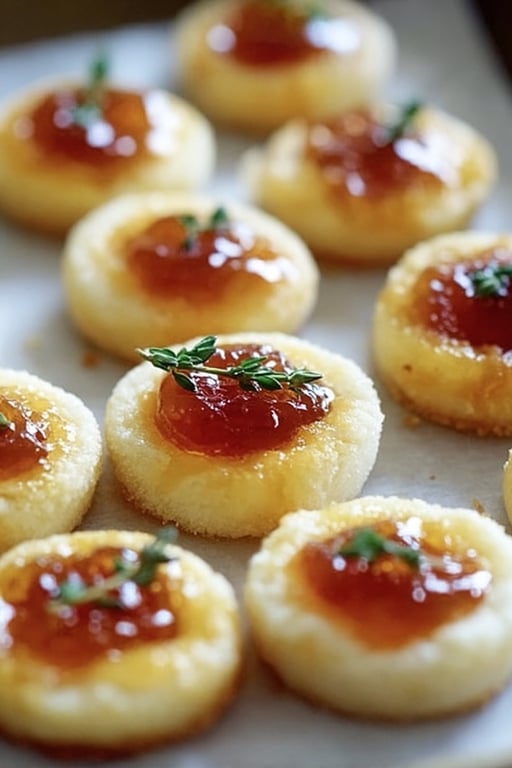
What makes these thumbprint appetizers so good is the contrast of a rich, savory cheese dough and a sweet-spicy jelly center in every bite. A buttery cheddar base cradles a vibrant pool of pepper jelly that bakes into a glossy, flavorful filling. They are the kind of irresistible, crowd-pleasing thumbprint appetizers that prove a few simple ingredients can come together into something elegant, savory, and completely snackable.

A buttery cheddar dough pressed and filled with sweet-spicy pepper jelly and baked golden, these thumbprint appetizers are a savory crowd-pleaser.
Why You Will Love These Thumbprint Appetizers
- They are savory. These thumbprint appetizers have a rich cheddar dough.
- They are sweet and spicy. Hot pepper jelly adds the perfect zing.
- They are bite-sized. The ideal pop-in-your-mouth snack.
- They are pretty. The jewel-like jelly centers look festive.
- They are make-ahead friendly. Prep the dough ahead and bake fresh.
- They are a crowd-pleaser. A guaranteed hit at any party.
What Makes These Thumbprint Appetizers So Good
It starts with the cheddar dough. Sharp cheddar blended with cream cheese and butter creates the rich, savory, buttery base that gives these thumbprint appetizers their melt-in-your-mouth texture.
Then comes the structure. A little flour binds the dough into a soft, workable mixture that holds its shape, so these thumbprint appetizers bake up tender with a lightly crisp edge.
Next is the seasoning. A touch of garlic powder and salt deepens the savory, cheesy flavor and balances the sweetness of the filling in these thumbprint appetizers.
Finally, the hot pepper jelly ties it all together. A spoonful of sweet-spicy jelly nestled in the center bakes into a glossy pool that gives these thumbprint cookie style bites their signature flavor.

Optional Pro Tip: Use Soft Ingredients and Chill the Dough
The smoothest, most workable dough starts with room-temperature cream cheese and butter. When they are soft, they blend evenly with the cheddar into a creamy, cohesive dough with no lumps, which makes rolling neat balls so much easier. Grating your own cheese rather than using pre-shredded also helps, since freshly grated cheddar blends in more smoothly and gives the best flavor and texture.
The other key is to chill the dough before shaping. A rest in the refrigerator firms up the butter and cheese so the dough holds its shape in the oven instead of spreading and flattening, which keeps those pretty thumbprint wells intact. Roll the chilled dough into uniform balls and space them apart so they bake evenly, then press a shallow indentation in each and fill it without overfilling, since the jelly bubbles slightly as it bakes.
Tips for the Best Thumbprint Appetizers
- Use soft ingredients. Room-temperature cheese and butter blend smoothly.
- Grate your own cheese. It blends in better than pre-shredded.
- Chill the dough. This helps it hold its shape while baking.
- Roll uniform balls. Even sizes bake at the same rate.
- Space them apart. They spread slightly as they bake.
- Do not overfill. The jelly bubbles slightly in the oven.
- Press centers again. Deepen the wells if they puff up.
- Watch the edges. Pull them when the edges turn golden.
- Use sharp cheddar. It gives the most flavor.

Variations and Add Ins
These bites are wonderfully easy to adapt. Here are a few simple ways to make these thumbprint appetizers your own.
- Switch the cheese. Try Monterey Jack, Gouda, or pepper jack.
- Make it milder. Use sweet pepper jelly instead of hot.
- Try other jellies. Apricot, fig, or raspberry preserves work too.
- Add heat. Mix a pinch of cayenne into the dough.
- Add herbs. Fresh rosemary or thyme in the dough.
- Make them mini. Smaller bites for cocktail parties.
- Add a savory jam. Onion jam is a lovely swap.
- Garnish them. A sprinkle of fresh thyme or parsley.
- Serve with a dip. Ranch or garlic aioli for dunking.
How to Store and Make Ahead
These thumbprint appetizers are wonderful for making ahead, which makes them a relaxed choice for entertaining. You can prepare the dough up to a couple of days in advance, wrap it tightly, and keep it in the refrigerator until you are ready to shape and bake. You can even shape and fill the dough balls ahead, then bake them fresh right before serving for that just-baked warmth.
For longer storage, the unbaked dough balls freeze beautifully. Shape them, freeze them on a tray until solid, then transfer them to a freezer bag. When you are ready, you can bake them straight from frozen, adding a few extra minutes so they come out golden and warm in the center.
Store any baked leftovers in an airtight container in the refrigerator, where they keep well for a few days. To bring back that fresh-baked texture, warm them in the oven for a few minutes rather than the microwave, which can soften them. They are lovely served warm or at room temperature.

Serving Suggestions for Thumbprint Appetizers
These thumbprint appetizers are a party favorite, which makes them a natural fit for any gathering. Their bite-sized, savory-sweet form is perfect for grazing, sitting beautifully on an appetizer spread alongside other finger foods at parties, game nights, and holidays.
They are just as lovely as part of a larger spread or a relaxed cocktail hour. Arrange them on a platter or wooden board garnished with fresh herbs, set them out next to fresh veggies and crackers, or add them to a charcuterie board where their jewel-like centers always draw attention.
- On a party spread. A savory-sweet addition to the table.
- On a charcuterie board. A colorful pop among the cheeses.
- With fresh veggies. A nice contrast to the rich cheese.
- At a cocktail hour. An elegant, bite-sized treat.
- On a holiday table. Festive jewel-toned centers.
Frequently Asked Questions
What are cheesy thumbprint appetizers?
They are bite-sized savory appetizers made from a buttery cheddar dough, rolled into balls, pressed with a thumbprint, and filled with hot pepper jelly. They are a savory twist on the classic thumbprint cookie.
Why chill the dough?
Chilling firms up the butter and cheese so the dough holds its shape in the oven instead of spreading and flattening. This keeps the thumbprint wells intact for a pretty presentation.
Can I make them ahead?
Yes. Make the dough up to a couple of days ahead, or shape and freeze the unbaked balls. Bake fresh before serving, adding a few extra minutes if baking from frozen.
What cheese works best?
Sharp cheddar gives the most flavor, and grating your own melts and blends better than pre-shredded. You can also try Monterey Jack, Gouda, or pepper jack for a different twist.
Can I make them less spicy?
Absolutely. Use a sweet pepper jelly instead of hot, or swap in apricot, fig, or raspberry preserves for a milder, sweeter filling. You control the heat with the jelly you choose.
How full should I fill the thumbprints?
Add just a small spoonful, about half a teaspoon, to each well. Overfilling causes the jelly to bubble over as it bakes, so a little goes a long way for a neat, glossy center.
Should I serve them warm or at room temperature?
Either works beautifully. They are wonderful warm from the oven when the cheese is at its softest, but they also hold their flavor and texture nicely at room temperature on a party platter.
Why is my dough too sticky?
If the dough feels too soft or sticky, add a little more flour and chill it longer. Make sure the butter is soft but not melted, since melted butter makes the dough greasy.
How do I reheat leftovers?
Warm them in the oven for a few minutes to bring back the fresh-baked texture. Avoid the microwave, which can soften them rather than keeping that lightly crisp edge.
How long do they keep?
They keep for a few days in an airtight container in the refrigerator. Warm them in the oven before serving to refresh the texture and bring back that just-baked taste.
A Savory, Sweet, and Spicy Favorite
Rich, cheesy, and just a touch sweet and spicy, these thumbprint appetizers are the kind of bite that disappears fast at any gathering. They are easy to make, endlessly adaptable, and simple to prep ahead, making them a perfect choice for parties, game nights, and holidays alike.
If you love fun, cheesy finger foods, try another favorite like our jalapeno popper balls next. However you fill them, we hope these thumbprint appetizers bring a little savory, sweet, and spicy fun to your table.
Results vary by ingredients, equipment, and cooking conditions. Always taste and adjust as you go.
Cheesy Thumbprint Appetizers with Hot Pepper Jelly
Ingredients
Equipment
Method
- In a large mixing bowl, combine the softened cream cheese and butter. Beat with a hand mixer until smooth and creamy.
- Add the shredded cheddar cheese and mix until fully incorporated.
- Gradually add the flour, salt, and garlic powder if using. Mix just until the dough comes together.
- Cover the dough with plastic wrap and refrigerate for at least 30 minutes.
- Preheat the oven to 375 F. Line a baking sheet with parchment paper or a silicone baking mat.
- Scoop the dough into 1-inch balls, roll smooth, and place them 2 inches apart on the prepared baking sheet.
- Press a small indentation into the center of each dough ball using your thumb or the back of a teaspoon.
- Fill each indentation with about 1/2 teaspoon of hot pepper jelly.
- Bake for 13 to 15 minutes, or until the edges are golden brown and the cheese is lightly crispy.
- Cool on the baking sheet for 5 minutes, then transfer to a wire rack. Garnish with fresh thyme or parsley if desired and serve warm or at room temperature.
Nutrition
Tried this recipe?
Let us know how it was!Enjoyed the recipe? Share it!

Kitchen Essentials We Recommend
Tools that make cooking easier — tried, tested, and loved.


As an Amazon Associate we earn from qualifying purchases.
Got a recipe the world should try?
Share your favorite family recipe or national dish with food lovers in 100+ countries.
Submit Your Recipe")