What Makes This Cannoli Cookies Recipe So Special
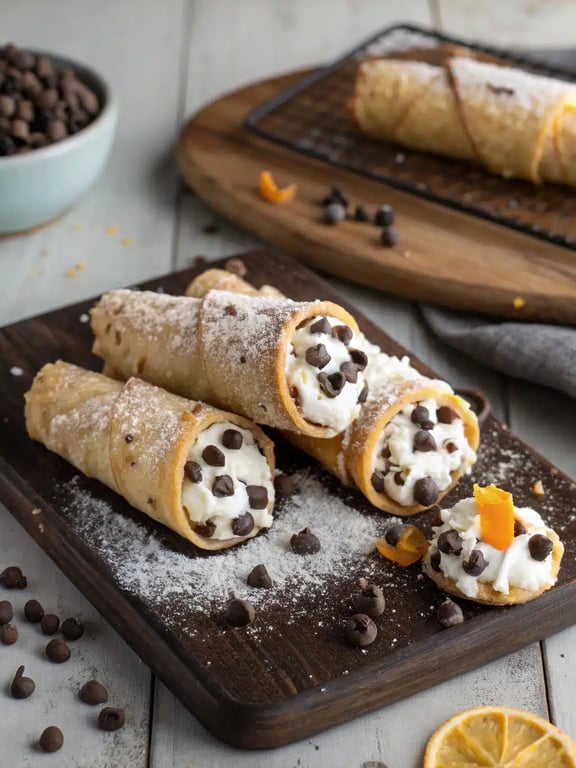
Crunchy, rich, and impossible to resist, this cannoli cookies recipe delivers the iconic flavors of a classic Italian pastry in a simple, handheld cookie form. We’re talking about tender, buttery cannoli shell cookies sandwiching a sweet, creamy ricotta filling dotted with chocolate and bright candied citrus. It’s the kind of treat that disappears from a holiday tray or turns an ordinary afternoon into something special. If you’ve ever wondered how to capture that authentic cannoli taste at home, you’ve found your perfect guide.
During our testing, we learned that the secret to perfect Italian cannoli cookies lies in two things: thoroughly draining the ricotta and giving the cannoli cookie dough a proper chill. That extra step of letting the dough firm up makes it so much easier to roll and cut, leading to beautifully uniform cookies. Trust us, taking that hour for the dough to rest is worth it for the final texture. You’re going to love how these elegant cannoli cream cookies come together!
This post may contain affiliate recommendations. Please see our disclosure policy.
What You’ll Find in This Article
Ingredients for This Cannoli Cookies Recipe
Here’s everything you’ll need to make these delightful Italian cannoli cookies. We recommend using room-temperature butter and egg for the smoothest cannoli cookie dough, and be sure your ricotta is well-drained for the perfect cannoli filling recipe consistency.
- 1 cup unsalted butter, at room temperature
- 1 cup granulated sugar
- 1 large egg, at room temperature
- 1 teaspoon pure vanilla extract
- 2 ½ cups all-purpose flour
- ½ teaspoon baking powder
- ¼ teaspoon salt
- 1 cup whole milk ricotta cheese, well-drained
- 1 cup powdered sugar, plus more for dusting
- ½ cup mini semi-sweet chocolate chips
- ¼ cup finely chopped candied orange peel or citron

Cook Time for Cannoli Cream Cookies
We know your time is precious, so we’ve broken down the timeline for this cannoli cookies recipe. The hands-on work is quite simple, but remember to account for chilling time for both the dough and the filling—it’s what ensures the best texture for your cannoli cream cookies.
- Prep Time: 25 minutes (plus 1 hour chilling)
- Cook Time: 12 minutes per batch
- Total Time: About 1 hour 45 minutes
How to Make Cannoli Cookies
Follow these steps to create your own batch of irresistible Italian cannoli cookies. We’ve included our team’s tested tips along the way to guarantee success.
Step 1: Make the Dough
In a large bowl, use an electric mixer on medium speed to cream together the softened butter and granulated sugar until light and fluffy, about 3 minutes. Beat in the egg and vanilla extract until fully combined.
Step 2: Combine Dry Ingredients
In a separate bowl, whisk together the flour, baking powder, and salt. Gradually add the dry ingredients to the butter mixture on low speed, mixing just until a soft dough forms and no dry streaks remain. Wrap the dough in plastic and chill for at least 1 hour to firm up.
Step 3: Prepare the Filling
While the dough chills, make the filling. In a medium bowl, stir together the drained ricotta, powdered sugar, chocolate chips, and chopped candied peel until well combined. Cover and refrigerate until ready to use.
Step 4: Roll, Cut, and Bake
Preheat your oven to 350°F and line baking sheets with parchment paper. On a lightly floured surface, roll out the chilled dough to about ⅛-inch thickness. Use a 3-inch round cookie cutter to cut out circles, re-rolling the scraps as needed. Place the dough circles about 1 inch apart on the prepared baking sheets. Bake for 10-12 minutes, or until the edges are just beginning to turn a light golden brown. Let the cookies cool on the sheets for 5 minutes before transferring them to a wire rack to cool completely.
Step 5: Assemble the Cookies
Once completely cool, spread or pipe about 1 tablespoon of the chilled ricotta filling onto the flat side of half the cookies. Gently press a second cookie on top to form a sandwich. Repeat with the remaining cookies and filling.
Step 6: Finish and Set
Lightly dust the tops of the assembled cookies with powdered sugar. For best texture, let the filled cookies set in the refrigerator for about 30 minutes before serving to allow the flavors to meld.

Pro Tips & Tasty Tweaks
After making this cannoli cookies recipe dozens of times, our team has gathered a few favorite insights to help you customize and perfect your batch.
- Flavor Swap: For a different twist, replace the candied citrus with an equal amount of finely chopped dried cherries or toasted pistachios.
- Timing Adjustment: If your kitchen is warm, don’t rush the dough chill. An extra 15-20 minutes can make rolling much easier.
- Texture Fix: If your filling seems a bit loose, stir in an extra tablespoon of powdered sugar to help it thicken and hold its shape better when piping.
- Storage Tip: Store assembled cookies in a single layer in the fridge for up to 3 days. The shells stay crisp, and the filling stays fresh.
Flavor & Texture Notes
When you get this cannoli cookies recipe just right, the balance is magical. You’ll be greeted by a tender, slightly crisp cookie that shatters delicately with each bite, giving way to a lush, creamy center. The cannoli filling recipe should be sweet but not cloying, with little bursts of rich chocolate and bright, chewy citrus that cut through the richness perfectly.
The doneness signal for the cannoli shell cookies is a light golden brown just around the very edges—the centers should remain pale. They’ll continue to firm up as they cool. We find that letting the filled cookies set in the fridge is the final, non-negotiable step. It allows the textures to harmonize, so you get a clean bite every time.
Variations & Substitutions
One of the joys of this cannoli cookies recipe is how easily you can make it your own. Here are a few team-approved twists that keep the spirit of the original while introducing new flavors.
For a nutty variation, fold a quarter cup of finely chopped toasted almonds or hazelnuts into the filling along with the chocolate chips. If you’re not a fan of candied peel, the zest of one orange or lemon added to the filling provides a wonderful, fresh citrus aroma. For a decadent touch, dip half of each assembled cookie in melted dark chocolate and let it set. And if you need a quick substitute for the candied citrus, an equal amount of high-quality chopped maraschino cherries (well-drained) offers a similar sweet-tart punch.
Make-Ahead & Scaling
We love a recipe that respects our busy schedules, and this cannoli cookies recipe is wonderfully flexible. You can easily break the work into stages, making it perfect for holiday prep or a relaxed weekend project. For instance, the cannoli cookie dough can be made, wrapped tightly, and refrigerated for up to 2 days before rolling and baking. Similarly, the cannoli filling recipe can be prepared and kept covered in the fridge for up to 24 hours, which actually allows the flavors to develop even more.
When it comes to scaling, this recipe doubles beautifully for a crowd. Just be sure to mix the dough in two separate batches to avoid overworking your mixer. If you’re baking a large quantity, rotate your baking sheets halfway through to ensure even browning on all your Italian cannoli cookies. One small trade-off when making components ahead is that the chilled dough might need a few minutes at room temperature to become pliable enough to roll without cracking—a small price for the convenience!
How to Serve cannoli cookies recipe
Presentation is part of the joy with these elegant treats. We like to arrange our cannoli cream cookies on a simple white platter or a vintage cake stand—the contrast really makes the powdered sugar dusting pop. For a casual gathering, we’ll often pile them high on a board alongside a pot of strong coffee; for something fancier, we plate them individually with a tiny espresso cup on the side.
The rich, creamy filling and crisp cannoli shell cookies pair wonderfully with bitter or bright beverages. A shot of espresso or a cup of black coffee cuts through the sweetness perfectly. For a non-caffeinated option, a glass of cold milk or a sparkling citrus-infused water provides a lovely, refreshing contrast.
One of our favorite team insights is that these cookies are a conversation starter. The moment you bring out a tray, someone always asks for the recipe. They truly feel like a special occasion, even on a regular Tuesday.
Mistakes to Avoid
Through all our testing, we’ve seen a few common hiccups that can happen with this cannoli cookies recipe. Fortunately, they’re all easy to avoid with a little know-how. If you’ve ever ended up with cookies that spread too much or a filling that seems runny, we’ve got you covered.
First, don’t skip chilling the dough. A warm, soft cannoli cookie dough will spread excessively in the oven, leading to thin, misshapen cookies instead of the tender, sturdy shells you want. Second, ensure your ricotta is thoroughly drained. Excess moisture is the main culprit behind a loose cannoli filling recipe. Let it drain in a fine-mesh sieve for at least 30 minutes, or even press it gently with a paper towel.
Another common misstep is overbaking. You’re looking for just the faintest hint of gold around the edges; the centers should remain pale. They’ll continue to firm up as they cool. Finally, resist the urge to assemble the cookies while they’re still warm. The heat will melt the filling and make the shells soggy. Patience here is key for perfect cannoli cream cookies.
By keeping these points in mind, you’ll sidestep the pitfalls and end up with a flawless batch of Italian cannoli cookies every single time.
How to Store cannoli cookies recipe
Proper storage is the secret to keeping that delightful texture intact. We learned through trial and error that the refrigerator is your best friend for these filled treats. Store assembled cannoli cookies in a single layer in an airtight container, with parchment paper between layers if you need to stack them. They’ll stay fresh and delicious for up to 3 days this way.
If you want to prep further in advance, you can freeze the components separately. The baked and completely cooled cannoli shell cookies freeze beautifully for up to a month in a freezer bag. The filling can also be frozen in a separate airtight container for up to two weeks. Thaw both in the refrigerator overnight before assembling. We don’t recommend freezing the fully assembled cookies, as the texture of the filling can become slightly grainy upon thawing.
Try This cannoli cookies recipe Yourself
We genuinely hope you give this cannoli cookies recipe a try in your own kitchen. There’s something incredibly satisfying about creating these classic flavors from scratch and seeing the delight on your family’s or guests’ faces. This project is a wonderful way to bring a taste of tradition into your home, and we’re confident our tested steps will guide you to success.
Remember, baking is as much about the process as the result. Don’t stress if your first few cookies aren’t perfectly round—the taste is what truly matters. We’d love to hear how your batch turns out. Share your experience, your twists, and your proud moments. Happy baking!
Cannoli Cookies
Ingredients
Equipment
Method
- In a large bowl, use an electric mixer on medium speed to cream together the softened butter and granulated sugar until light and fluffy, about 3 minutes. Beat in the egg and vanilla extract until fully combined.
- In a separate bowl, whisk together the flour, baking powder, and salt. Gradually add the dry ingredients to the butter mixture on low speed, mixing just until a soft dough forms and no dry streaks remain. Wrap the dough in plastic and chill for at least 1 hour to firm up.
- While the dough chills, make the filling. In a medium bowl, stir together the drained ricotta, powdered sugar, chocolate chips, and chopped candied peel until well combined. Cover and refrigerate until ready to use.
- Preheat your oven to 350°F and line baking sheets with parchment paper. On a lightly floured surface, roll out the chilled dough to about ⅛-inch thickness. Use a 3-inch round cookie cutter to cut out circles, re-rolling the scraps as needed. Place the dough circles about 1 inch apart on the prepared baking sheets. Bake for 10-12 minutes, or until the edges are just beginning to turn a light golden brown. Let the cookies cool on the sheets for 5 minutes before transferring them to a wire rack to cool completely.
- Once completely cool, spread or pipe about 1 tablespoon of the chilled ricotta filling onto the flat side of half the cookies. Gently press a second cookie on top to form a sandwich. Repeat with the remaining cookies and filling.
- Lightly dust the tops of the assembled cookies with powdered sugar. For best texture, let the filled cookies set in the refrigerator for about 30 minutes before serving to allow the flavors to meld.
Nutrition
Notes
Tried this recipe?
Let us know how it was!Enjoyed the recipe? Share it!

Kitchen Essentials We Recommend
Tools that make cooking easier — tried, tested, and loved.


As an Amazon Associate we earn from qualifying purchases.
Got a recipe the world should try?
Share your favorite family recipe or national dish with food lovers in 100+ countries.
Submit Your RecipeFrequently Asked Questions
Can I make the cannoli cookie dough ahead of time?
Absolutely. The dough for this cannoli cookies recipe can be wrapped tightly and refrigerated for up to 2 days. If it becomes too firm, let it sit at room temperature for about 10 minutes before rolling to prevent cracking.
How do I prevent my cannoli cream cookies from getting soggy?
The key is to ensure both the cannoli shell cookies and the ricotta filling are completely cool before assembling. Also, store the assembled cookies in the refrigerator, which helps the filling set and maintains the shell’s crispness.
What can I use instead of candied citrus in the filling?
Finely chopped dried cherries, toasted pistachios, or even a bit of fresh orange zest are excellent alternatives that keep the spirit of the classic cannoli filling recipe alive with a different flavor profile.
Can I pipe the filling instead of spreading it?
Yes, piping gives a very professional look. Use a piping bag fitted with a large round tip. If your filling seems too soft to pipe, chill it for another 15-20 minutes or stir in an extra tablespoon of powdered sugar to thicken it slightly.
Conclusion
We’re so glad you joined us to explore this delightful cannoli cookies recipe. It’s a project that fills your kitchen with wonderful aromas and ends with a tray of truly special, handheld treats. Whether you’re making them for a holiday cookie exchange or just to brighten a regular week, the process is rewarding and the results are always met with smiles. Remember to take your time, enjoy each step, and don’t forget that final chill for the perfect texture. We can’t wait for you to experience the joy of baking and sharing these classic Italian cannoli cookies. Give it a try soon—you’ve got this!
")