What Makes Baked Salmon Sushi So Special
With just a handful of simple ingredients, this baked salmon sushi delivers a perfect harmony of warm, flaky fish, tangy seasoned rice, and a savory-sweet glaze, all wrapped in a crisp sheet of nori. It’s the ultimate fusion of comforting baked flavors and the elegant, handheld appeal of a classic salmon sushi recipe. We love it because it feels like a special occasion dish, yet it’s surprisingly approachable for a weeknight dinner or impressive appetizer.
During our testing, we discovered a key trick that makes all the difference: letting the hot, seasoned rice cool completely before mixing in the salmon. This prevents the fish from overcooking and keeps the texture of your baked salmon roll perfectly distinct. Trust us, taking that extra few minutes to fan the rice is a game-changer for texture. You’re going to love how simple and satisfying this salmon sushi bake method truly is!
This post may contain affiliate recommendations. Please see our disclosure policy.
What You’ll Find in This Article
Ingredients for Baked Salmon Sushi
Here’s everything you’ll need to create this flavorful baked sushi salmon roll. We recommend gathering all your ingredients before you start—it makes the process so smooth!
- 1 pound salmon fillet, skin removed
- 1 cup sushi rice
- 1 1/4 cups water
- 2 tablespoons rice vinegar
- 1 tablespoon granulated sugar
- 1 teaspoon kosher salt
- 1 sheet nori seaweed
- 2 tablespoons mayonnaise
- 1 tablespoon soy sauce
- 1 teaspoon toasted sesame oil
- 1/2 teaspoon sriracha sauce
- 1 tablespoon toasted sesame seeds
- 1 green onion, thinly sliced

Cook Time for Baked Salmon Sushi
One of the best parts about this baked salmon sushi recipe is how the timing works out. While the oven preheats and the salmon bakes, you can prepare the rice and other components. Here’s our team’s breakdown of the total time commitment:
- Prep Time: 20 minutes
- Cook Time: 20 minutes (mostly hands-off)
- Total Time: About 40 minutes
You’ll have a gorgeous, restaurant-worthy baked salmon roll ready in well under an hour. The active time is minimal, making this a fantastic choice when you want something special without a huge time investment.
How to Make Baked Salmon Sushi
Follow these steps for a perfectly executed salmon sushi bake roll. We’ve broken it down to make the process clear and foolproof.
1. Cook and Season the Rice
Preheat your oven to 400°F. Rinse the sushi rice in a fine-mesh strainer until the water runs clear, then combine it with the 1 1/4 cups water in a saucepan. Bring to a boil, reduce heat to low, cover, and simmer for 18 minutes. Remove from heat and let stand, covered, for 10 minutes. While the rice cooks, stir together the rice vinegar, sugar, and salt in a small bowl until dissolved. Gently fold this mixture into the hot, cooked rice using a rice paddle or spatula, fanning the rice to help it cool to room temperature.

2. Bake the Glazed Salmon
Place the salmon fillet on a parchment-lined baking sheet. In a small bowl, mix the mayonnaise, soy sauce, sesame oil, and sriracha. Brush this glaze generously over the top of the salmon. Bake for 12-15 minutes, or until the salmon flakes easily with a fork.
3. Combine Salmon and Rice
Flake the baked salmon into large chunks. Gently fold the flaked salmon and half of the sliced green onion into the seasoned sushi rice until just combined.
4. Roll the Sushi
Lay the nori sheet shiny-side down on a bamboo sushi mat or piece of plastic wrap. With damp hands, spread the salmon-rice mixture evenly over the nori, leaving a 1-inch border at the top edge. Starting from the bottom, use the mat to tightly roll the sushi into a cylinder, pressing firmly as you go. Let the roll rest seam-side down for a minute to seal.
5. Slice and Garnish
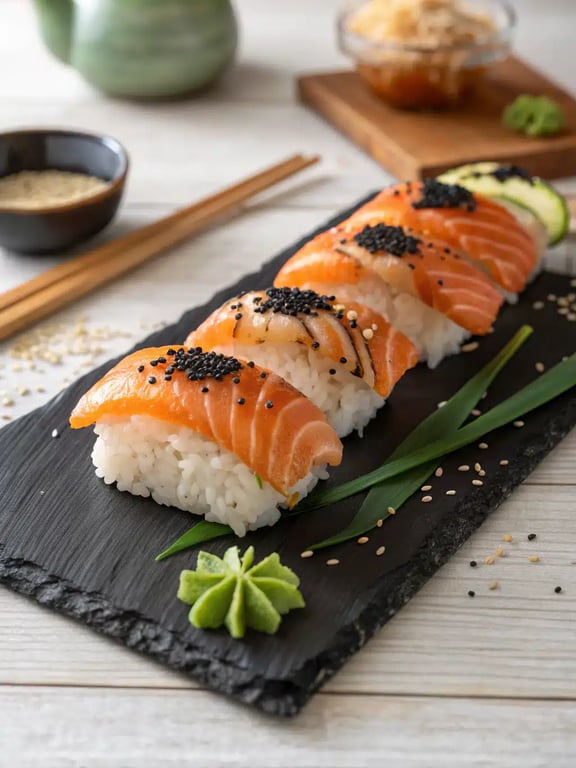
Using a very sharp, wet knife, slice the roll into 8 even pieces. Wipe the knife clean between cuts for neat slices. Arrange the pieces on a plate, sprinkle with toasted sesame seeds and the remaining green onion, and serve immediately.

Pro Tips & Tasty Tweaks
After making this baked salmon sushi dozens of times, our team has gathered some favorite insights to help you nail it on the first try.
- Flavor Swap: For a different twist, try adding a teaspoon of grated ginger or a sprinkle of furikake to the rice mixture.
- Timing Adjustment: If your salmon fillet is particularly thick, add 2-3 minutes to the bake time. Conversely, a thin fillet might be done closer to 10 minutes.
- Prep Fix: To prevent sticky hands when spreading the rice, keep a small bowl of water with a splash of vinegar nearby to re-dampen your fingers.
- Storage Tip: This baked salmon roll is best enjoyed fresh, but you can store leftovers in an airtight container in the fridge for up to a day. The nori will soften, but the flavor will still be delicious.
Flavor & Texture Notes
When you take a bite of this baked salmon sushi, you can expect a wonderful contrast of textures and a deeply satisfying flavor profile. The rice should be tender and slightly sticky, with a balanced sweet-tangy note from the seasoning. The salmon will be moist and flaky, carrying the rich, umami-packed glaze that bakes right into it.
The nori adds a subtle briny flavor and a satisfying crispness that holds everything together. Finally, the toasted sesame seeds and fresh green onion provide the perfect finishing crunch and brightness. Essentially, you get all the comforting warmth of a salmon sushi bake with the elegant structure of traditional sushi—a true best-of-both-worlds experience.
Variations & Substitutions
We love this recipe as written, but part of the fun of cooking is making it your own. Here are a few team-approved twists and swaps for your next baked sushi salmon adventure.
- Citrus Zest: Add a teaspoon of lemon or lime zest to the mayonnaise glaze for a bright, fresh kick that cuts through the richness beautifully.
- Spice Level: Adjust the heat to your liking. Use more sriracha in the glaze, or add a pinch of red pepper flakes to the rice mixture.
- Herbaceous Note: Fold in finely chopped cilantro or dill along with the green onion for an herby flavor dimension.
- Rice Alternative: While sushi rice is ideal for its stickiness, you can use short-grain brown rice for a whole-grain option. Just note the texture will be a bit more chewy and the rolls may be less tight.
- Creamy Twist: For extra creaminess, mix a tablespoon of softened cream cheese into the salmon and rice filling before rolling.
How to Serve Baked Salmon Sushi
We love how versatile this baked salmon roll is—it can be the star of a casual dinner or the elegant centerpiece of a gathering. During one of our team tastings, we realized it’s just as perfect for a relaxed movie night as it is for a fancy appetizer spread. The key is to keep the accompaniments simple and fresh to complement the rich, savory flavors of the salmon sushi bake.
For a complete meal, we often serve it with a light miso soup and a simple cucumber salad dressed with rice vinegar. If you’re hosting, arrange the slices on a beautiful platter with pickled ginger and extra soy sauce for dipping. A crisp, cold sparkling water with a squeeze of lime makes a wonderfully refreshing drink pairing that doesn’t compete with the dish’s delicate flavors.

Our favorite little trick? We always set out a small dish of toasted sesame seeds and extra sliced green onions so everyone can add their own final crunch. It makes the whole experience feel interactive and special.
Mistakes to Avoid
We’ve made our share of mistakes in the kitchen so you don’t have to! Here are the most common pitfalls we’ve encountered with this baked salmon sushi recipe and exactly how to sidestep them for perfect results every time.
Using Hot Rice: If you’ve ever ended up with a mushy filling, the rice was likely too warm when mixed. Always fan the seasoned rice until it’s truly at room temperature before adding the salmon. This keeps the texture of your baked sushi salmon distinct and perfect.
Overbaking the Salmon: A dry, overcooked salmon fillet is the quickest way to compromise your roll. Remember, the salmon continues to cook slightly after it comes out of the oven. Pull it when it just begins to flake easily—it should still look moist and glossy.
Rolling Too Loosely: A loose roll will fall apart when you slice it. Use your bamboo mat to apply firm, even pressure as you roll. That initial tightness is what gives you those beautiful, neat slices of baked salmon roll.
Using a Dull Knife: Trying to slice with a dull knife will smash your beautiful roll. A sharp, wet knife is non-negotiable. Wipe it clean between each cut for the cleanest presentation.
Trust us, avoiding these simple missteps will make your salmon sushi recipe process smooth and the results absolutely stunning.
How to Store Baked Salmon Sushi
This baked salmon sushi is truly best enjoyed fresh, but we know life happens. Through our testing, we found the best ways to store it if you have leftovers or need to prep components ahead of time.
If you need to store assembled rolls, place them in a single layer in an airtight container. They’ll keep in the refrigerator for up to a day. Be aware that the nori will soften from the moisture in the rice and salmon, but the flavor will still be delicious. For longer-term storage, you can freeze the un-sliced roll tightly wrapped in plastic for up to a month. Thaw overnight in the fridge before slicing.
For make-ahead ease, you can prepare the glazed salmon and seasoned rice separately up to a day in advance. Store them in separate containers in the fridge, then bring the rice to room temperature and flake the salmon cold before combining and rolling. This method helps preserve the best possible texture for your salmon sushi bake.
Try This Baked Salmon Sushi Yourself
We genuinely hope you give this baked salmon sushi a try in your own kitchen. It’s one of those recipes that consistently impresses everyone at our table, from sushi novices to seasoned enthusiasts. There’s something so rewarding about creating such a beautiful, flavorful dish with your own hands.
Remember, the first time you make any salmon sushi recipe might feel a little new, but by the second roll, you’ll be a pro. We encourage you to gather your ingredients, put on some music, and enjoy the process. The combination of warm, flaky fish and cool, tangy rice is a experience worth creating.
Once you’ve mastered the basic baked salmon roll, feel free to play with the variations we mentioned earlier. Add a little extra sriracha, try a different herb, or make it a fun family activity where everyone builds their own mini roll. However you choose to enjoy it, we’re confident this dish will become a new favorite.
Baked Salmon Sushi
Ingredients
Equipment
Method
- Preheat oven to 400°F. Rinse sushi rice until water runs clear. Combine rice and water in a saucepan, bring to a boil, reduce heat to low, cover, and simmer for 18 minutes. Remove from heat and let stand, covered, for 10 minutes. In a small bowl, stir together rice vinegar, sugar, and salt until dissolved. Gently fold this mixture into the hot cooked rice, fanning the rice to help it cool to room temperature.
- Place salmon fillet on a parchment-lined baking sheet. In a small bowl, mix mayonnaise, soy sauce, sesame oil, and sriracha. Brush this glaze generously over the top of the salmon. Bake for 12-15 minutes, or until the salmon flakes easily with a fork.
- Flake the baked salmon into large chunks. Gently fold the flaked salmon and half of the sliced green onion into the cooled, seasoned sushi rice until just combined.
- Lay the nori sheet shiny-side down on a bamboo sushi mat or piece of plastic wrap. With damp hands, spread the salmon-rice mixture evenly over the nori, leaving a 1-inch border at the top edge. Starting from the bottom, use the mat to tightly roll the sushi into a cylinder, pressing firmly as you go. Let the roll rest seam-side down for a minute to seal.
- Using a very sharp, wet knife, slice the roll into 8 even pieces, wiping the knife clean between cuts. Arrange the pieces on a plate, sprinkle with toasted sesame seeds and the remaining green onion, and serve immediately.
Nutrition
Notes
Storage: Best enjoyed fresh. Leftover assembled rolls can be stored in an airtight container in the fridge for up to a day (nori will soften). For make-ahead, prepare rice and salmon separately and combine when cool.
Tried this recipe?
Let us know how it was!Enjoyed the recipe? Share it!

Kitchen Essentials We Recommend
Tools that make cooking easier — tried, tested, and loved.


As an Amazon Associate we earn from qualifying purchases.
Got a recipe the world should try?
Share your favorite family recipe or national dish with food lovers in 100+ countries.
Submit Your RecipeFrequently Asked Questions
Can I use a different type of rice for baked salmon sushi?
While sushi rice is ideal for its sticky texture, you can use short-grain brown rice for a whole-grain version. The roll may be a bit less tight and the texture more chewy, but it will still work for your baked sushi salmon creation.
How do I prevent the nori from getting soggy?
The key is to ensure your rice and salmon mixture is completely cool before spreading it on the nori sheet. Also, assemble and slice the baked salmon roll just before serving for the crispiest possible seaweed.
What’s the best way to reheat leftover baked salmon sushi?
We don’t recommend reheating the assembled slices, as it will make the nori very soft. If you have leftover components, gently reheat the flaked salmon separately in a microwave at low power and enjoy it over the cold rice for a delicious salmon sushi bake bowl.
Can I make this recipe without a sushi mat?
Absolutely! A sturdy piece of plastic wrap or even a clean kitchen towel can help you roll. Place your nori on top, use the wrap or towel to grip and tighten as you roll your baked salmon sushi, applying even pressure.
Conclusion
We truly believe this baked salmon sushi recipe is a wonderful bridge between comforting home cooking and the special occasion feel of sushi. It’s approachable enough for a Tuesday night yet impressive enough for guests. The warm, savory salmon paired with the tangy rice is a combination we keep coming back to again and again. We hope you’ll gather your ingredients and give it a try soon—you might just discover your new favorite way to enjoy a salmon sushi recipe. Happy cooking from our team to your kitchen!
")