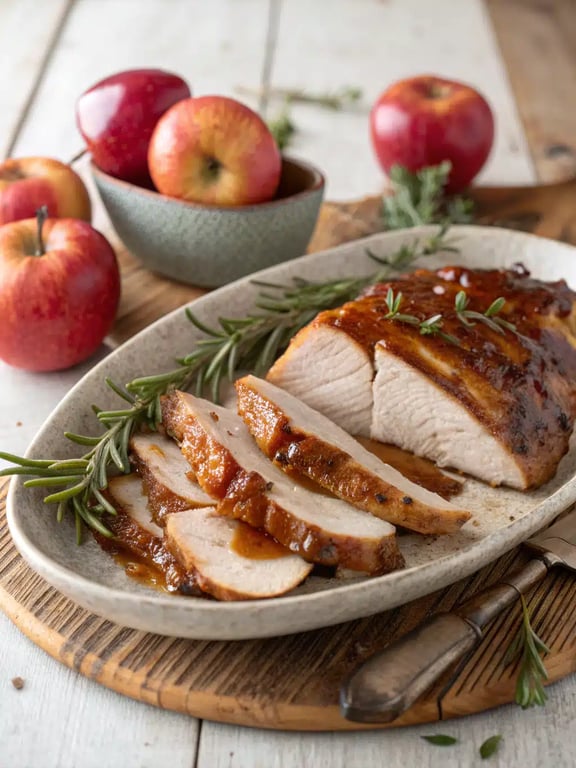
With just a handful of simple ingredients, this apple butter turkey delivers a stunning centerpiece that’s both deeply flavorful and incredibly juicy. The magic lies in a rich, spiced apple butter glaze that caramelizes into a gorgeous, mahogany crust, while sealing in moisture for the most tender meat.
What Makes apple butter turkey So Special
With just a handful of simple ingredients, this apple butter turkey delivers a stunning centerpiece that’s both deeply flavorful and incredibly juicy. The magic lies in a rich, spiced apple butter glaze that caramelizes into a gorgeous, mahogany crust, while sealing in moisture for the most tender meat. It’s the kind of showstopping holiday turkey dinner that fills your kitchen with the warm, comforting aromas of roasted apples, herbs, and sweet spices. During our testing, we found the key to an unforgettable bird is getting that luscious glaze under the skin, directly onto the breast meat. This simple trick, which we’ll walk you through, makes all the difference in flavor and moisture. You’re going to love how approachable this recipe is—it’s simpler than it looks and guaranteed to earn rave reviews!
This post may contain affiliate recommendations. Please see our disclosure policy.
What You’ll Find in This Article
Ingredients for apple butter turkey
Here’s everything you’ll need to create this beautiful and flavorful roast. We recommend using a good-quality apple butter for the best depth of flavor in your apple butter glaze.- 1 (12 to 14 pound) whole turkey, thawed if frozen
- 1 cup apple butter
- 1/4 cup unsalted butter, melted
- 1 large yellow onion, roughly chopped
- 2 stalks celery, roughly chopped
- 1 apple, cored and quartered
- 3 sprigs fresh rosemary
- 3 sprigs fresh thyme
- 1 teaspoon kosher salt
- 1/2 teaspoon freshly ground black pepper
- 1 cup low-sodium chicken broth
Cook Time for apple butter turkey
We know timing is everything for a stress-free holiday turkey dinner. Here’s our team’s tested timeline to help you plan your day. Remember, the most important tool is a reliable meat thermometer to ensure perfect doneness.- Prep Time: 20 minutes
- Cook Time: 3 to 3.5 hours
- Resting Time: 30 minutes
- Total Time: About 4 to 4.5 hours
How to Make apple butter turkey
Follow these straightforward steps for a perfectly glazed and juicy bird. We’ve broken it down to make your cooking process smooth and successful.Step 1: Prep the Oven and Turkey
Preheat your oven to 325°F. Remove the turkey from its packaging, pat it completely dry inside and out with paper towels, and place it on a rack set inside a large roasting pan.Step 2: Create the Glaze
In a small bowl, combine the apple butter and melted unsalted butter. Season the cavity of the turkey generously with about half of the salt and pepper.
Step 3: Stuff and Truss
Loosely stuff the turkey cavity with the chopped onion, celery, apple quarters, rosemary, and thyme sprigs. Tuck the wing tips under the body and tie the legs together with kitchen twine.Step 4: Apply the Glaze
Gently separate the skin from the breast meat by sliding your fingers underneath. Spread about one-third of the apple butter mixture directly onto the breast meat under the skin. Rub the remaining mixture all over the outside of the turkey, then season the exterior with the remaining salt and pepper.Step 5: Roast to Perfection
Pour the chicken broth into the bottom of the roasting pan. Roast the turkey, uncovered, for about 3 to 3 1/2 hours, or until a meat thermometer inserted into the thickest part of the thigh reads 165°F. Baste the turkey with pan juices every 45 minutes. If the skin browns too quickly, tent it loosely with aluminum foil.Step 6: Rest and Carve
Once cooked, carefully transfer the turkey to a large cutting board or platter, tent it loosely with foil, and let it rest for at least 30 minutes before carving. This allows the juices to redistribute for moist, tender meat.
Pro Tips & Tasty Tweaks
After making this recipe dozens of times, our team has gathered a few favorite insights to help you nail it on the first try and make it your own.- Flavor Swap: For a deeper, smokier note, add a teaspoon of smoked paprika to the apple butter glaze mixture.
- Timing Adjustment: If you’re short on time, this method also works beautifully as a turkey breast recipe. Simply adjust the roasting time for a smaller cut.
- Prep Fix: For the crispiest skin, ensure the turkey is patted completely dry before applying the glaze. A dry start is key for that perfect crackle.
- Storage Tip: Leftovers store beautifully for up to 4 days. We recommend keeping the carved meat and gravy separate for the best texture when reheating.
Flavor & Texture Notes
When you make this apple butter turkey, you can expect a beautiful harmony of sweet, savory, and herbal notes. The apple butter glaze caramelizes into a sticky, slightly sweet crust with a subtle tang, while the herbs and aromatics in the cavity perfume the meat from the inside out. Texture-wise, the skin should be taut and crisp, giving way to incredibly juicy and tender meat. A perfect slice will have a thin layer of that flavorful glaze clinging to the outside. The doneness signal is non-negotiable: use a thermometer. When it reads 165°F in the thickest part of the thigh, you’re guaranteed a safe and succulent holiday turkey dinner.Variations & Substitutions
We love how versatile this apple butter turkey recipe is! Whether you’re cooking for a smaller group or want to play with flavors, here are some of our team-approved tweaks. For a smaller gathering, this method translates perfectly to a bone-in turkey breast. Just reduce the roasting time significantly, and you’ll have an equally impressive main course. If you’re out of fresh herbs, using two teaspoons of dried poultry seasoning mixed into the glaze works wonderfully. To add a bright, fresh counterpoint to the rich glaze, stir the zest of one orange into the apple butter mixture before applying it. Finally, for a different aromatic base, try using a combination of leeks and fennel in the cavity instead of onion and celery for a slightly sweeter, more complex fragrance.How to Serve apple butter turkey
After all that beautiful roasting, it’s time for the best part: gathering everyone around the table. We love serving this apple butter turkey as the stunning centerpiece of a classic holiday turkey dinner. The sweet and savory notes in the glaze pair wonderfully with so many traditional sides, creating a meal that feels both special and deeply comforting. During our team tastings, we found that carving the turkey at the table adds a wonderful sense of occasion. The aroma that wafts up as you slice into that glazed crust is absolutely irresistible. For a truly memorable spread, we recommend starting with the rich pan drippings to make a simple gravy—it’s the perfect finishing touch for every plate. For side dishes, think of flavors that complement without competing. Creamy mashed potatoes or sweet potato casserole are ideal for soaking up that delicious gravy. A bright, crunchy salad with apples and walnuts or simple roasted Brussels sprouts provides a fresh contrast. And don’t forget a warm, buttery dinner roll to complete the feast! One of our favorite reader tips is to set out the carved meat on a warm platter. This little trick keeps everything cozy and inviting until the last bite is served. However you choose to present it, this apple butter turkey is sure to be the star of the show.
Mistakes to Avoid
We’ve tested this recipe countless times and, along the way, we’ve learned what pitfalls can trip up even experienced cooks. By sharing these common mistakes, we hope to help you achieve a perfectly juicy and flavorful apple butter turkey on your very first try. A frequent question we hear is, “Why did my turkey turn out dry?” The culprit is almost always overcooking. Relying on time alone or poking the turkey too often releases precious juices. The single most important tool for your holiday turkey dinner is a reliable meat thermometer. Insert it into the thickest part of the thigh, away from the bone, and pull the bird out the moment it hits 165°F. The carryover heat will do the rest. Another common error is applying the glaze too thickly or only on the surface. If you’ve ever wondered how to get maximum flavor into every bite, the secret is getting that apple butter glaze under the skin. Don’t be shy! Gently loosening the skin and spreading the mixture directly on the meat seasons it from the inside out and locks in incredible moisture. Finally, skipping the rest is a big mistake. We know it’s tempting to carve right into that gorgeous bird, but letting your apple butter turkey rest for a full 30 minutes is non-negotiable. This allows the frantic juices to settle back into the meat fibers. If you carve too soon, all those flavorful juices will end up on the cutting board instead of in your meal. By avoiding these simple missteps, you’re setting yourself up for a truly spectacular and stress-free main course that everyone will remember.How to Store apple butter turkey
Good news: the deliciousness doesn’t have to end with the holiday meal! This apple butter turkey stores beautifully, making fantastic leftovers for sandwiches, soups, and salads. We’ve found that a little planning during cleanup makes enjoying it later a breeze. Our team always recommends carving the leftover meat off the carcass and storing it separately from the bones and skin. Place the carved meat in an airtight container; it will keep in the refrigerator for up to 4 days. For longer storage, you can freeze the meat in freezer-safe bags or containers for up to 3 months. Don’t forget to label it with the date! The carcass itself is a treasure—don’t throw it away! It’s the perfect base for a rich, homemade turkey stock. Simply place it in a large pot with any leftover onion and celery from the cavity, cover with water, and simmer for a few hours. Strain, and you’ve got a flavorful broth ready for soup. When reheating, we suggest gently warming the turkey in a covered dish with a splash of broth to prevent it from drying out. A quick stint in the microwave works, but for the best texture, a low oven (around 300°F) is our preferred method. This way, your leftover turkey breast recipe tastes just as tender as it did on day one.Try This apple butter turkey Yourself
We genuinely hope you feel inspired to bring this apple butter turkey to your own table. It’s a recipe that has brought so much joy to our test kitchens and, more importantly, to the family dinners of countless readers. The combination of simple prep and spectacular results is what makes it a true keeper. If you’re looking for a simpler, hands-off approach for a smaller gathering, remember that this method works wonderfully as a slow cooker turkey breast. The gentle, moist heat is fantastic for locking in the flavors of the apple butter glaze. Just adjust the cooking time according to your appliance’s instructions. So, gather your ingredients, preheat your oven, and get ready to create a new holiday tradition. We’re confident this recipe will earn a permanent spot in your rotation. Don’t forget to take a photo of your beautiful bird—we’d love to see how it turns out!Apple Butter Turkey
With just a handful of simple ingredients, this apple butter turkey delivers a stunning centerpiece that’s both deeply flavorful and incredibly juicy. The magic lies in a rich, spiced apple butter glaze that caramelizes into a gorgeous, mahogany crust, while sealing in moisture for the most tender meat.
Ingredients
Equipment
Method
- Preheat your oven to 325°F. Remove the turkey from its packaging, pat it completely dry inside and out with paper towels, and place it on a rack set inside a large roasting pan.
- In a small bowl, combine the apple butter and melted unsalted butter. Season the cavity of the turkey generously with about half of the salt and pepper.
- Loosely stuff the turkey cavity with the chopped onion, celery, apple quarters, rosemary, and thyme sprigs. Tuck the wing tips under the body and tie the legs together with kitchen twine.
- Gently separate the skin from the breast meat by sliding your fingers underneath. Spread about one-third of the apple butter mixture directly onto the breast meat under the skin. Rub the remaining mixture all over the outside of the turkey, then season the exterior with the remaining salt and pepper.
- Pour the chicken broth into the bottom of the roasting pan. Roast the turkey, uncovered, for about 3 to 3 1/2 hours, or until a meat thermometer inserted into the thickest part of the thigh reads 165°F. Baste the turkey with pan juices every 45 minutes. If the skin browns too quickly, tent it loosely with aluminum foil.
- Once cooked, carefully transfer the turkey to a large cutting board or platter, tent it loosely with foil, and let it rest for at least 30 minutes before carving. This allows the juices to redistribute for moist, tender meat.
Nutrition
Notes
Pro Tips: For the crispiest skin, ensure the turkey is patted completely dry before applying the glaze. Leftovers store beautifully for up to 4 days. Keep carved meat and gravy separate for best texture when reheating.
Tried this recipe?
Let us know how it was!Enjoyed the recipe? Share it!

Kitchen Essentials We Recommend
Tools that make cooking easier — tried, tested, and loved.


As an Amazon Associate we earn from qualifying purchases.
Got a recipe the world should try?
Share your favorite family recipe or national dish with food lovers in 100+ countries.
Submit Your RecipeFrequently Asked Questions
Can I make apple butter turkey in a slow cooker?
Absolutely! For a smaller cut, this method adapts beautifully to a slow cooker turkey breast. Place your prepared breast in the cooker, add a bit of broth to the bottom, and cook on low until it reaches 165°F. The meat will be incredibly tender, though you won’t get the same crispy skin as a roasted bird.
How do I prevent the skin from burning?
The sugar in the apple butter can cause browning to happen quickly. If you notice the skin getting too dark during roasting, simply tent the turkey loosely with aluminum foil. This will shield it from direct heat and allow the inside to finish cooking without over-browning the exterior of your apple butter turkey.
What’s the best way to use the pan drippings?
Those drippings are liquid gold! After removing the turkey, skim off excess fat from the pan juices. Then, place the roasting pan on the stovetop over medium heat, scraping up all the flavorful browned bits. You can thicken it with a flour slurry for a classic gravy, which is the perfect accompaniment for your holiday turkey dinner.
")