Crunchy, savory, and impossible to resist, air fryer spring rolls deliver that perfect crispy texture without deep frying. These golden-brown appetizers feature a flavorful filling of seasoned turkey and fresh vegetables, perfect for snacks, parties, or family dinners.
What Makes air fryer spring rolls So Special
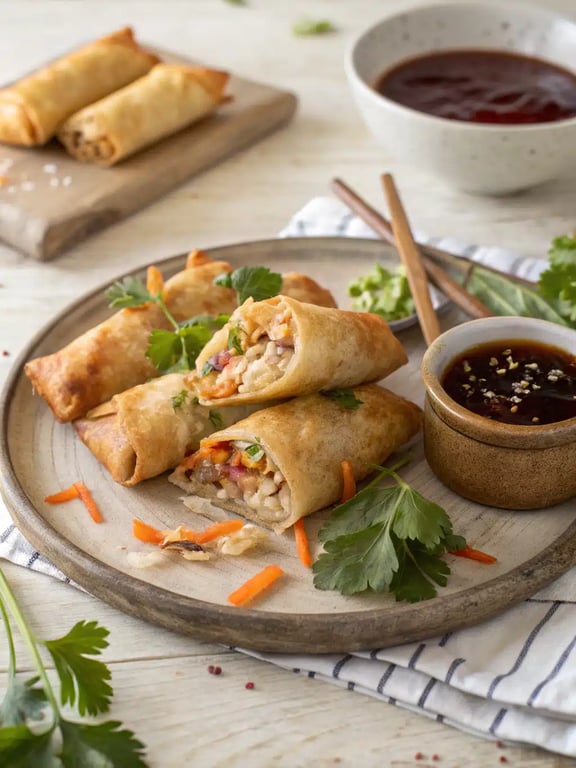
Crunchy, savory, and impossible to resist, air fryer spring rolls deliver that perfect crispy texture we all crave without the need for deep frying. We love how the delicate, golden-brown wrapper gives way to a flavorful, steaming-hot filling of seasoned meat and fresh, crunchy vegetables. They are the ultimate air fryer appetizers, perfect for a quick snack, a party platter, or a fun family dinner. During our testing, we found that letting the filling cool completely is the secret to a perfectly crisp wrapper. This simple step prevents the spring roll skins from getting soggy as you assemble them. You’re going to be amazed at how easy spring rolls can be to make right in your own kitchen!
This post may contain affiliate recommendations. Please see our disclosure policy.
What You’ll Find in This Article
Ingredients for air fryer spring rolls
Here’s everything you’ll need to create these delicious crispy spring rolls. We recommend having your ingredients prepped and ready to go for a smooth assembly process.- 1 package spring roll wrappers, thawed if frozen
- 8 ounces ground turkey
- 2 cups shredded green cabbage
- 1 large carrot, shredded
- 2 green onions, thinly sliced
- 2 cloves garlic, minced
- 1 tablespoon soy sauce
- 1 teaspoon grated fresh ginger
- 1 teaspoon sesame oil
- 1/4 teaspoon black pepper
- 2 tablespoons cornstarch mixed with 3 tablespoons water
- Cooking spray

Cook Time for crispy spring rolls
We know you’re eager to enjoy these, so here’s a quick timeline. From start to finish, you can have a batch of these delicious crispy spring rolls ready in under 30 minutes. The active prep time is about 15 minutes, and the air fryer works its magic in just 8-10 minutes.How to Make easy spring rolls
Follow these simple steps for perfect results every time. We’ve broken it down to make the process of creating these easy spring rolls completely foolproof.Step 1: Cook the Filling
In a large skillet over medium heat, cook the ground turkey until no longer pink, breaking it up with a spoon as it cooks. Drain any excess fat.Step 2: Sauté the Vegetables
Add the cabbage, carrot, green onions, and garlic to the skillet. Cook for 3-4 minutes until vegetables have softened slightly but still have some crunch. Stir in soy sauce, ginger, sesame oil, and black pepper. Remove from heat and let cool completely.
Step 3: Assemble the Spring Rolls
Lay one spring roll wrapper on a clean surface with a corner pointing toward you. Place 2 tablespoons of filling near the bottom corner. Fold the bottom corner over the filling, then fold in the sides. Brush the top corner with cornstarch slurry, then roll up tightly to seal.Step 4: Prepare for Air Frying
Lightly spray the air fryer basket with cooking spray. Arrange spring rolls in a single layer without touching. Spray the tops of the spring rolls lightly with cooking spray.
Step 5: Air Fry to Perfection
Air fry at 375°F for 8-10 minutes, flipping halfway through, until golden brown and crispy. Work in batches if needed to avoid overcrowding.Step 6: Rest and Serve
Let spring rolls rest for 2-3 minutes before serving to allow the filling to set and avoid burning your mouth.
Pro Tips & Tasty Tweaks
After making countless batches, our team has gathered a few insights to help you master these air fryer spring rolls. Here are our favorite tips for ensuring success.- Flavor Swap: For a different flavor profile, try adding a teaspoon of hoisin sauce or a dash of chili garlic sauce to the filling mixture.
- Timing Adjustment: Don’t skip the flip! Flipping halfway through is non-negotiable for that all-over, even crispiness we love.
- Prep Fix: If your wrappers tear, don’t worry. Simply use a second wrapper to double-wrap the filling for an extra-crispy result.
- Storage Tip: You can freeze unbaked spring rolls on a parchment-lined sheet, then transfer to a freezer bag. Cook from frozen, adding 2-3 extra minutes to the air fry time.
Flavor & Texture Notes
When you bite into one of these perfectly cooked air fryer spring rolls, you’ll experience a wonderful contrast of textures and flavors. The exterior should be a deep golden brown with a satisfying, shatteringly crisp shell that gives way to the savory, steaming filling inside. The interior is a harmonious blend of savory, well-seasoned turkey and the fresh, slight crunch of the cabbage and carrot. The ginger and garlic provide a warm, aromatic base note, while the soy sauce and sesame oil round out the flavor with their signature umami richness. You’ll know they’re done when they are uniformly golden and firm to the touch.Variations & Substitutions
One of the things we love about this recipe is how adaptable it is. Feel free to get creative and make these vegetable spring rolls your own based on what you have on hand or your personal taste preferences. For a spicier kick, mix in some finely chopped jalapeño or a spoonful of sriracha into the filling. If you’re out of green cabbage, napa cabbage or even thinly sliced Brussels sprouts work beautifully. You can also create delicious vegetable spring rolls by swapping the turkey for crumbled firm tofu or simply doubling down on shredded mushrooms for a hearty, meat-free version. Finally, try adding a handful of bean sprouts or water chestnuts for an extra layer of interesting texture.Make-Ahead & Scaling
We love how these air fryer spring rolls can be prepped ahead, making them a fantastic option for stress-free entertaining. You can prepare the filling up to two days in advance and store it in an airtight container in the refrigerator. For the best results, we recommend assembling the spring rolls just before you plan to cook them to ensure the wrappers stay crisp and don’t become soggy. When scaling this recipe for a larger crowd, simply double or triple the ingredients. Just be sure to cook the filling in batches to avoid steaming the vegetables, which can make them release too much water. For smaller batches, the recipe halves beautifully. Whether you’re making a dozen or three dozen, these crispy spring rolls are sure to be a hit.How to Serve air fryer spring rolls
We love serving these air fryer spring rolls straight from the basket while they’re still hot and incredibly crispy. They are the ultimate air fryer appetizers for any gathering. For a complete experience, pair them with a simple sweet chili dipping sauce or a classic soy-vinegar blend. We often serve them alongside a fresh, crunchy Asian slaw or a light cucumber salad to balance the savory filling. During our testing, we found that arranging them on a large platter with small bowls of different dipping sauces lets everyone customize their experience. These easy spring rolls also make a wonderful light meal when served with steamed jasmine rice.
Mistakes to Avoid
After testing many batches, we’ve identified a few common pitfalls that can affect your results. Fortunately, they’re all easy to avoid with a little know-how. For instance, if you’ve ever ended up with soggy spring rolls, the filling was probably still warm when you assembled them. First, never skip the step of letting the filling cool completely. A warm filling will steam the wrapper from the inside, preventing that perfect crispiness we all love. Second, avoid overfilling the wrappers. While it’s tempting to pack in more filling, this can cause the spring rolls to burst open during cooking. Third, don’t overcrowd the air fryer basket. Giving each spring roll some space allows for proper air circulation, which is essential for achieving that all-over golden brown color. Finally, be sure to use the cornstarch slurry as your “glue” instead of just water. The slurry creates a much stronger seal that holds up during the flipping process. Following these simple tips will ensure your vegetable spring rolls turn out perfectly every time.How to Store air fryer spring rolls
We know you’ll want to enjoy any leftovers, so here’s our tested method for storing and reheating. Allow any uneaten spring rolls to cool completely to room temperature before storing. Then, place them in a single layer in an airtight container, separating layers with parchment paper to prevent sticking. They will keep in the refrigerator for up to three days. When you’re ready to enjoy them again, reheat in the air fryer at 375°F for 3-4 minutes to restore their crisp texture. We don’t recommend microwaving, as it will make the wrappers soft and chewy. For longer storage, you can freeze the uncooked spring rolls on a baking sheet before transferring them to a freezer bag.Try This air fryer spring rolls Yourself
We genuinely hope you feel inspired to try making these delicious air fryer spring rolls in your own kitchen. They’re one of our favorite recipes to share because they consistently deliver restaurant-quality results with minimal effort. The combination of the crispy wrapper and savory filling is simply irresistible. Remember, the process becomes much quicker once you’ve assembled a few. We think you’ll be amazed at how simple it is to create these impressive air fryer appetizers. Whether you’re cooking for a party or just treating yourself, these easy spring rolls are sure to become a regular in your recipe rotation.Air Fryer Spring Rolls
Crunchy, savory, and impossible to resist, air fryer spring rolls deliver that perfect crispy texture without deep frying. These golden-brown appetizers feature a flavorful filling of seasoned turkey and fresh vegetables, perfect for snacks, parties, or family dinners.
Ingredients
Equipment
Method
- In a large skillet over medium heat, cook the ground turkey until no longer pink, breaking it up with a spoon as it cooks. Drain any excess fat.
- Add the cabbage, carrot, green onions, and garlic to the skillet. Cook for 3-4 minutes until vegetables have softened slightly but still have some crunch. Stir in soy sauce, ginger, sesame oil, and black pepper. Remove from heat and let cool completely.
- Lay one spring roll wrapper on a clean surface with a corner pointing toward you. Place 2 tablespoons of filling near the bottom corner. Fold the bottom corner over the filling, then fold in the sides. Brush the top corner with cornstarch slurry, then roll up tightly to seal.
- Lightly spray the air fryer basket with cooking spray. Arrange spring rolls in a single layer without touching. Spray the tops of the spring rolls lightly with cooking spray.
- Air fry at 375°F for 8-10 minutes, flipping halfway through, until golden brown and crispy. Work in batches if needed to avoid overcrowding.
- Let spring rolls rest for 2-3 minutes before serving to allow the filling to set and avoid burning your mouth.
Nutrition
Notes
Let the filling cool completely before assembling to prevent soggy wrappers. Don't overfill the wrappers to avoid bursting. For freezing, place unbaked spring rolls on a parchment-lined sheet, freeze solid, then transfer to freezer bags. Cook from frozen, adding 2-3 extra minutes.
Tried this recipe?
Let us know how it was!Enjoyed the recipe? Share it!

Kitchen Essentials We Recommend
Tools that make cooking easier — tried, tested, and loved.


As an Amazon Associate we earn from qualifying purchases.
Got a recipe the world should try?
Share your favorite family recipe or national dish with food lovers in 100+ countries.
Submit Your RecipeFrequently Asked Questions
Can I make spring rolls ahead of time and air fry later?
Absolutely! You can assemble the spring rolls ahead of time and refrigerate them for up to 4 hours before air frying. Just place them on a baking sheet lined with parchment paper, cover with plastic wrap, and keep them in the refrigerator. For longer storage, freeze them on a baking sheet until solid, then transfer to a freezer bag.
How do I prevent spring rolls from bursting in the air fryer?
The key is not overfilling them and ensuring a tight seal. Use only about 2 tablespoons of filling per wrapper, and make sure to brush the final corner generously with the cornstarch slurry before sealing. Also, avoid overpacking the air fryer basket, as crowded spring rolls can stick together and tear when separated.
Do I need to thaw frozen spring rolls before air frying?
No, you can cook frozen spring rolls directly in the air fryer. Just add 2-3 extra minutes to the cooking time and flip them halfway through. They might need a minute or two longer than fresh ones, but they’ll still turn out wonderfully crispy.
Can I use different vegetables in the filling?
Certainly! These vegetable spring rolls are very adaptable. We’ve successfully used shredded napa cabbage, bean sprouts, thinly sliced bell peppers, and even finely chopped water chestnuts for extra crunch. Just make sure to chop everything finely so the rolls wrap easily and cook evenly.
")