With just a handful of simple ingredients, this Italian herb cheese bread delivers a warm, savory loaf that’s soft and cheesy on the inside with a beautifully golden, buttery crust. The aroma of garlic and Italian seasoning that fills your kitchen is almost as rewarding as pulling that perfect loaf from the oven.
What Makes Italian Herb Cheese Bread So Special
With just a handful of simple ingredients, this Italian herb cheese bread delivers a warm, savory loaf that’s soft and cheesy on the inside with a beautifully golden, buttery crust. The aroma of garlic and Italian seasoning that fills your kitchen is almost as rewarding as pulling that perfect loaf from the oven. It’s the kind of easy herb bread that feels like a treat but is straightforward enough for any weeknight. During our testing, we found that the key to the best texture is patience during the rises. Letting the dough truly double in size creates those wonderful air pockets that make each slice so light. Trust us, the wait is worth it. You’re going to love how this homemade focaccia bread-style loaf turns out—it’s simpler than it looks!
This post may contain affiliate recommendations. Please see our disclosure policy.
What You’ll Find in This Article
Ingredients for Italian Herb Cheese Bread
Here’s everything you’ll need to make this irresistible cheese herb bread. We love that most of these are pantry staples, so you can whip this up without a special trip to the store.- 2 ¼ teaspoons active dry yeast (1 packet)
- 1 teaspoon granulated sugar
- 1 cup warm water (about 110°F)
- 3 cups all-purpose flour, plus more for dusting
- 1 teaspoon kosher salt
- 2 tablespoons olive oil, plus more for the bowl
- 1 cup shredded Italian cheese blend (like mozzarella and provolone)
- 1 tablespoon dried Italian seasoning
- 1 teaspoon garlic powder
- ½ teaspoon onion powder
- 2 tablespoons unsalted butter, melted
- Flaky sea salt for sprinkling (optional)

Cook Time for Easy Herb Bread
We know your time is precious, so we’ve broken down the timeline for this Italian herb bread. Most of the time is hands-off while the dough rises, giving you a chance to tidy up or relax. Here’s what you can expect:- Prep Time: 20 minutes
- Rise Time: 1 hour 30 minutes (total)
- Cook Time: 35 minutes
- Total Time: About 2 hours 25 minutes
How to Make Garlic Cheese Bread
Follow these steps for a perfect loaf every time. We’ve included our team’s little insights along the way to guide you.Step 1: Activate the Yeast
In a large bowl or the bowl of a stand mixer, combine the warm water, sugar, and yeast. Let it sit for 5-10 minutes until the mixture is foamy and bubbly, indicating the yeast is active.Step 2: Make the Dough
Add the flour, kosher salt, 2 tablespoons of olive oil, Italian seasoning, garlic powder, and onion powder to the yeast mixture. Mix with a dough hook or a wooden spoon until a shaggy dough forms. Knead by machine for 5-7 minutes, or by hand on a lightly floured surface for 8-10 minutes, until the dough is smooth, elastic, and slightly tacky.
Step 3: First Rise
Place the dough in a lightly oiled bowl, turning to coat. Cover with a damp kitchen towel or plastic wrap and let rise in a warm spot for about 1 hour, or until doubled in size.Step 4: Shape and Add Cheese
Gently punch down the risen dough and turn it out onto a lightly floured surface. Press and stretch it into a rough rectangle, about ½-inch thick. Sprinkle the shredded cheese evenly over the surface, then roll the dough tightly into a log, pinching the seam to seal. Shape the log into a round loaf or place it seam-side down into a greased 9×5-inch loaf pan.
Step 5: Second Rise and Preheat
Cover the shaped loaf loosely and let it rise again for 30-45 minutes until puffy. Meanwhile, preheat your oven to 375°F.Step 6: Bake and Finish
Brush the top of the risen loaf generously with the melted butter. Use a sharp knife to make a few shallow slashes on top for decoration and to allow steam to escape. Sprinkle with flaky sea salt if desired.Step 7: Bake to Perfection
Bake for 30-35 minutes, or until the bread is deeply golden brown, sounds hollow when tapped on the bottom, and the internal temperature reaches 190°F. If the top browns too quickly, tent it loosely with foil.Step 8: Cool and Slice
Let the bread cool in the pan for 10 minutes, then transfer it to a wire rack to cool completely before slicing. This allows the cheese to set and makes for cleaner slices.
Pro Tips & Tasty Tweaks
After making this Italian herb cheese bread countless times, we’ve gathered a few favorite tips to help you succeed and make it your own.- Flavor Swap: For a sharper bite, swap half the Italian cheese blend for freshly grated Parmesan or Asiago.
- Timing/Heat Adjustment: If your kitchen is cool, place the bowl of dough in a turned-off oven with the light on for a perfect, draft-free rise.
- Prep/Texture Fix: If your dough feels too sticky when kneading, add flour one tablespoon at a time. Conversely, if it’s too dry, add warm water a teaspoon at a time.
- Storage/Reheat Tip: To revive day-old bread, wrap it in foil and warm it in a 350°F oven for 10 minutes. For a crisp crust, unwrap it for the last few minutes.
Flavor & Texture Notes
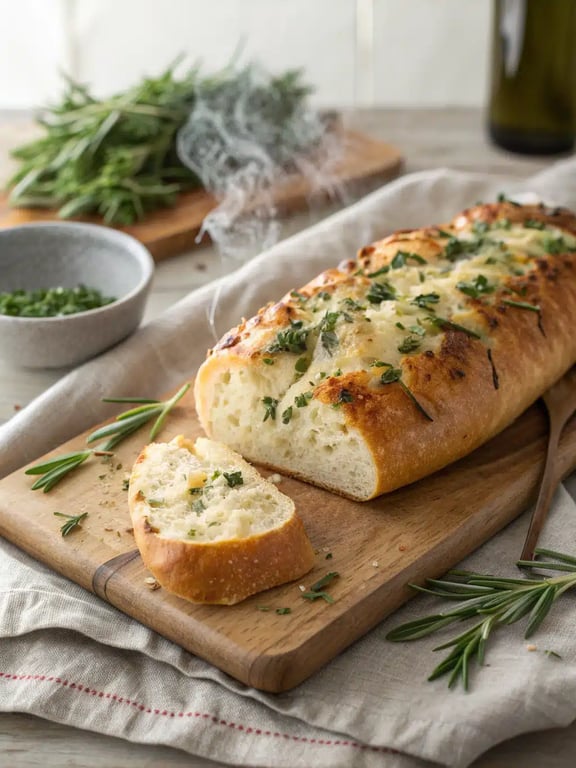
When you get this Italian herb cheese bread right, it’s a true symphony of savory flavors and satisfying textures. You can expect a soft, tender crumb that’s speckled with pockets of melted, gooey cheese. The crust should be a deep golden brown with a slight crispness that gives way to the soft interior. The aroma is unmistakably inviting, thanks to the garlic powder and dried herbs. As for doneness, we rely on three signals: a rich golden color, a hollow sound when tapped on the bottom, and that perfect internal temperature of 190°F. Letting it cool is crucial, as it allows the cheese to set so you get beautiful, clean slices of this homemade focaccia bread-inspired loaf.Variations & Substitutions
One of the joys of this recipe is how adaptable it is. Whether you want to tweak the flavors or use what you have on hand, here are some of our team’s favorite ways to mix things up while keeping this Italian herb bread delicious.- Herb Garden Fresh: Use 2 tablespoons of finely chopped fresh herbs (like rosemary, thyme, and oregano) in place of the dried Italian seasoning.
- Sun-Dried Tomato & Basil: Fold in ½ cup of chopped sun-dried tomatoes (oil-packed and drained) and 2 tablespoons of fresh chopped basil along with the cheese for a vibrant, tangy twist.
- Everything Bagel Style: Before the final rise, brush the loaf with an egg wash and sprinkle generously with everything bagel seasoning for a fantastic savory crunch.
- Flour Swap: For a slightly heartier texture, you can substitute up to 1 cup of the all-purpose flour with whole wheat flour. The rise might be a touch less dramatic, but the flavor is wonderful.
- Dairy-Free Option: Use your favorite plant-based shredded cheese and substitute the melted butter with olive oil or a vegan butter alternative for brushing.
Make-Ahead & Scaling
We love recipes that fit into real life, and this Italian herb cheese bread is wonderfully flexible. Whether you’re planning for a party or just want fresh bread on a busy weeknight, a little advance prep makes all the difference. Here’s how we manage timing and batches in our own kitchens. For make-ahead ease, you can prepare the dough through the first rise. After the dough has doubled, gently punch it down, wrap it tightly in plastic, and refrigerate for up to 24 hours. When you’re ready, let it sit at room temperature for 30 minutes before shaping, adding the cheese, and proceeding with the second rise. This method deepens the flavor of your easy herb bread beautifully. Scaling the recipe is straightforward. For a smaller loaf, halve all ingredients and use a 7×3-inch loaf pan, reducing the bake time by 5-10 minutes. To make two loaves, simply double everything. Use two standard loaf pans and rotate them on the oven rack halfway through baking to ensure even browning. Remember, the rise times will remain roughly the same regardless of batch size. A quick note on texture: bread made with refrigerated dough may have a slightly tighter crumb, but it will be just as delicious. And when reheating, a quick warm-up in the oven is key to restoring that fresh-from-the-oven feel without making the crust soggy.How to Serve Italian Herb Cheese Bread
Pulling a warm, fragrant loaf of garlic cheese bread from the oven is one of our favorite kitchen moments. The real joy, however, is sharing it. We’ve found this versatile bread shines in so many settings, from a simple family dinner to a casual gathering with friends. During our testing, we unanimously agreed that this bread is best served warm, when the cheese is still wonderfully soft. For a cozy meal, pair thick slices with a hearty bowl of soup or a fresh garden salad. It transforms a simple pasta night into something special, soaking up sauces beautifully. Think of it as your new favorite homemade focaccia bread for dipping into olive oil or a rich tomato bisque. For entertaining, we love to present the whole loaf on a wooden board, letting everyone tear off their own piece. It pairs wonderfully with a charcuterie spread or as part of an antipasto platter. A light, crisp sparkling water with lemon makes for a refreshing drink pairing that doesn’t overpower the savory herbs and cheese. One of our team’s favorite tricks is to use any leftovers (if there are any!) for next-day lunches. Slices make incredible grilled cheese sandwiches or a decadent base for open-faced turkey melts.Mistakes to Avoid
We’ve made our share of baking blunders so you don’t have to. After many test batches of this cheese herb bread, we’ve pinpointed the most common pitfalls. Avoiding these will guarantee your loaf turns out perfect every single time. First, using water that’s too hot is a yeast killer. If your water is hotter than 110°F, it can deactivate the yeast, leading to a dense loaf that doesn’t rise. Always use a thermometer, or test it on your wrist—it should feel warm, not hot. Conversely, if your kitchen is chilly, your rise will take longer. Be patient and look for that true doubling in size. Another frequent issue is adding too much flour during kneading. A slightly tacky dough is what you want; it leads to a softer crumb. If you keep adding flour to combat stickiness, you’ll end up with a dry, tough bread. Trust the process and knead until the dough is smooth and elastic, even if it sticks to your hands a little at first. Don’t skip the cooling step. We know it’s tempting to slice into that warm Italian herb bread right away, but cutting too soon lets the steam escape and can cause the loaf to become gummy. Letting it cool allows the cheese to set, giving you those beautiful, clean slices we all love. Finally, keep an eye on the oven. Oven temperatures can vary, so if your loaf is browning too quickly on top but still doughy inside, tent it with foil. Rely on the internal temperature of 190°F and the hollow sound when tapped for the most accurate doneness check. Remember, baking is a learning process. If your first attempt isn’t perfect, don’t worry. Each loaf teaches you something new, and the delicious results are always worth the effort.How to Store Italian Herb Cheese Bread
To keep your Italian herb cheese bread tasting its best, proper storage is key. We’ve tested various methods to find what works best for preserving that wonderful texture and flavor. From our experience, the best way to store this bread is at room temperature. Once completely cooled, wrap the loaf tightly in plastic wrap or aluminum foil, or place it in a bread bag. Stored this way, it will stay fresh for about 2 days. The crust will soften, which some of our team actually prefers for sandwiches! For longer storage, freezing is your friend. Wrap the cooled loaf (or individual slices) tightly in plastic wrap, then again in foil or a freezer bag. It will keep well for up to 3 months. To revive it, thaw at room temperature while still wrapped to prevent condensation, then warm it in a 350°F oven for 10-15 minutes. This method restores the crust’s crispness and makes the cheese wonderfully gooey again, just like a fresh batch of easy herb bread. Avoid storing bread in the refrigerator, as the cold temperature accelerates staling and can dry it out. The freezer is a much better option for maintaining quality. With these simple tips, you can enjoy your homemade creation for days to come.Try This Italian Herb Cheese Bread Yourself
We truly hope you feel inspired to bake this Italian herb cheese bread. There’s a special kind of satisfaction that comes from pulling a golden, cheesy, aromatic loaf from your own oven. It’s a recipe that feels impressive but is built on simple, reliable techniques. Whether you’re new to yeast breads or a seasoned baker, this recipe is a joyful one to master. The process of watching the dough rise, folding in the cheese, and smelling those herbs bake is as rewarding as the first bite. We think you’ll find this garlic cheese bread becomes a requested favorite in your home, just as it has in ours. So, gather your ingredients, clear a little counter space, and give it a try. Share it with someone you love, or savor it all yourself with a good book. Happy baking!Italian Herb Cheese Bread
With just a handful of simple ingredients, this Italian herb cheese bread delivers a warm, savory loaf that’s soft and cheesy on the inside with a beautifully golden, buttery crust. The aroma of garlic and Italian seasoning that fills your kitchen is almost as rewarding as pulling that perfect loaf from the oven.
Ingredients
Equipment
Method
- In a large bowl or the bowl of a stand mixer, combine the warm water, sugar, and yeast. Let it sit for 5-10 minutes until the mixture is foamy and bubbly, indicating the yeast is active.
- Add the flour, kosher salt, 2 tablespoons of olive oil, Italian seasoning, garlic powder, and onion powder to the yeast mixture. Mix with a dough hook or a wooden spoon until a shaggy dough forms. Knead by machine for 5-7 minutes, or by hand on a lightly floured surface for 8-10 minutes, until the dough is smooth, elastic, and slightly tacky.
- Place the dough in a lightly oiled bowl, turning to coat. Cover with a damp kitchen towel or plastic wrap and let rise in a warm spot for about 1 hour, or until doubled in size.
- Gently punch down the risen dough and turn it out onto a lightly floured surface. Press and stretch it into a rough rectangle, about ½-inch thick. Sprinkle the shredded cheese evenly over the surface, then roll the dough tightly into a log, pinching the seam to seal. Shape the log into a round loaf or place it seam-side down into a greased 9x5-inch loaf pan.
- Cover the shaped loaf loosely and let it rise again for 30-45 minutes until puffy. Meanwhile, preheat your oven to 375°F.
- Brush the top of the risen loaf generously with the melted butter. Use a sharp knife to make a few shallow slashes on top for decoration and to allow steam to escape. Sprinkle with flaky sea salt if desired.
- Bake for 30-35 minutes, or until the bread is deeply golden brown, sounds hollow when tapped on the bottom, and the internal temperature reaches 190°F. If the top browns too quickly, tent it loosely with foil.
- Let the bread cool in the pan for 10 minutes, then transfer it to a wire rack to cool completely before slicing. This allows the cheese to set and makes for cleaner slices.
Nutrition
Notes
Pro Tips: For a sharper bite, swap half the Italian cheese blend for Parmesan or Asiago. If your kitchen is cool, place the dough in a turned-off oven with the light on for the rise. To revive day-old bread, wrap in foil and warm in a 350°F oven for 10 minutes.
Storage: Store cooled loaf tightly wrapped at room temperature for 2 days. For longer storage, freeze for up to 3 months. Avoid refrigeration.
Tried this recipe?
Let us know how it was!Enjoyed the recipe? Share it!

Kitchen Essentials We Recommend
Tools that make cooking easier — tried, tested, and loved.


As an Amazon Associate we earn from qualifying purchases.
Got a recipe the world should try?
Share your favorite family recipe or national dish with food lovers in 100+ countries.
Submit Your RecipeFrequently Asked Questions
Can I use fresh yeast instead of dry yeast?
Absolutely. You can substitute one packet of active dry yeast with about 0.6 ounces (17 grams) of fresh cake yeast. Crumble it into the warm water with the sugar and proceed as directed. Fresh yeast is quite active, so you might notice a slightly faster rise.
How do I know when the bread is fully baked?
We rely on three signs: a deep golden-brown crust, a hollow sound when you tap the bottom of the loaf, and an internal temperature of 190°F when checked with an instant-read thermometer. The thermometer is the most reliable method to ensure your Italian herb cheese bread is perfectly baked through.
Why didn’t my bread rise very much?
This usually points to an issue with the yeast. The water may have been too hot, which kills it, or too cold, which slows it down. Ensure your water is around 110°F. Also, check the expiration date on your yeast and give it the full 5-10 minutes to become foamy before adding other ingredients.
Can I make this dough in a bread machine?
Yes, you can. Add the liquid ingredients and yeast to the pan first, followed by the dry ingredients. Select the dough cycle. Once the cycle is complete, remove the dough, shape it, add the cheese, let it have its second rise, and then bake as directed for your perfect homemade focaccia bread-style loaf.
")