Chocolate peanut butter protein bars became a staple in our kitchen after a morning that started in a frenzy. Chloe, my 8-year-old, couldn’t find her shoes, the dog had knocked over his food, and I hadn’t eaten a thing before my workout. That day, my mom Linda handed me a homemade bar she’d made the night before. It was rich, chocolatey, full of protein, and—miraculously—calming. Ever since, it’s been our go-to post-workout bite and Chloe’s favorite lunchbox treat. We make a batch every Sunday, so we always have something easy, filling, and just sweet enough. Let’s dive into why they work so well.

Table of Contents
Benefits of Chocolate Peanut Butter Protein Bars
These no bake bars are more than a quick treat—they’re a nourishing tool in your routine. Whether you’re powering through a workout or just trying to make it to pickup time without crashing, the right combination of protein, fiber, and healthy fats makes all the difference.
A Sweet Source of Strength
Each bar blends creamy peanut butter and flaxseed meal with your favorite protein powder. This combination provides steady energy without the crash, thanks to its balance of macros and natural sweetness. Instead of reaching for something processed, these give you a dose of strength disguised as dessert.
During our family’s shift toward protein-rich snacks, I noticed how much more focused and satisfied I felt between meals. My husband even started keeping one in the fridge at work, saying it beats the vending machine by miles.
Balanced Energy in Every Bite
The real magic comes from the ratio. Peanut butter delivers satisfying fats and protein, while flax adds fiber. The protein powder offers an extra boost, and the touch of dark chocolate on top gives it just enough richness to feel like a reward.
These bars became part of our weekly prep. We cut them into squares so Chloe can grab one after school and I can enjoy mine with a post-yoga iced coffee. You’ll love how full they keep you—without feeling heavy or overly sweet.
Chocolate Peanut Butter Protein Bars – No Bake, Healthy & Delicious
Ingredients
Equipment
Method
- In a medium bowl, mix peanut butter, honey, coconut oil, and vanilla until smooth. Stir in flaxseed meal and protein powder until dough forms.
- Line an 8×4 inch loaf pan with parchment. Press mixture evenly into the pan to form the base.
- Melt dark chocolate in a small saucepan over low heat. Pour over the peanut butter base and spread evenly.
- Chill in fridge for 30–60 minutes until set. Slice into bars or squares. Optionally sprinkle with sea salt.
Nutrition
Notes
Tried this recipe?
Let us know how it was!Enjoyed the recipe? Share it!

Kitchen Essentials We Recommend
Tools that make cooking easier — tried, tested, and loved.


As an Amazon Associate we earn from qualifying purchases.
Got a recipe the world should try?
Share your favorite family recipe or national dish with food lovers in 100+ countries.
Submit Your RecipeWhat You’ll Need to Make These Chocolate Peanut Butter Protein Bars
Before you even think about turning on the oven—don’t! These chocolate peanut butter protein bars come together without any baking at all. Everything stirs up in one bowl and sets beautifully in the fridge. The best part? You probably have most of the ingredients in your pantry already.
Here’s exactly what you’ll need:
| Ingredient | Amount |
|---|---|
| Natural creamy peanut butter (just peanuts + salt) | ¾ cup (192g) |
| Honey (or coconut palm syrup for vegan version) | ¼ cup (84g) |
| Melted coconut oil | 1 tablespoon |
| Vanilla extract | 1 teaspoon |
| Ground flaxseed meal | ⅓ cup (40g) |
| Vanilla or plain protein powder | ½ cup (40g) |
| 85% dark chocolate bar | 2.5 ounces |
| Coarse sea salt (optional, for topping) | A pinch |
Tip: You can also use Stevia – a natural sweetener with zero carbs.
How to Make Chocolate Peanut Butter Protein Bars – Step by Step
Step 1: Mix the base
Grab a medium mixing bowl. Add the peanut butter, honey, coconut oil, and vanilla. Stir until creamy and smooth. Now toss in your flaxseed meal and protein powder. The mixture will start to thicken—once it gets tough to stir, switch to using your hands to knead it into a dough-like consistency.
Step 2: Press and shape
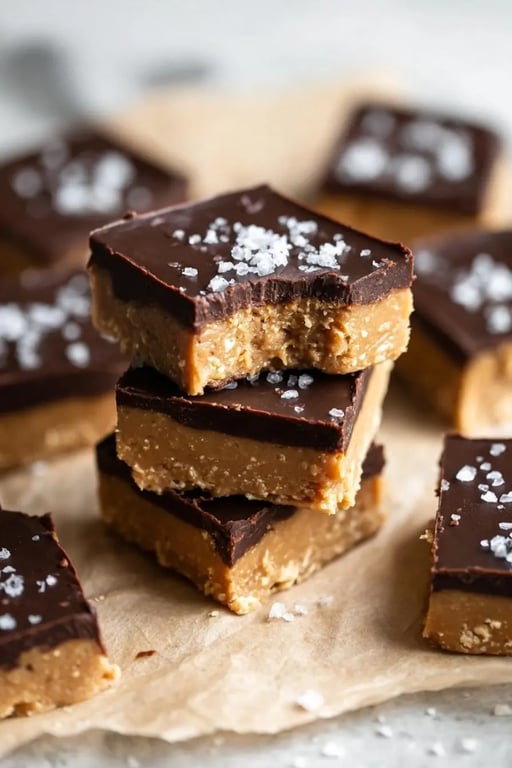
Line an 8×4 inch loaf pan with parchment paper. Scoop the peanut butter mixture into the pan and use your hands or a spatula to press it down firmly and evenly into all corners. This will be your protein bar base.
Step 3: Melt the chocolate
In a small saucepan over low heat, melt the dark chocolate until smooth and glossy. Pour it right over the peanut butter base, then gently tilt the pan so the chocolate spreads across the top.
Step 4: Chill and slice
Place the pan in the fridge for 30 minutes to 1 hour. Once firm, remove and slice into bars or squares—however you like them. A little sprinkle of coarse sea salt on top adds that final gourmet touch.

How These Chocolate Peanut Butter Protein Bars Support Your Protein Goals
These bars aren’t just a treat—they’re a smart way to meet your daily protein needs. Whether you’re heading to the gym, chasing after little ones, or need a snack between meetings, these bars work hard for you in the background.
Ideal Pre- or Post-Workout Snack
You know that moment right before a workout when you need fuel—but not too much? Or right after, when you need recovery support but don’t want to cook? That’s where these chocolate peanut butter protein bars come in. With clean protein and healthy fats, they help replenish energy, aid muscle repair, and fight off that post-workout crash. Plus, they’re light enough to enjoy before a session without weighing you down.
If you’re strength training or on a higher-protein meal plan, this kind of snack can help you stay consistent without boredom creeping in. They taste like dessert, but they’re built for performance.
Perfect for Kids and Adults Alike
One of the things I love most about these chocolate peanut butter protein bars is how kid-friendly they are—Chloe absolutely loves them. And I don’t worry, because they’re made with ingredients I trust. The texture is soft but firm, the flavor is like a healthy Reese’s, and they fit perfectly in a lunchbox or after-school snack bowl.
For adults, they work as a midday pick-me-up or even a late-night craving fix when you want something sweet without the regret. A balanced bite with protein, fiber, and just the right amount of chocolate? Yes, please. You might also enjoy these protein pancakes for an energizing breakfast option that pairs beautifully with your snack plan.

When you’re looking for a sugar alternative, Stevia is a wonderful option. I often recommend the Pure Organic Stevia Powder because it’s keto friendly, zero-calorie, and doesn’t carry that bitter aftertaste some sweeteners do. A little goes a long way, making it a pantry staple for anyone who loves healthier baking.
With each purchase via our Amazon link, you support this blog – at no extra cost to you.
Storage Tips & Smart Meal Prep for Chocolate Peanut Butter Protein Bars
One of the best things about these chocolate peanut butter protein bars is how well they fit into real life. They’re made to be stored, stashed, and savored whenever you need a protein-rich treat that doesn’t require any effort.
Store Them Like a Pro
Once your bars are chilled and sliced, you’ve got two great options:
- In the fridge: Keep them in an airtight container and they’ll stay fresh for up to two weeks. I like placing parchment paper between layers so they don’t stick.
- In the freezer: Want to stock up? These bars freeze beautifully. Just pop them into a freezer-safe bag or container, and they’ll keep for a full month. Let them sit at room temp for 5–10 minutes before eating for the perfect texture.
Whether you’re packing them for school snacks, gym bags, or late-night cravings, they’re ready when you are.

Make-Ahead Friendly for Busy Days
Life gets hectic—and that’s why I love making these bars ahead on Sundays. You can double the batch, slice them into smaller bites for portion control, or even roll the mixture into balls for a different snack style. Want to mix things up? Try adding mini chocolate chips, chopped almonds, or shredded coconut to the base layer before chilling.
If you’re already a fan of make-ahead recipes like our low carb cottage cheese snack bowls, these bars will fit right into your weekly prep routine.

FAQ – Chocolate Peanut Butter Protein Bars
What to mix with chocolate peanut butter protein powder?
If you have chocolate peanut butter protein powder on hand, it blends beautifully into smoothies with frozen banana, almond milk, or even a spoon of Greek yogurt. But in this recipe, we use it right in the dough base to boost protein and flavor without any chalky aftertaste. It adds that rich, chocolatey depth and makes the bars even more satisfying.
Is it cheaper to make your own protein bars?
Yes, making your own chocolate peanut butter protein bars is usually much more cost-effective than buying store-bought ones. You’re using pantry staples like peanut butter, flaxseed, and protein powder, and skipping pricey fillers and preservatives. One batch here makes 10 generous bars—saving you money while giving you total control over ingredients.
What is a good binder for protein bars?
Natural binders like peanut butter, honey, and flaxseed meal work together in this recipe to hold everything in place. The texture is soft but firm—no crumbling. If you’re making tweaks to the recipe, you could also try almond butter or date paste as alternative binders that keep things naturally sticky and structured.
Is a peanut butter protein bar healthy?
Absolutely—when you make it at home with clean ingredients. These chocolate peanut butter protein bars are full of healthy fats, fiber, and protein, making them a smart snack or light meal addition. Unlike commercial bars, there are no hidden sugars or artificial ingredients—just delicious fuel for your day.
When I first made chocolate peanut butter protein bars, it was on a busy school night with Chloe. She had just finished soccer practice, and we needed something quick that felt like a treat but still gave her energy. Stirring the peanut butter and pressing the mixture into the pan became “our thing,” and now it’s a weekly ritual. Linda sometimes joins us, sneaking little spoonfuls of peanut butter while we work. These bars are simple, healthy, and taste just like dessert. It’s amazing how something so easy can bring so much joy—and keep us fueled for the week ahead.
Conclusion – Your Go-To No Bake Protein Bar
There’s something special about having a tray of homemade chocolate peanut butter protein bars chilling in the fridge. They’re not only convenient, but they also give you peace of mind knowing every bite is made from wholesome, nourishing ingredients you trust. For me, it’s about more than just a snack—it’s about creating little rituals that make life feel smoother and more enjoyable. Mixing the peanut butter base, pouring the glossy chocolate topping, and slicing the bars once they’re set has become a rhythm in our kitchen that Chloe and I both look forward to each week.
What I love most is how versatile these bars are. They fit seamlessly into busy mornings when you need grab-and-go fuel, or into quiet evenings when you want something sweet that doesn’t throw your goals off track. They’re proof that healthy eating doesn’t have to be complicated or boring—it can feel indulgent, satisfying, and truly delicious.
And here’s the fun part: once you’ve made a batch, you can experiment with flavors and toppings. Maybe add a sprinkle of shredded coconut, some crushed almonds, or even a swirl of extra peanut butter before the chocolate sets. Every variation keeps things interesting while sticking to the same no-bake, simple method.
If you’d like to share your own batch or see how others are enjoying their bars, come connect with us on Facebook and join the conversation. You’ll also find inspiration and more healthy snack ideas on our Pinterest board, where we’re always pinning new ways to keep meals fun, nourishing, and family-friendly.
So the next time you’re craving something sweet yet nourishing, skip the store-bought bars and make your own. These chocolate peanut butter protein bars are proof that when wholesome ingredients meet a little creativity, you end up with something that feels both practical and special.

When pressing the mixture into the pan or slicing your chilled bars, a sharp kitchen knife makes all the difference. I personally like the SHAN ZU Chef Knife 8 Inch Japanese Steel Damascus because it glides through layers smoothly without sticking, leaving you with neat, even bars every time. It’s a solid investment for any home cook who values precision and durability.
With each purchase via our Amazon link, you support this blog – at no extra cost to you.
")