By Ava
We make these oat cups whenever we want a quick, satisfying treat without turning on the oven. These easy no bake peanut butter oat cups layer a chewy peanut butter and oat base with a rich dark chocolate topping, finished with a sprinkle of sea salt for the perfect salty-sweet bite. That is real food for real life, wholesome and a little indulgent, the kind of oat cups that turn a handful of pantry staples like oats, peanut butter, and honey into a grab-and-go snack or dessert the whole family loves.
What makes these oat cups so good is the combination of textures and flavors, a hearty, chewy oat base, creamy peanut butter, and a snappy chocolate top, all balanced by a touch of flaky salt. They taste like a healthier homemade peanut butter cup, packed with energy from oats and nut butter. They are the kind of oat cups that prove a few simple ingredients and a muffin tin can come together into a treat that is both nourishing and irresistible.

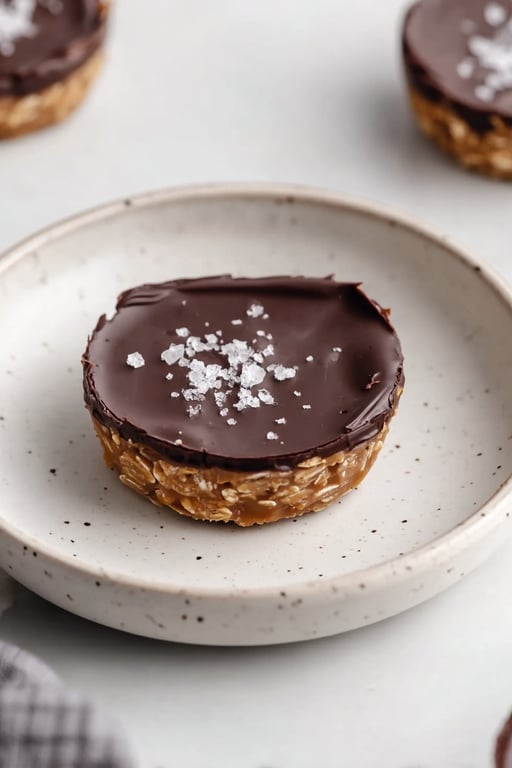
A chewy peanut butter base and snappy chocolate top, these no bake oat cups are a salty-sweet treat.
Why You Will Love These Oat Cups
- They are no bake. No oven required, ready fast.
- They are easy. Just a handful of pantry staples.
- They are salty-sweet. A perfect balance of flavors.
- They are satisfying. Energy from oats and nut butter.
- They are grab and go. Great for snacks and lunchboxes.
- They keep well. Store in the fridge or freezer.
What Makes These Oat Cups So Good
It starts with the peanut butter. Creamy peanut butter binds the oat base together and gives these oat cups their classic, rich, nutty flavor that everyone loves.
Then come the oats. Hearty rolled oats give these oat cups their satisfying, chewy texture and a wholesome boost of fiber, making them a treat that truly fills you up.
Next is the honey. A drizzle of honey naturally sweetens these oat cups and helps the base hold together beautifully, sticking everything into a firm, chewy bite.
Finally, the chocolate ties it together. A smooth layer of melted dark chocolate, set firm with a little coconut oil and finished with flaky sea salt, gives these oat cups their snappy, salty-sweet top.

Optional Pro Tip: Press Firmly and Chill to Set
The key to oat cups that hold together is pressing the base down firmly. Take a moment to compact the oat mixture into the bottom of each cup using the back of a spoon or your fingers, packing it tightly into an even layer. This creates a sturdy base that supports the chocolate top and keeps the cups from crumbling. If your mixture feels a little dry or crumbly, stir in a teaspoon or two of water until it easily presses together and holds its shape.
Just as important is giving them enough time to chill and set. Once the chocolate is spread on top, pop the tin into the freezer until everything is firm, which keeps the layers clean and the cups easy to remove. A little coconut oil stirred into the melted chocolate helps it set smoothly and snap nicely. Using a silicone muffin tin or paper liners also makes the set cups pop out effortlessly.
Tips for the Best Oat Cups
- Press the base firmly. So the cups hold together.
- Use creamy peanut butter. It binds the base best.
- Add water if dry. A teaspoon or two helps it stick.
- Use honey to bind. It holds together better than some sweeteners.
- Add coconut oil to the chocolate. For a smooth, snappy set.
- Sprinkle salt while wet. So it sticks to the chocolate.
- Use a silicone tin or liners. For easy removal.
- Chill until firm. About an hour in the freezer.
- Store cold. They keep their shape best chilled.

Variations and Add Ins
These easy cups are simple to customize. Here are a few fun ways to make these oat cups your own.
- Swap the nut butter. Use almond, cashew, or sunflower butter.
- Add dried fruit. Raisins or dried cranberries for chewiness.
- Add crunch. Chopped peanuts or seeds in the base.
- Use milk chocolate. For a sweeter topping.
- Add chia or flax. For extra fiber and nutrients.
- Make them mini. Use a mini muffin tin for bite-sized cups.
- Add a pinch of cinnamon. To the oat base for warmth.
- Top with mini chips. Sprinkled on the wet chocolate.
- Drizzle extra peanut butter. Over the chocolate top.
How to Store and Make Ahead
These oat cups are perfect for making ahead, which makes them a great snack to prep for the week. Because they are no bake and use fresh ingredients, store them in an airtight container in the refrigerator, where they stay fresh for up to a week. The cold also keeps them firm and holding their shape.
They are also wonderfully freezer-friendly. Keep a batch in the freezer in an airtight container for up to a few months, ready to grab whenever a sweet craving strikes. A frozen cup is a lovely firm, fudgy treat.
If you store them frozen, let them sit at room temperature for a few minutes before enjoying if you prefer a softer bite. Either way, they make an easy, satisfying grab-and-go snack any time.

Serving Suggestions for Oat Cups
These oat cups are a versatile treat for so many moments, which makes them a handy go-to. They are perfect on their own, whether you enjoy one as an after-meal treat, an afternoon snack, or a grab-and-go bite on a busy day.
They also pair beautifully with a few simple additions. Enjoy one with a coffee, a glass of milk, or some fresh fruit for a satisfying snack.
- With coffee. A perfect afternoon pick-me-up.
- With a glass of milk. A classic, cozy pairing.
- With fresh fruit. For a balanced snack.
- In a lunchbox. An easy, portable treat.
- Straight from the freezer. For a firm, fudgy bite.
Frequently Asked Questions
What are no bake peanut butter oat cups?
They are an easy treat made of a chewy peanut butter and oat base topped with melted dark chocolate, set firm in the freezer. They taste like a healthier homemade peanut butter cup and require no oven at all.
What oats should I use?
Rolled oats work well for a hearty, chewy texture. They give the base structure and a satisfying bite. Make sure the mixture is sticky enough to press together, adding a little water if it feels dry.
Why use honey?
Honey naturally sweetens the cups and acts as the binder, helping the oat base stick together and hold its shape. It tends to bind a little better than some other liquid sweeteners.
Why add coconut oil to the chocolate?
A little coconut oil helps the chocolate melt smoothly and set with a nice snap. It gives the topping a clean, glossy finish and helps it harden evenly over the peanut butter base.
Can I use a different nut butter?
Yes. Almond butter, cashew butter, or sunflower seed butter all work well in place of peanut butter. Use whichever you prefer, just keep it creamy so it binds the oat base together.
How do I get them out of the tin?
Use a silicone muffin tin or paper liners for the easiest removal once they are set. If using a regular tin, spray it well first, and a butter knife run along the edges helps lift them out cleanly.
How long do they take to set?
About an hour in the freezer to firm up completely. Once the chocolate has hardened and the base is set, the cups will hold their shape and are ready to pop out and enjoy.
How do I store them?
Keep them in an airtight container in the refrigerator for up to a week, or in the freezer for a few months. Because they are no bake and use fresh ingredients, they are best stored cold to keep their shape.
Can I make them mini?
Absolutely. Use a mini muffin tin for bite-sized cups, which are perfect for little hands or quick snacks. Just adjust the amount of base and chocolate in each cup accordingly.
Are these a healthy snack?
They are made with wholesome ingredients like rolled oats, peanut butter, and honey, which offer fiber and a satisfying boost of energy. They are naturally sweetened and feel indulgent while using simple, real ingredients, making them a feel-good treat.
An Easy No Bake Treat
Chewy, chocolatey, and perfectly salty-sweet, these oat cups are the kind of easy treat you will make again and again. They come together with simple pantry staples, no oven required, and keep beautifully in the fridge or freezer for whenever a craving hits.
If you love wholesome, oat-packed treats, try another favorite like our banana protein muffins next. However you enjoy them, we hope these oat cups become a go-to snack in your kitchen.
Results vary by ingredients, equipment, and cooking conditions. Always taste and adjust as you go.
No Bake Peanut Butter Oat Cups
Ingredients
Equipment
Method
- In a medium bowl, combine oats, honey, peanut butter, and vanilla.
- Mix everything together until well combined, ensuring the oats are thoroughly coated with the peanut butter and honey mixture.
- Spray a muffin tin with nonstick cooking spray.
- Divide the oat mixture evenly between the muffin cups, pressing the mixture down slightly with the back of a spoon for a firm base.
- In a small bowl, place chocolate chips and coconut oil.
- Microwave in 30 second increments, stirring in between, until the chocolate is completely melted and smooth.
- Spoon the melted chocolate on top of each peanut butter oat cup and spread evenly.
- While the chocolate is still wet, sprinkle sea salt on top.
- Place the muffin tin in the freezer and let the cups set for about an hour.
- Once the chocolate has hardened, remove the peanut butter oat cups from the muffin tin.
- Serve immediately, or store leftovers.
Nutrition
Tried this recipe?
Let us know how it was!Enjoyed the recipe? Share it!

Kitchen Essentials We Recommend
Tools that make cooking easier — tried, tested, and loved.


As an Amazon Associate we earn from qualifying purchases.
Got a recipe the world should try?
Share your favorite family recipe or national dish with food lovers in 100+ countries.
Submit Your Recipe