By Ava
If you want a dinner that feels special without asking much of you, turkey bacon chicken tenders is it. That is what real food for real life means to us, one honest recipe that makes an ordinary evening taste like something.
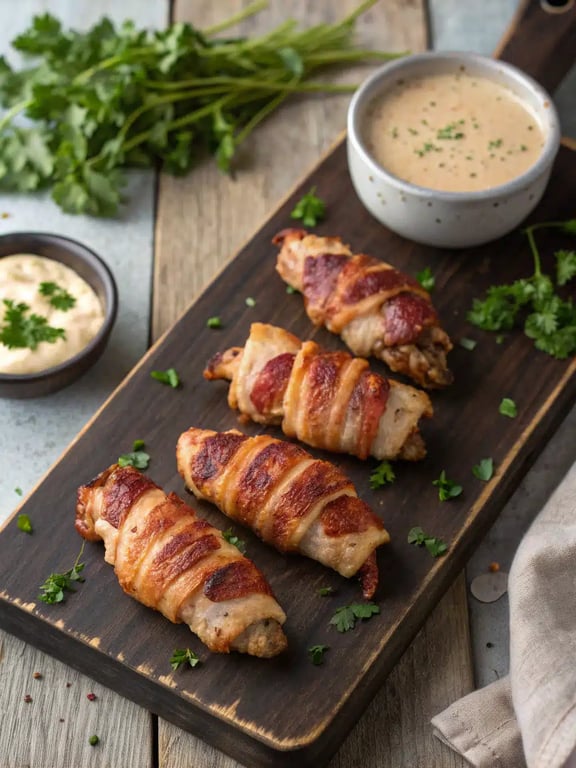
A sweet-and-savory creation that challenges the idea that quick dinners have to be bland. Juicy chicken wrapped in crispy turkey bacon with a caramelized brown sugar glaze delivers texture, flavor, and comfort in every bite. These turkey bacon chicken tenders comes together in about 30 minutes from start to finish, which is exactly why it keeps showing up on our table. Below you will find the full ingredient list, the exact method we use, and the small details that make these turkey bacon chicken tenders work every single time.

A sweet-and-savory creation that challenges the idea that quick dinners have to be bland. Juicy chicken wrapped in crispy turkey bacon with a caramelized brown sugar glaze delivers texture, flavor, and comfort in every bite.
Prep: 10 minutes | Cook: 20 minutes | Total: 30 minutes | Serves: 4 | Calories: 400 per serving | Protein: 30 g
- Why You Will Love Turkey Bacon Chicken Tenders
- Ingredients You Will Need
- How to Make Turkey Bacon Chicken Tenders
- Tips for the Best Results
- Variations and Add Ins
- Storing and Reheating
- What to Serve Alongside
- Frequently Asked Questions
Why You Will Love Turkey Bacon Chicken Tenders
There are plenty of weeknight dinners out there. Here is why these turkey bacon chicken tenders keeps winning in our kitchen.
- It just works. Offers a delightful balance of sweetness and savory flavors.
- Dinner in about 30 minutes. Start to plate, including the prep.
- About 30 g of protein per serving. Enough to hold you until morning, not just until nine.
Ingredients You Will Need for Turkey Bacon Chicken Tenders
Everything here is an everyday ingredient. This is the exact list we use for these turkey bacon chicken tenders, measured the way we actually cook it.
Protein
- 1 lb chicken tenders, use chicken breast strips if tenders unavailable
- 8 slices turkey bacon, cooked and crumbled, use thin cut turkey bacon for crispness
Seasoning
- 1 tsp paprika, adds warm color and mild smokiness
- 1/2 tsp garlic powder, subtle garlic aroma without using fresh garlic
- 1/2 tsp onion powder, enhances layered savory flavor
- 1/2 tsp salt, balances sweetness and seasons the chicken
- 1/4 tsp black pepper, mild peppery heat contrasts the sweet glaze
Pantry
- 1/2 cup brown sugar, light brown sugar for caramel notes
- Cooking spray or oil, for greasing; use a light coating
A quick word on the parts that matter most in these turkey bacon chicken tenders:
- Chicken tenders. Cook it just to done and no further, and it stays tender all the way through.
- Turkey bacon. It is an everyday ingredient doing quiet, useful work here.
Prefer metric? The recipe card below switches every amount over for you.

A sweet-and-savory creation that challenges the idea that quick dinners have to be bland. Juicy chicken wrapped in crispy turkey bacon with a caramelized brown sugar glaze delivers texture, flavor, and comfort in every bite.
How to Make Turkey Bacon Chicken Tenders
Here is exactly how we make these turkey bacon chicken tenders: about 10 minutes of prep and roughly 20 minutes of cooking.
What you need: Oven, Baking Dish.
- Preheat oven to 375 F. Grease a baking dish or line with foil and apply cooking spray for easier cleanup.
- Lay out the chicken tenders and season evenly with garlic powder, onion powder, salt, paprika, and black pepper. Toss with brown sugar until evenly coated.
- Wrap each chicken tender with one slice of turkey bacon. Place seam side down in the baking dish, leaving slight space between pieces.
- Bake for about 20 minutes, until the chicken is cooked through and the turkey bacon is crisp. Optionally broil for 2 to 3 minutes for extra caramelization, watching carefully.
- Remove from the oven and let rest for 2 to 3 minutes before serving. Serve warm.
That is the whole method. Nothing here needs special technique, just a little attention at the right moments.
Tips for the Best Turkey Bacon Chicken Tenders
None of this is complicated, but these are the small habits that separate a good plate of this recipe from a great one.
- Use an oven thermometer if you have one. Most ovens run hotter or cooler than the dial says.
- Rotate the pan halfway through for even color. Rotate the pan halfway through for even color.
- Let it rest before cutting so it sets and slices cleanly. Let it rest before cutting so it sets and slices cleanly.
- Read the steps once before you start. Knowing what is coming makes the whole thing calmer.
- Have everything measured and within reach before the heat goes on. Have everything measured and within reach before the heat goes on.
Taste as you go and adjust the seasoning at the end rather than the beginning. This dish rewards a little attention right at the finish.

A sweet-and-savory creation that challenges the idea that quick dinners have to be bland. Juicy chicken wrapped in crispy turkey bacon with a caramelized brown sugar glaze delivers texture, flavor, and comfort in every bite.
Variations and Add Ins
Turkey bacon chicken tenders takes changes well, so treat the recipe above as a starting point rather than a set of rules. These are the swaps we come back to most often.
- Swap the cut. Boneless thighs stay juicier than breasts and work here with no other changes.
- Make it spicier. A pinch of red pepper flakes or a spoonful of your favorite hot sauce lifts the whole dish.
- Add vegetables. Spinach, peppers or mushrooms stir in easily and stretch it further.
- Change the cheese. Anything that melts well will work, so use what is already in the refrigerator.
- Change the herbs. Fresh parsley, basil or dill at the end each send it somewhere slightly different for no extra effort.
- Make it a bigger meal. Serve it over rice or with warm bread and it stretches to feed another person or two.
Change one thing at a time rather than three. That way you find out what you actually like in the recipe instead of guessing at the end.
How to Store and Reheat Turkey Bacon Chicken Tenders
Leftovers keep in an airtight container in the refrigerator for up to three days. Reheat gently in a skillet or in the microwave at half power, adding a splash of broth so the chicken stays tender rather than drying out.
If you are cooking ahead on purpose, prep the components and keep them separate until you are ready. It takes a few minutes off a busy evening and this one holds its texture far better that way.

A sweet-and-savory creation that challenges the idea that quick dinners have to be bland. Juicy chicken wrapped in crispy turkey bacon with a caramelized brown sugar glaze delivers texture, flavor, and comfort in every bite.
What to Serve With Turkey Bacon Chicken Tenders
It carries a plate on its own, but a few simple things turn it into a proper dinner.
- Rice or buttered noodles. Simple, and it soaks up everything on the plate.
- A simple green salad. A little contrast keeps the whole plate from feeling heavy.
- Roasted vegetables. Easy to put together while the main event finishes.
- Warm bread for the sauce. The kind of small addition that makes dinner feel finished.
Turkey Bacon Chicken Tenders FAQ
Can I make Turkey Bacon Chicken Tenders ahead of time?
Yes. You can prep the components a day ahead and keep them covered in the refrigerator, then finish the dish when you are ready to eat. It saves real time on a busy evening.
Can I use something other than chicken tenders?
You can. Use what you have and keep the quantity about the same. The cooking time may shift slightly, so go by how this recipe looks rather than the clock.
How long does Turkey Bacon Chicken Tenders take?
About 30 minutes from start to finish, including roughly 10 minutes of hands on prep. The first time through may run a little longer.
Can I double the recipe?
Yes. Doubling works well here. Use a larger pan so nothing crowds, and expect this dish to need a little more time in the heat.
How do I store leftovers?
Leftovers keep in an airtight container in the refrigerator for up to three days.
Can I freeze Turkey Bacon Chicken Tenders?
It is better fresh. Freezing changes the texture more than it is worth here, so plan to eat it within a couple of days.
The Kind of Dinner You Come Back To
If you make turkey bacon chicken tenders, we hope it turns into one of those recipes you stop measuring after a while, the one you can put together on a Tuesday without thinking too hard about it. That is the best thing a recipe can become, not a special occasion dish but a reliable one.
If something worked especially well for you, or you found a swap worth passing on, we would genuinely like to hear about it. Most of the small improvements in our recipes started as somebody else’s idea.
Simple ingredients, an honest method, and a plate worth sitting down for. That is all we are ever after.
Easy Homemade Turkey Bacon Brown Sugar Chicken Tenders
Ingredients
Equipment
Method
- Preheat oven to 375 F. Grease a baking dish or line with foil and apply cooking spray for easier cleanup.
- Lay out the chicken tenders and season evenly with garlic powder, onion powder, salt, paprika, and black pepper. Toss with brown sugar until evenly coated.
- Wrap each chicken tender with one slice of turkey bacon. Place seam side down in the baking dish, leaving slight space between pieces.
- Bake for about 20 minutes, until the chicken is cooked through and the turkey bacon is crisp. Optionally broil for 2 to 3 minutes for extra caramelization, watching carefully.
- Remove from the oven and let rest for 2 to 3 minutes before serving. Serve warm.
Nutrition
Tried this recipe?
Let us know how it was!Enjoyed the recipe? Share it!

Kitchen Essentials We Recommend
Tools that make cooking easier — tried, tested, and loved.


As an Amazon Associate we earn from qualifying purchases.
Got a recipe the world should try?
Share your favorite family recipe or national dish with food lovers in 100+ countries.
Submit Your Recipe")