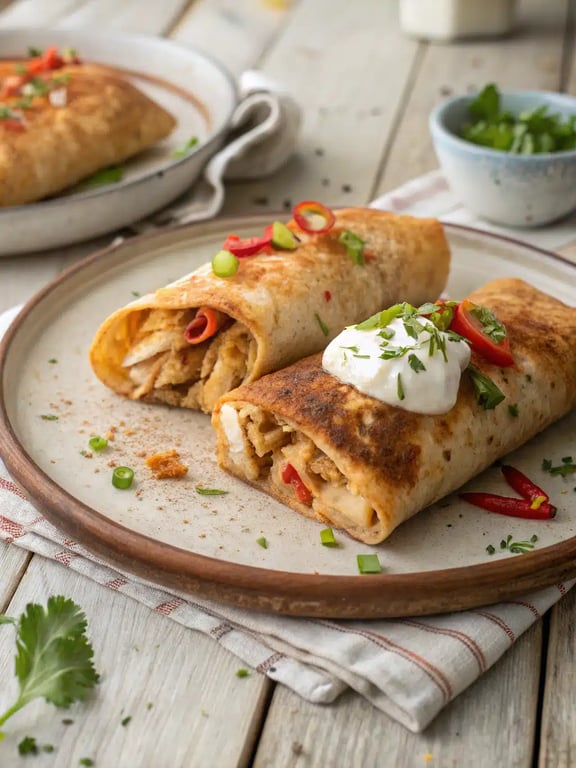
Golden, crispy tortillas filled with a savory, cheesy, and lightly spiced chicken mixture. This hands-on, fun-to-make meal delivers a perfect crunch with every bite and is perfect for a weeknight dinner or casual gathering.
What Makes This Chicken Chimichangas Recipe So Special
Wrapped in flavor and texture, this chicken chimichangas recipe is the kind of treat that delivers a perfect crunch with every single bite. We’re talking about golden, crispy tortillas giving way to a savory, cheesy, and lightly spiced chicken filling. It’s a hands-on, fun-to-make meal that transforms simple ingredients into something truly special for a weeknight dinner or a casual gathering with friends. During our testing, we found that the key to the ultimate crispy chimichangas lies not just in the frying, but in how you roll them. A tight, secure roll keeps the flavorful chimichanga filling safely inside where it belongs. Trust us, once you master the simple fold-and-roll technique, you’ll be making these golden bundles of joy on repeat. You’re going to love how simple and satisfying this chicken chimichangas recipe truly is!
This post may contain affiliate recommendations. Please see our disclosure policy.
What You’ll Find in This Article
Ingredients for This Chicken Chimichangas Recipe
Here’s everything you’ll need to bring these crispy chimichangas to life. The beauty of this chicken chimichangas recipe is in its straightforward, flavor-packed components.- 1 pound boneless, skinless chicken breasts, cooked and shredded
- 1 cup shredded Monterey Jack cheese
- 4 ounces canned diced green chiles, drained
- 1/2 cup finely chopped yellow onion
- 1 teaspoon ground cumin
- 1/2 teaspoon chili powder
- 1/4 teaspoon garlic powder
- 1/4 cup chopped fresh cilantro
- 8 large flour tortillas
- Vegetable oil for frying
- 1 cup sour cream for serving
- 1 cup salsa for serving

Cook Time for Baked Chimichangas
We know your time is precious, so we’ve timed every step of this chicken chimichangas recipe. From prep to that first glorious bite, you can have a platter of hot, crispy chimichangas on the table in under an hour. Of course, if you choose the baked chimichangas method we mention later, the cook time adjusts slightly for an equally delicious, lighter result.- Prep Time: 20 minutes
- Cook Time: 15-20 minutes (for frying in batches)
- Total Time: 35-40 minutes
How to Make Chicken Chimichangas
Follow these simple steps to create your own restaurant-quality crispy chimichangas at home. We’ve broken it down so you can focus on the fun part—eating!Step 1: Combine the Filling
In a large bowl, combine the shredded chicken, Monterey Jack cheese, diced green chiles, chopped onion, cumin, chili powder, garlic powder, and cilantro. Mix thoroughly until all ingredients are evenly distributed. This flavorful chimichanga filling is the heart of the dish.Step 2: Warm the Tortillas
Warm the flour tortillas in a microwave for 20 seconds or in a dry skillet until pliable to prevent cracking when rolling. This is a non-negotiable step for easy assembly!Step 3: Fill and Roll
Place about 1/2 cup of the chicken mixture in the center of each tortilla. Fold the sides inward over the filling, then roll tightly from the bottom to form a secure burrito shape. Place them seam-side down as you finish.Step 4: Fry to Golden Perfection
Heat 1 inch of vegetable oil in a heavy skillet over medium heat until it reaches 350°F. Carefully place 2-3 chimichangas seam-side down in the hot oil using tongs. Don’t overcrowd the pan for the crispiest results. Step 5: Drain and Crisp Fry for 2-3 minutes per side until golden brown and crispy, turning once. Drain on a wire rack set over a baking sheet to keep them crisp. This prevents sogginess better than draining on paper towels.
Step 6: Serve and Enjoy
Serve immediately with cool sour cream and your favorite salsa on the side for dipping. A simple chimichanga sauce or extra salsa makes the perfect accompaniment.Pro Tips & Tasty Tweaks
After making this chicken chimichangas recipe countless times, our team has gathered some insider knowledge to guarantee your success and let you put your own spin on it.- Flavor Swap: For a smoky twist, use a pepper jack cheese instead of Monterey Jack.
- Heat Adjustment: If your oil isn’t hot enough, the chimichangas will absorb too much oil and become greasy. Use a thermometer for perfect 350°F results every time.
- Prep Fix: To save time, use a store-bought rotisserie chicken. Just shred the meat and you’re halfway to your chimichanga filling.
- Storage Tip: Let any leftovers cool completely before storing. Reheat in an air fryer or oven to bring back the crunch.
Flavor & Texture Notes
When you get this chicken chimichangas recipe right, the experience is all about contrast. You’re aiming for a shatteringly crisp, golden-brown exterior that gives way to a steaming, tender, and incredibly savory interior. The filling should be moist and well-seasoned, with the melted cheese binding the shredded chicken, aromatic onions, and tangy green chiles together. The cumin and chili powder provide a warm, earthy backbone without overwhelming heat, while the fresh cilantro adds a bright, herbal finish. When you take a bite, you should hear that satisfying crunch first, followed by the rich and cheesy flavors of the filling. Serving them with cool, creamy sour cream and a zesty salsa balances the warmth and richness perfectly, making each bite of these chicken chimichangas utterly irresistible.Variations & Substitutions
One of the things we love most about this chicken chimichangas recipe is how adaptable it is. Whether you’re looking to switch up the flavors or need to work with what’s in your pantry, here are some of our favorite team-tested tweaks.- Cheese Choices: Monterey Jack is our go-to for its meltability, but sharp cheddar, a Mexican cheese blend, or even mozzarella work beautifully.
- Add More Veggies: Stir in a half-cup of thawed frozen corn or some finely diced bell peppers to the filling for extra color and sweetness.
- Spice Level: Control the heat! For milder chimichangas, use mild green chiles. For a kick, add a finely chopped jalapeño (seeds removed) or a dash of cayenne pepper to the filling.
- Baked Option: For a lighter take, try baked chimichangas. Brush the rolled chimichangas lightly with oil and bake on a parchment-lined sheet at 400°F for 20-25 minutes, flipping halfway, until crisp.
- Protein Swap: Shredded cooked turkey makes a fantastic and flavorful substitute for the chicken in this recipe.
Make-Ahead & Scaling
We love a recipe that respects our busy schedules, and this chicken chimichangas recipe is wonderfully flexible. You can absolutely get a head start on the prep, which makes dinner feel effortless. For the best results, we recommend preparing the flavorful chimichanga filling up to two days in advance and storing it, covered, in the refrigerator. The flavors actually meld and deepen, making it even more delicious. You can also assemble the chimichangas themselves a few hours before cooking; just keep them covered on a baking sheet in the fridge to prevent the tortillas from drying out. When it comes to scaling, this recipe is a dream. For a smaller batch, simply halve all the ingredients—it works perfectly. For a crowd, you can double or even triple the recipe. Just remember to fry in consistent, small batches to maintain the oil temperature for perfectly crispy chimichangas every time. If you’re making a large quantity, keep the finished ones warm on a wire rack set in a 200°F oven while you fry the rest. The texture holds up beautifully this way, ensuring everyone gets that satisfying crunch.How to Serve Chicken Chimichangas
Presentation is part of the fun with this chicken chimichangas recipe! We like to think of the platter as a colorful, inviting canvas. After testing countless combinations, we found that a simple, vibrant approach works best. Serve these golden bundles hot, straight from the fryer or oven, to guarantee that signature crisp exterior. For a truly memorable meal, pair your chicken chimichangas with classic sides. A cool, crisp salad with a lime vinaigrette cuts through the richness beautifully. For something heartier, a scoop of cilantro-lime rice or warm, seasoned black beans is always a hit. Don’t forget the essentials: generous bowls of cool sour cream, chunky salsa, and perhaps a quick chimichanga sauce made by blending sour cream with a bit of lime juice and cilantro. A squeeze of fresh lime wedges over the top just before eating adds a necessary burst of brightness. One of our favorite team discoveries? Setting up a casual “chimichanga bar” for gatherings. Place the crispy chimichangas in the center of the table surrounded by all the toppings and let everyone build their perfect bite. It’s interactive, delicious, and always a crowd-pleaser.
Mistakes to Avoid
We’ve made our share of kitchen missteps so you don’t have to! Learning from common pitfalls is the fastest way to master this chicken chimichangas recipe. Here are the key mistakes we’ve identified and exactly how to sidestep them for flawless results every time. First, using cold tortillas straight from the package is a recipe for cracks and tears. Always warm them briefly until pliable; it makes rolling a tight, secure bundle so much easier and prevents the filling from escaping during frying. Second, overfilling the tortilla is a tempting but messy error. Stick to about 1/2 cup of filling per large tortilla—it’s the perfect amount to roll securely without bursting. Another critical error is frying in oil that isn’t hot enough. If the oil is below 350°F, the chimichangas will absorb it and become greasy instead of achieving a light, crispy shell. Use a thermometer for accuracy. Conversely, don’t overcrowd the pan, as adding too many at once will cause the temperature to plummet, leading to soggy, oil-logged results. Fry in small batches for the crispiest chimichangas. Finally, draining fried chimichangas on paper towels can trap steam and soften the bottom. Instead, use a wire rack set over a baking sheet. This allows air to circulate all around, keeping the entire surface wonderfully crisp until you’re ready to serve.How to Store Chicken Chimichangas
Good news: this chicken chimichangas recipe stores and reheats remarkably well, so you can enjoy the deliciousness for days. The key is managing moisture to preserve that coveted texture. After our team tested various methods, we landed on a foolproof system. For short-term storage, let any leftovers cool completely on a wire rack. Then, transfer them to an airtight container, separating layers with parchment paper to prevent sticking. They’ll keep in the refrigerator for up to 3 days. To freeze, wrap each cooled chimichanga individually in plastic wrap and then aluminum foil before placing them in a freezer bag. They’ll maintain quality for up to 2 months. This method is perfect for having a quick, homemade meal ready at a moment’s notice. Reheating is where you can bring back the magic. We don’t recommend the microwave, as it will turn the crispy shell soft and chewy. Instead, for the best texture, reheat in an air fryer at 375°F for 6-8 minutes or in a conventional oven at 400°F for 10-15 minutes, until heated through and crisp. You can bake frozen chimichangas directly from the freezer; just add 5-10 extra minutes to the baking time.Try This Chicken Chimichangas Recipe Yourself
We genuinely hope you give this chicken chimichangas recipe a try in your own kitchen. It’s one of those dishes that never fails to bring smiles to the table, and we’re confident you’ll love the process as much as the result. There’s something incredibly satisfying about rolling up those flavorful bundles and watching them turn golden and crisp. Remember, cooking is about joy and sharing. Don’t stress about perfection—embrace the fun of it! Whether you’re making a cozy dinner for two or a festive platter for friends, these chimichangas are sure to impress. We’d love to hear how your version turns out. What sides did you choose? Did you add a personal twist to the chimichanga filling? Your kitchen, your rules!Crispy Chicken Chimichangas
Golden, crispy tortillas filled with a savory, cheesy, and lightly spiced chicken mixture. This hands-on, fun-to-make meal delivers a perfect crunch with every bite and is perfect for a weeknight dinner or casual gathering.
Ingredients
Equipment
Method
- In a large bowl, combine the shredded chicken, Monterey Jack cheese, diced green chiles, chopped onion, cumin, chili powder, garlic powder, and cilantro. Mix thoroughly until all ingredients are evenly distributed.
- Warm the flour tortillas in a microwave for 20 seconds or in a dry skillet until pliable to prevent cracking when rolling.
- Place about 1/2 cup of the chicken mixture in the center of each tortilla. Fold the sides inward over the filling, then roll tightly from the bottom to form a secure burrito shape. Place them seam-side down as you finish.
- Heat 1 inch of vegetable oil in a heavy skillet over medium heat until it reaches 350°F. Carefully place 2-3 chimichangas seam-side down in the hot oil using tongs. Don’t overcrowd the pan.
- Fry for 2-3 minutes per side until golden brown and crispy, turning once. Drain on a wire rack set over a baking sheet to keep them crisp.
- Serve immediately with cool sour cream and your favorite salsa on the side for dipping.
Nutrition
Notes
Pro Tips: Use a store-bought rotisserie chicken to save time. Ensure oil is at 350°F for a crisp, non-greasy result. Drain on a wire rack, not paper towels, to prevent sogginess.
Baked Option: For a lighter version, brush assembled chimichangas lightly with oil and bake at 400°F for 20-25 minutes, flipping halfway, until crisp.
Storage: Cool completely, then store in an airtight container in the fridge for up to 3 days. Reheat in an air fryer or oven to restore crunch.
Baked Option: For a lighter version, brush assembled chimichangas lightly with oil and bake at 400°F for 20-25 minutes, flipping halfway, until crisp.
Storage: Cool completely, then store in an airtight container in the fridge for up to 3 days. Reheat in an air fryer or oven to restore crunch.
Tried this recipe?
Let us know how it was!Enjoyed the recipe? Share it!

Kitchen Essentials We Recommend
Tools that make cooking easier — tried, tested, and loved.


As an Amazon Associate we earn from qualifying purchases.
Got a recipe the world should try?
Share your favorite family recipe or national dish with food lovers in 100+ countries.
Submit Your RecipeFrequently Asked Questions
Can I make baked chimichangas instead of frying?
Absolutely! For a lighter version, baked chimichangas are a fantastic option. Simply brush the assembled chimichangas lightly with oil and bake on a parchment-lined sheet at 400°F for 20-25 minutes, flipping halfway through, until they are golden and crisp all over.
How do I keep my chimichangas from getting soggy?
The two biggest guards against sogginess are proper draining and serving immediately. Always drain fried chimichangas on a wire rack instead of paper towels to allow steam to escape. Also, ensure your oil is at the correct 350°F temperature so the exterior seals quickly and doesn’t absorb excess oil.
What’s the best way to shred chicken for the filling?
For tender, easy-to-shred chicken, we poach breasts in simmering broth or water for about 15 minutes until cooked through. Let them cool slightly, then use two forks or stand mixer paddles on low speed to pull the meat apart into perfect shreds for your chimichanga filling.
Can I use corn tortillas for this recipe?
We recommend large flour tortillas for this chicken chimichangas recipe, as they are more pliable and less likely to crack when rolling and frying. Corn tortillas are typically smaller and more brittle, which makes creating a tight, sealed bundle quite difficult.
")