Wrapped in flavor and texture, this creamy burrito casserole is the kind of comforting dinner that brings everyone to the table. We're talking layers of savory ground beef, refried beans, and soft tortillas all smothered in a rich, creamy sauce and melted cheese. It's the ultimate answer for anyone searching for easy burrito casserole recipes that deliver maximum flavor with minimal fuss.
What Makes creamy burrito casserole So Special
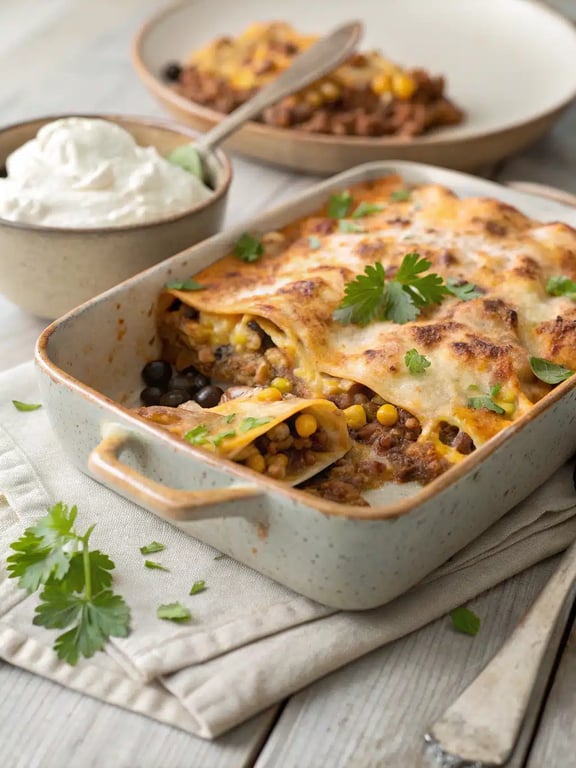
Wrapped in flavor and texture, this creamy burrito casserole is the kind of comforting dinner that brings everyone to the table. We’re talking layers of savory ground beef, refried beans, and soft tortillas all smothered in a rich, creamy sauce and melted cheese. It’s the ultimate answer for anyone searching for easy burrito casserole recipes that deliver maximum flavor with minimal fuss. During our team testing, we discovered that letting the casserole rest for a full 10 minutes after baking is the secret to perfect, clean slices. This waiting period allows all those incredible layers to set up beautifully. Trust us, the anticipation is worth it for that first perfect, cheesy bite of this cheesy burrito casserole.
This post may contain affiliate recommendations. Please see our disclosure policy.
What You’ll Find in This Article
Ingredients for creamy burrito casserole
Here is everything you’ll need to create this family-friendly meal. We love that most of these are pantry staples or easy to find at any grocery store, making this one of our go-to Mexican casserole recipes for busy weeknights.- 1 pound ground beef
- 1 medium yellow onion, diced
- 1 packet taco seasoning
- 1/4 cup water
- 1 (16-ounce) can refried beans
- 1 (4-ounce) can diced green chiles
- 1 (10.5-ounce) can condensed cream of chicken soup
- 1/2 cup sour cream
- 1/2 cup milk
- 8 large flour tortillas, cut into quarters
- 2 cups shredded Mexican blend cheese
- 1 (8-ounce) can enchilada sauce
- Fresh cilantro for garnish

Cook Time for easy burrito casserole
We know your time is precious, so we’ve timed every step of this easy burrito casserole. From start to finish, you can have this comforting dish on the table in about an hour. The active prep time is surprisingly short, leaving the oven to do most of the work.- Prep Time: 15 minutes
- Cook Time: 40 minutes
- Resting Time: 10 minutes
- Total Time: 1 hour 5 minutes
How to Make creamy burrito bake
Follow these simple steps to build your creamy burrito bake. We’ve broken it down so you can easily assemble the layers for a result that’s as beautiful as it is delicious.Step 1: Preheat and Brown
Preheat your oven to 375°F and lightly grease a 9×13 inch baking dish. Brown the ground beef with the diced onion in a large skillet over medium-high heat, breaking it up with a spoon, until fully cooked and no pink remains, about 8-10 minutes. Drain any excess grease.Step 2: Build the Filling
Stir the taco seasoning and water into the beef mixture, then add the refried beans and diced green chiles. Cook for 3-4 minutes, stirring constantly, until everything is well combined and heated through. Remove from heat.
Step 3: Create the Creamy Sauce
In a separate medium bowl, whisk together the cream of chicken soup, sour cream, and milk until you have a smooth, creamy sauce.Step 4: Assemble the First Layers
Arrange half of the tortilla quarters in the bottom of the prepared baking dish, overlapping slightly to cover the surface. Spread the entire beef and bean mixture evenly over the tortillas, then drizzle with half of the enchilada sauce.
Step 5: Add Cheese and Cream
Sprinkle one cup of the shredded cheese over the beef layer, then pour half of the creamy soup mixture over the top, spreading gently with a spatula.Step 6: Repeat the Layers
Layer the remaining tortilla quarters over the sauce, followed by the remaining enchilada sauce, the rest of the creamy sauce, and finally the remaining cup of cheese.Step 7: Bake to Perfection
Cover the dish with foil and bake for 25 minutes. Remove the foil and continue baking for another 10-15 minutes, until the cheese is completely melted and the edges are bubbly.Step 8: Rest and Serve
Let the casserole rest for 10 minutes before serving to allow the layers to set. Garnish with fresh cilantro and serve warm.
Pro Tips & Tasty Tweaks
After making this creamy burrito casserole countless times, our team has gathered some of our favorite insights to help you make it your own. These small tweaks can make a big difference in your final dish.- Flavor Swap: For a smoky twist, try using a chipotle-seasoned enchilada sauce instead of the traditional red sauce.
- Heat Adjustment: If you’re short on time, you can assemble the casserole ahead of time, cover it, and refrigerate it for up to 8 hours before baking. Just add a few extra minutes to the baking time.
- Prep Fix: To prevent the tortillas from becoming soggy, make sure your beef mixture has cooled slightly before assembling the layers.
- Storage Tip: Leftovers reheat beautifully! Cover with foil and warm in a 350°F oven for 15-20 minutes, or until heated through.
Flavor & Texture Notes
When you pull this cheesy burrito casserole from the oven, you’re greeted with a truly inviting aroma. The scent of seasoned beef and melted cheese is simply irresistible. Furthermore, the visual cues are just as important; you’re looking for that golden, bubbly cheese top and slightly browned edges. Texture-wise, this dish is a wonderful contrast. You get the soft, almost pillowy layers of tortilla, the hearty and savory beef and bean filling, and the luxurious, creamy sauce that binds it all together. Consequently, every forkful is a perfect bite of comfort. The fresh cilantro garnish isn’t just for looks; it adds a bright, fresh note that cuts through the richness beautifully, making this one of the most satisfying burrito bake recipes we’ve ever created.Variations & Substitutions
One of the things we love most about this creamy burrito casserole is how adaptable it is. We encourage you to make it your own! For instance, here are some of our team’s favorite twists on this classic. If you’re looking for a different protein, ground turkey is a fantastic and lean alternative to ground beef. You can also stir a cup of frozen corn or black beans into the beef mixture for extra color and fiber. For a little extra kick, mix a teaspoon of smoked paprika or a diced jalapeño into the filling. Additionally, if you prefer corn tortillas, they work wonderfully here, though they will give the casserole a more traditional enchilada-like texture. Finally, for a tangier cream sauce, you can use plain Greek yogurt in place of the sour cream.Make-Ahead & Scaling
We know that weeknights can be hectic, which is why we love how well this creamy burrito bake can be prepped in advance. During our team testing, we found that you can assemble the entire casserole, cover it tightly, and refrigerate it for up to 24 hours before baking. If you’re planning a larger gathering, this easy burrito casserole doubles beautifully in a large disposable foil pan, making it a fantastic option for potlucks or feeding a crowd. For smaller households, you can easily halve the recipe and bake it in an 8×8 inch dish. The baking time will be slightly shorter, so start checking for doneness around the 25-minute mark. When scaling up, just remember that a larger pan may require a few extra minutes in the oven to heat through completely. The texture holds up remarkably well, though we did notice that the tortillas become slightly more tender when the assembled casserole sits overnight—this actually makes the final dish even more cohesive and delicious.How to Serve creamy burrito casserole
One of our favorite things about this cheesy burrito casserole is how it becomes the centerpiece of a truly satisfying meal. We love serving it family-style right from the baking dish, letting everyone scoop out their own generous portion. The beauty of this Mexican casserole recipe is its versatility—it pairs wonderfully with so many simple sides that round out the meal perfectly. During our team dinners, we found that a crisp green salad with a lime vinaigrette provides a refreshing contrast to the rich, creamy layers. A side of Mexican rice or seasoned black beans complements the flavors beautifully. For a cool, creamy element, we often set out extra sour cream and guacamole for topping. If you’re serving a crowd, consider setting up a topping bar with diced tomatoes, sliced olives, and pickled jalapeños so everyone can customize their plate. We discovered through our testing that letting each person add their favorite toppings not only makes the meal more interactive but also allows for different flavor preferences at the table. This approach has made this burrito bake recipe a regular in our team meal rotations because it truly pleases everyone.
Mistakes to Avoid
After making this creamy burrito casserole countless times, we’ve identified a few common pitfalls that can affect your final result. We want to help you avoid these so your first attempt turns out as delicious as ours did after all our testing. Many home cooks wonder why their casserole sometimes turns out too watery or the tortillas become mushy—we’re here to share what we’ve learned. First, don’t skip draining the ground beef after browning. Excess grease can make your casserole oily and affect the texture of the creamy sauce. Second, avoid using cold ingredients straight from the refrigerator when assembling—this can significantly increase the baking time and potentially lead to uneven cooking. Third, resist the temptation to cut into the casserole immediately after baking. That 10-minute rest period is crucial for allowing the layers to set properly, which prevents a soupy texture. Another common mistake we’ve seen is overloading the casserole with extra sauce or ingredients. While it’s tempting to add more of everything, sticking to the measured amounts ensures the perfect balance between the tortillas, filling, and creamy elements. Finally, don’t forget to remove the foil during the last part of baking—this gives you that beautifully melted, slightly golden cheese topping that makes this cheesy burrito casserole so visually appealing. We’ve made all these mistakes ourselves during development, so we can confidently say that avoiding them will give you the perfect creamy burrito bake every time.How to Store creamy burrito casserole
Proper storage is key to enjoying your creamy burrito casserole beyond the first meal. We found through extensive testing that this dish holds up beautifully when stored correctly. Allow any leftovers to cool completely to room temperature before transferring them to an airtight container—this prevents condensation that could make the tortillas soggy. Refrigerated portions will stay fresh for 3-4 days. For longer storage, this easy burrito casserole freezes remarkably well. We recommend portioning it into individual servings before freezing, as this makes reheating much more convenient. Wrap each portion tightly in plastic wrap and then in foil, or place them in freezer-safe containers. Properly stored, your frozen creamy burrito bake will maintain its quality for up to 3 months. When reheating, we suggest thawing frozen portions in the refrigerator overnight for best results. Then, reheat in a 350°F oven covered with foil for 15-20 minutes, or until heated through. The microwave works in a pinch, but the oven method preserves the texture of the tortillas and keeps the cheese perfectly melted.Try This creamy burrito casserole Yourself
We genuinely hope you’ll give this creamy burrito casserole a try in your own kitchen. After all our testing and tweaking, this has become one of our most requested team recipes—the kind of dish that makes ordinary weeknights feel special. There’s something truly comforting about pulling a bubbling, cheesy casserole from the oven that you know will bring smiles to the table. What we love most about this Mexican casserole recipe is how approachable it is for cooks of all experience levels. The layers come together quickly, and the oven does most of the work. Whether you’re feeding a busy family or preparing a meal for friends, this burrito bake recipe delivers on both flavor and convenience. The combination of familiar ingredients with that special creamy sauce creates something greater than the sum of its parts. We encourage you to make it your own—try our suggested variations or stick with the classic version. Either way, we’re confident this will become a regular in your meal rotation, just as it has in ours.Creamy Burrito Casserole
Wrapped in flavor and texture, this creamy burrito casserole is the kind of comforting dinner that brings everyone to the table. We're talking layers of savory ground beef, refried beans, and soft tortillas all smothered in a rich, creamy sauce and melted cheese. It's the ultimate answer for anyone searching for easy burrito casserole recipes that deliver maximum flavor with minimal fuss.
Ingredients
Equipment
Method
- Preheat your oven to 375°F and lightly grease a 9x13 inch baking dish.
- Brown the ground beef with the diced onion in a large skillet over medium-high heat, breaking it up with a spoon, until fully cooked and no pink remains, about 8-10 minutes. Drain any excess grease.
- Stir the taco seasoning and water into the beef mixture, then add the refried beans and diced green chiles. Cook for 3-4 minutes, stirring constantly, until everything is well combined and heated through. Remove from heat.
- In a separate medium bowl, whisk together the cream of chicken soup, sour cream, and milk until you have a smooth, creamy sauce.
- Arrange half of the tortilla quarters in the bottom of the prepared baking dish, overlapping slightly to cover the surface. Spread the entire beef and bean mixture evenly over the tortillas, then drizzle with half of the enchilada sauce.
- Sprinkle one cup of the shredded cheese over the beef layer, then pour half of the creamy soup mixture over the top, spreading gently with a spatula.
- Layer the remaining tortilla quarters over the sauce, followed by the remaining enchilada sauce, the rest of the creamy sauce, and finally the remaining cup of cheese.
- Cover the dish with foil and bake for 25 minutes. Remove the foil and continue baking for another 10-15 minutes, until the cheese is completely melted and the edges are bubbly.
- Let the casserole rest for 10 minutes before serving to allow the layers to set. Garnish with fresh cilantro and serve warm.
Nutrition
Notes
Letting the casserole rest for a full 10 minutes after baking is the secret to perfect, clean slices. To prevent the tortillas from becoming soggy, make sure your beef mixture has cooled slightly before assembling the layers. Leftovers reheat beautifully! Cover with foil and warm in a 350°F oven for 15-20 minutes, or until heated through.
Tried this recipe?
Let us know how it was!Enjoyed the recipe? Share it!

Kitchen Essentials We Recommend
Tools that make cooking easier — tried, tested, and loved.


As an Amazon Associate we earn from qualifying purchases.
Got a recipe the world should try?
Share your favorite family recipe or national dish with food lovers in 100+ countries.
Submit Your RecipeFrequently Asked Questions
Can I make this creamy burrito casserole ahead of time?
Absolutely! We frequently assemble this creamy burrito bake ahead for busy days. You can prepare the entire casserole, cover it tightly with plastic wrap or foil, and refrigerate it for up to 24 hours before baking. Just add a few extra minutes to the baking time since it will be going into the oven cold.
How do I prevent my burrito casserole from becoming soggy?
The key to avoiding a soggy texture in your easy burrito casserole is letting the beef mixture cool slightly before assembling and making sure you drain any excess grease thoroughly. Also, that crucial 10-minute resting period after baking allows the layers to set properly, which prevents a soupy consistency.
Can I use corn tortillas instead of flour tortillas?
Yes, corn tortillas work well in this cheesy burrito casserole, though they will give it a more traditional enchilada-like texture. We recommend lightly warming the corn tortillas before assembling to prevent them from cracking. The flavor profile will be slightly different but equally delicious.
What’s the best way to reheat leftovers?
For the best texture when reheating this Mexican casserole, we recommend using the oven. Cover with foil and warm at 350°F for 15-20 minutes, or until heated through. The microwave works for quick reheating, but the oven method preserves the perfect texture of the tortillas and melted cheese.
Can I freeze this burrito bake?
This creamy burrito casserole freezes beautifully! We suggest portioning it into individual servings before freezing for easier reheating. Wrap each portion tightly in plastic wrap and foil, or use freezer-safe containers. Properly stored, it will maintain its quality for up to 3 months.
")