This enchirito recipe brings together the best of two worlds - a hearty beef enchilada and a portable burrito. The result is a cheesy, saucy comfort food with seasoned beef, creamy beans, and melted cheese that's both satisfying and fun to eat.
What Makes This Enchirito Recipe So Special
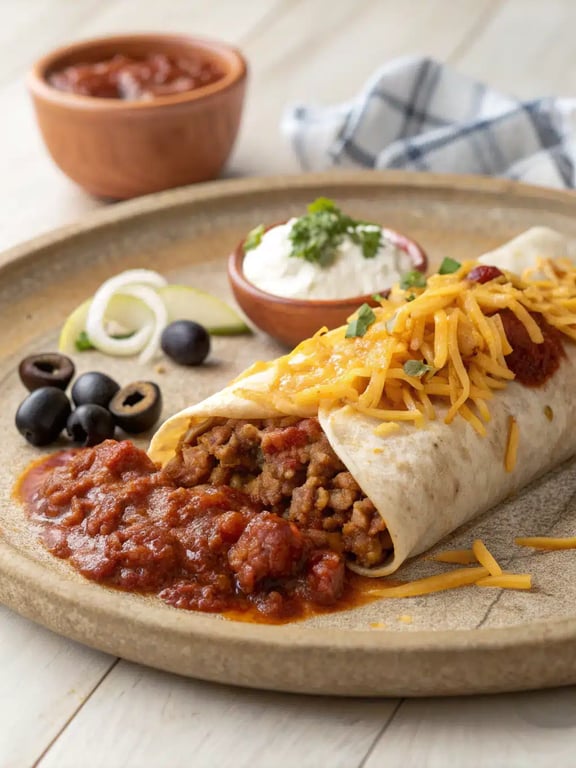
Wrapped in flavor and texture, this enchirito recipe is the kind of comfort food that brings the best of two worlds together. Imagine a hearty beef enchilada, cozy and saucy from the oven, hugged by the soft, portable form of a burrito. The result is a cheesy enchilada experience that’s both satisfying and incredibly fun to eat, with every bite offering a perfect mix of seasoned beef, creamy beans, and melted cheese. During our team testing, we found that warming the tortillas is the secret handshake to a perfect roll—it prevents tearing and makes assembly a breeze. We also love adding the cold, crisp onion on top after baking for a fresh contrast to the warm, bubbly dish. Trust us, once you try this homemade version, you’ll understand why this enchilada burrito hybrid has such a devoted following.
This post may contain affiliate recommendations. Please see our disclosure policy.
What You’ll Find in This Article
Ingredients for This Enchirito Recipe
Gathering your ingredients is the first step to creating this fantastic enchilada burrito. Here’s everything you’ll need for this cheesy enchilada masterpiece:- 1 pound ground beef
- 1 packet taco seasoning
- 1/4 cup water
- 8 large flour tortillas
- 16 ounces canned refried beans
- 2 cups shredded cheddar cheese
- 10 ounces canned enchilada sauce
- 1/2 cup finely chopped white onion
- 1/4 cup sliced black olives
- 1/2 cup sour cream

Cook Time for Your Beef Enchilada Creation
We know you’re eager to dig in, so we’ve timed everything for you. From start to finish, this chicken enchirito-inspired dish comes together in under an hour. Your prep time is about 15 minutes, and the baking time is 20-25 minutes. That means you’ll have a total time of just around 40 minutes for a pan of hot, comforting enchiritos.How to Make This Enchilada Burrito Hybrid
Follow these simple steps to create your own cheesy enchilada burrito masterpiece. We’ve broken it down so you can easily follow along.Step 1: Preheat and Prepare
Preheat your oven to 375°F and lightly grease a 9×13 inch baking dish with cooking spray.Step 2: Cook the Beef
Brown the ground beef in a large skillet over medium-high heat, breaking it into small crumbles with a spatula until fully cooked, about 8 minutes. Drain any excess grease.
Step 3: Season the Beef
Stir in the taco seasoning and water, simmering for 3-4 minutes until the liquid is absorbed and the beef is well coated. Remove from heat.Step 4: Assemble the Enchiritos
Warm the tortillas briefly in the microwave for 20 seconds to make them pliable. Spread about 2 tablespoons of refried beans down the center of each tortilla, then top with a generous scoop of the seasoned beef and a sprinkle of cheddar cheese.
Step 5: Roll and Arrange
Roll each tortilla tightly around the filling and place seam-side down in the prepared baking dish, arranging them snugly in a single layer.Step 6: Add Sauce and Toppings
Pour the enchilada sauce evenly over the rolled tortillas, making sure each one is well covered. Sprinkle the remaining cheese, chopped onion, and black olives over the top.Step 7: Bake to Perfection
Bake for 20-25 minutes until the cheese is melted and bubbly and the edges of the tortillas are lightly golden.Step 8: Serve and Enjoy
Let rest for 5 minutes before serving warm, topped with a dollop of sour cream.
Pro Tips & Tasty Tweaks
After making this enchirito recipe dozens of times, we’ve picked up a few tricks we’re excited to share with you. These small adjustments can make a big difference in your final dish.- For a flavor twist, try using a spicy enchilada sauce or adding a diced jalapeño to the beef mixture.
- If your tortillas are cracking, warm them for a few seconds longer. A damp paper towel over the stack in the microwave works wonders.
- To prevent a soggy bottom, you can lightly spray the baking dish and quickly pan-fry each rolled enchirito seam-side down for 30 seconds before saucing and baking.
- For easy leftovers, store them in an airtight container for up to 3 days and reheat in the oven or toaster oven to maintain texture.
Flavor & Texture Notes
When you pull this enchirito recipe from the oven, you’re greeted by a wonderful aroma of spices and melted cheese. The first bite delivers a soft, saucy tortilla that gives way to a hearty, savory filling. The beef enchilada center is richly seasoned, while the refried beans add a creamy, smooth contrast. Finally, the cool, tangy sour cream and crisp, sharp onion on top cut through the richness beautifully. We look for a few key signs of doneness: the cheese on top should be fully melted and bubbly, often with a few golden-brown spots. The edges of the tortillas peeking out from the sauce will be slightly firmer and lightly golden. Letting the dish rest for five minutes is crucial—it allows the sauces to settle, making the enchiritos easier to serve without falling apart.Variations & Substitutions
One of the things we love about this enchirito recipe is how adaptable it is. Whether you’re feeding a crowd with different tastes or just working with what’s in your pantry, here are some of our favorite twists. For a popular alternative, a chicken enchirito is easily made by swapping the ground beef for shredded cooked chicken. If you’re looking for a heartier, vegetarian-friendly option, a black bean enchilada version is fantastic. Simply replace the beef with a cup of corn and an extra can of black beans, rinsed and drained. You can also mix up the cheeses; a Monterey Jack blend offers a superb melt, while a pepper jack adds a gentle heat. For a lighter touch, sometimes we use Greek yogurt instead of sour cream for topping—it provides a similar tangy creaminess that works wonderfully.Make-Ahead & Scaling
We love a good make-ahead meal, and this enchirito recipe is wonderfully flexible for planning ahead. You can easily prepare the seasoned beef filling up to two days in advance and store it in the refrigerator. Similarly, you can shred the cheese and chop the onions a day ahead, keeping them in separate airtight containers. When you’re ready to assemble, simply warm the tortillas and proceed with the recipe as directed. For scaling this dish, we’ve found that doubling the recipe works beautifully for a crowd. Just use two baking dishes to avoid overcrowding, which can lead to steaming instead of baking. Conversely, for a smaller batch, you can easily halve all the ingredients and use an 8×8 inch dish. The baking time remains roughly the same, but always keep an eye on the cheese—it should be bubbly and golden. While the texture is best fresh from the oven, holding the components separately and assembling just before baking ensures your final enchilada burrito hybrid is perfect every time.How to Serve Your Enchirito Recipe
After pulling your bubbling pan from the oven, we recommend letting your enchirito recipe rest for about five minutes. This brief wait allows the sauces to settle, making the enchiritos much easier to serve without falling apart. We love plating them with a generous dollop of cool sour cream and a sprinkle of fresh, crisp onion for that perfect temperature and texture contrast. For a complete meal, consider serving this beef enchilada creation with a simple side salad dressed with a lime vinaigrette or a helping of cilantro-lime rice. The fresh, bright flavors complement the rich, cheesy enchilada beautifully. During our team tests, we found that a classic chicken enchirito variation also pairs wonderfully with these same sides, offering a delightful alternative for different tastes. We often serve these family-style, right from the baking dish in the center of the table. It creates a warm, inviting atmosphere where everyone can help themselves to this comforting cheesy enchilada experience.
Mistakes to Avoid
Through our many rounds of testing this enchirito recipe, we’ve identified a few common pitfalls that are easy to avoid with a little know-how. For instance, if you’ve ever ended up with a cracked tortilla, the issue is almost always a cold tortilla. Always warm your flour tortillas briefly before rolling to make them pliable and prevent tearing. Another frequent question we get is about a soggy bottom. To prevent this, ensure your baking dish is properly greased and avoid over-saucing the bottom before placing the rolled enchiritos. You want the sauce mainly on top. Also, be careful not to overfill your tortillas. While it’s tempting to pack in more of that delicious beef and bean filling, an overstuffed enchilada burrito is difficult to roll and more likely to burst open during baking. Finally, don’t skip the rest time after baking. We know it’s hard to wait when your kitchen smells so amazing, but those five minutes allow the structure to set, ensuring you get a perfect serving instead of a saucy mess. Following these simple tips will guarantee your homemade version of this classic dish turns out perfectly every time.How to Store Your Enchirito Recipe
We nearly always have leftovers of this enchirito recipe, and we’re happy to report they store and reheat wonderfully. Let the baked enchiritos cool completely to room temperature before transferring them to an airtight container. They will keep in the refrigerator for up to three days. For longer storage, you can freeze them for up to two months. When reheating, we strongly recommend using an oven or toaster oven set to 350°F. This method helps revive the texture of the tortilla and keeps the cheese nicely melted. If you’re reheating from frozen, there’s no need to thaw; just add a few extra minutes to the baking time. While the microwave is quick, it can make the tortillas a bit soft. A quick reheat in a skillet can also work wonders for a crisper exterior on your leftover beef enchilada creation.Try This Enchirito Recipe Yourself
We genuinely hope you feel inspired to try this enchirito recipe in your own kitchen. It’s the kind of comforting, crowd-pleasing meal that quickly becomes a regular in your dinner rotation. The process is straightforward, the ingredients are simple, and the result is incredibly rewarding. Whether you stick with the classic beef version or experiment with a black bean enchilada alternative, the core method remains the same. We love how this dish brings people together around the table. From our kitchen to yours, we’re confident this recipe will deliver a delicious, satisfying meal that everyone will enjoy. So gather your ingredients, preheat your oven, and get ready to create a new family favorite.Enchirito Recipe
This enchirito recipe brings together the best of two worlds - a hearty beef enchilada and a portable burrito. The result is a cheesy, saucy comfort food with seasoned beef, creamy beans, and melted cheese that's both satisfying and fun to eat.
Ingredients
Equipment
Method
- Preheat your oven to 375°F and lightly grease a 9x13 inch baking dish with cooking spray.
- Brown the ground beef in a large skillet over medium-high heat, breaking it into small crumbles with a spatula until fully cooked, about 8 minutes. Drain any excess grease.
- Stir in the taco seasoning and water, simmering for 3-4 minutes until the liquid is absorbed and the beef is well coated. Remove from heat.
- Warm the tortillas briefly in the microwave for 20 seconds to make them pliable. Spread about 2 tablespoons of refried beans down the center of each tortilla, then top with a generous scoop of the seasoned beef and a sprinkle of cheddar cheese.
- Roll each tortilla tightly around the filling and place seam-side down in the prepared baking dish, arranging them snugly in a single layer.
- Pour the enchilada sauce evenly over the rolled tortillas, making sure each one is well covered. Sprinkle the remaining cheese, chopped onion, and black olives over the top.
- Bake for 20-25 minutes until the cheese is melted and bubbly and the edges of the tortillas are lightly golden.
- Let rest for 5 minutes before serving warm, topped with a dollop of sour cream.
Nutrition
Notes
Warming tortillas prevents cracking. For crispier bottoms, pan-fry rolled enchiritos seam-side down for 30 seconds before baking. Store leftovers in airtight container for up to 3 days. Reheat in oven for best texture.
Tried this recipe?
Let us know how it was!Enjoyed the recipe? Share it!

Kitchen Essentials We Recommend
Tools that make cooking easier — tried, tested, and loved.


As an Amazon Associate we earn from qualifying purchases.
Got a recipe the world should try?
Share your favorite family recipe or national dish with food lovers in 100+ countries.
Submit Your RecipeFrequently Asked Questions
Can I make enchiritos ahead of time?
Absolutely. You can assemble the entire enchirito recipe a day in advance, cover the baking dish tightly, and refrigerate it. When you’re ready to bake, you may need to add a few extra minutes to the baking time since you’ll be starting with a cold dish. Alternatively, you can prepare and cook the filling ahead of time for a quicker assembly on the day you plan to serve.
How do I keep my enchiritos from getting soggy?
The key is managing the sauce. Make sure your filling isn’t too wet, and pour the enchilada sauce primarily over the top of the rolled tortillas rather than pooling it heavily on the bottom of the dish. Also, warming your tortillas before rolling creates a slight barrier that helps prevent them from absorbing too much moisture and becoming soggy.
What’s the best way to reheat leftover enchiritos?
For the best texture, we always reheat leftovers in a conventional oven or toaster oven at 350°F until warmed through. This method helps crisp up the tortilla edges and melts the cheese beautifully again. The microwave is convenient but tends to steam the tortillas, making them softer.
Can I use corn tortillas instead of flour?
You can, but the process and result will be different. Corn tortillas are smaller and less pliable, so you’ll likely need more of them and they may crack more easily. We recommend lightly frying each corn tortilla in oil for a few seconds to make them flexible before filling and rolling. The final dish will have a more traditional enchilada feel than a burrito hybrid.
")